In MA
© Copyright 2000 - 2026 WHDH-TV. WHDH
Location, location (most important for eternity though)
Posted on 01/01/2026 5:52:41 AM PST by Diana in Wisconsin
The MONTHLY Gardening Thread is a gathering of folks that love soil, seeds and plants of all kinds. From complete newbies that are looking to start that first potted plant, to gardeners with some acreage, to Master Gardener level and beyond, we would love to hear from you.
If you have specific question about a plant/problem you are having, please remember to state the Growing Zone where you are located.
This thread is a non-political respite. No matter what, you won’t be flamed, and the only dumb question is the one that isn’t asked.
It is impossible to hijack the Gardening Thread. Planting, Harvest to Table Recipes, Preserving, Good Living - there is no telling where it will go - and that is part of the fun and interest. Jump in and join us! Send a Private Message to Diana in Wisconsin if you'd like to be added to/removed from our New & Improved Ping List.
NOTE: This is a once a MONTH Ping List, but we DO post to the thread all throughout the month. Links to related articles and discussions which might be of interest to Gardeners are welcomed any time.
We went to a bday early evening get-together yesterday for our friend. The temps were about 7 degrees with a wind chill somewhere in the negative digits.
I was pretty bundled up. Long Johns underneath my blue jeans. Turtleneck with another top over it. Thick partly woolen socks. Followed by coats, scarves, hats, gloves.
When we got inside the winery, we found our friends were not dressed like we were. Bday friend was in short sleeves and blue jeans. His wife had on a lightweight long sleeved blouse. I was very confused. How can it be that I dress in multiple layers, and this guy had on short sleeves? Is something wrong with him…or with me?
I’ll say him, because I think that’s crazy. I see people up here with multiple layers on. I’m warm enough when I do that. Shorts sleeves in this weather? You must have a screw loose. I love my friend, but I will always remember this weird birthday of his.
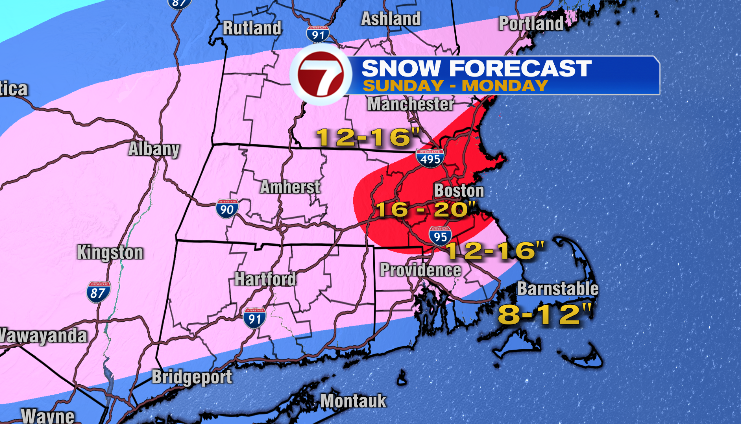
I think we will have about 7" - 8" snow when this is done, not overwhelming. You will probably have about the same. I am on a main street on one side. Its been plowed 3 or 4 times which is good for emergencies, but being retired I have no need to go anywhere this weekend.
He over-dosed his pepper seedlings. WOW.
Like Tim The Toolman Taylor...
too much power !
⚡️⚡️⚡️
My complaint about Aldi’s and Trader Joes are that so many of products use Canola oil and HFCS and that is how they keep the prices low.
(Good to avoid most seed oils—soy, safflower, corn— in any case.)
I have really started reading labels, much more so than I used to. I appreciate the tips! Thanks!
11:30 pm, light snow & 12°. Eerily quiet outside, glad the wind has died down.
If I do get chickens, it would likely be 3, maybe 4 and no permanent chicken run. I want a chicken tractor. With so few hens, it would be easily movable & I could pull it in the barn or under the pole shed in weather like we’re having now. My problem would be getting myself out there in this weather to tend to them - of course I would, but I would be grumbling about it! I guess after 40 years of dealing with horses in all manner of weather, I enjoy being relieved of that work & with 5 horses at one point, it was a LOT of work.
HEAVY sleet here. Reflectivity is running at almost 60 dBZ. In terms of total precipitation, we may well hit the original forecast, but of course the sleet really cuts into the snowfall total, so, I really doubt we’ll be over 10” when it’s all said and done. I’d rather have a foot of snow than this stuff, though.
At least we got enough snow to insulate the roof somewhat. I could already tell yesterday noon that the house was getting easier to heat.
At least this is good weather to be using the toaster oven, as the extra heat is not extra, and at these (outside) temperatures the heat pump is useless & the system falls back on resistive heating anyway.
Winter storms can be really hard to predict, as a slight shift in the track can make a huge difference in where (and what type) heavy precipitation falls. We may not get 1/2 our predicted snow totals, but, the area just north of us that was expected to get half ther snow that we were expected to get looks like it will get considerably MORE snow than what was predicted for us. We, OTOH, are getting much heavier sleet than was predicted for us..
In MA
© Copyright 2000 - 2026 WHDH-TV. WHDH
Location, location (most important for eternity though)
Good one! (About eternity)
The big snow missed us, but the heavy sleet on top of the 4” or so that we got (of snow) is making life for RWD pickup trucks “hell” here. TWO have become stuck right in the middle of the road as it approaches the intersection we are at. One was about 1 am last night, then another was about an hour ago. The road that passes to the side of our garage is more lightly traveled and has a stop sign at the intersection. So, these guys brake for the stop and get slightly sideways in the ruts, about 30 ft. short of the intersection. With RWD and a light rear end and worn non-snow tires, then they can’t get out, even tho’ just about any FWD car could. (My wife once had this happen to her in a parking lot, in our old minivan.) It’s amazing how little “obstruction” can pin you in, with RWD and a light back end.
2nd dude had a friend come out and try to help, and he almost got stuck too. They finally dug up some gravel and got it under the drive wheels and got out.
Travel-wise, it’d have been better if we just got the 12” of snow. It’d insulate the roof better, too, unless it blows off. To the north of us, snow accumulations are much heavier than we got, when even Friday it looked like the heaviest snow might be a bit to our south. South, some counties are still under an ice storm warning with possibly as much as 1” of ice - yikes!
Early tomorrow a.m. we are pegged to drop to -2 deg. F, with wind chill of -14 deg. F. That’s REALLY cold for us.
Even one MULE and one Steer in the winter can be a lot of work!
I like the chicken tractor idea. Wish I could get my girls outside of their Luxury Accommodations, but we have too many predators around for that.
The only issues I’ve ever had - and I used to have a flock of 50 at any given time - was water in the winter months. I had no electric to the coop, so when we had Big Snow, it was a PITA to shovel from the house to the coop in the first place, then to drag water down there 2-4x a day. But, we all managed to survive!
I’ve been meaning to ask my neighbor how he’s been managing to get enough water to their horses in this cold snap. They have a minimum of 100 horses right now, and three separate locations around the ‘hood where they all live. The most valuable horses that she uses for breeding stock have plush housing in their horse barn.
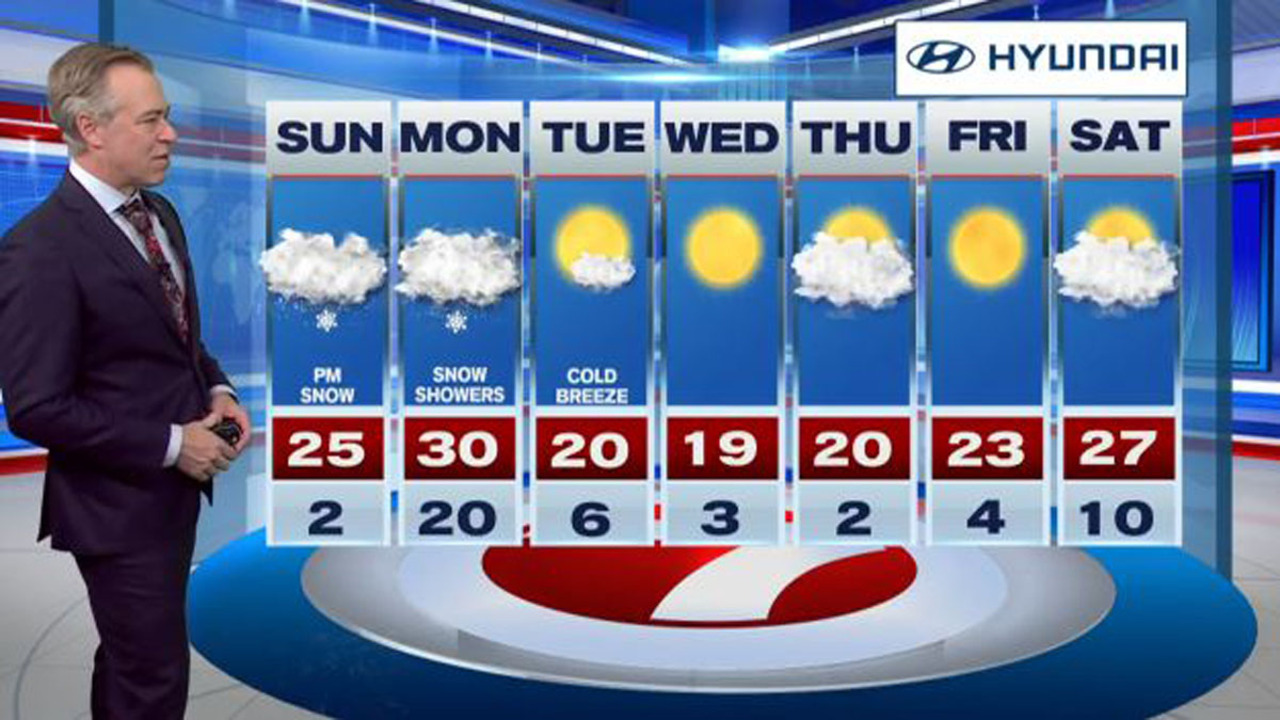
Only -3 this morning. It appears that the worst of it is over, though I’m still not going out until Tuesday, when 20 degrees is going to feel like a day at the beach. ;)
You need more body fat and/or thicker blood, LOL!
I always bundle up if I have to be OUT in the weather to get from Point A to Point B, but once indoors I run hot, so I’d be stripping off layers - in front of everyone if need be!
It was just a few weeks ago that I saw a guy at Walmart in shorts and tennies, but with a very warm jacket on top. There was snow on the ground. My boys were the same way. Nicholas was the worst ‘Winter Clothing Offender’ of the three. The other two loved to ski, so they were good about wearing the proper gear on the slopes.
So, yeah - Weirdos, LOL!
Boston proper is a nightmare to navigate as it is! Where do they go with 20” of snow in those narrow streets? Yikes!
Blizzard of '78 we got 3 feet in two days. Made some money shoveling but we got more and at 13 years old, it was hard throwing that snow up over shoulder height.
My sister slid off the road coming home from work and was at the end of a driveway for a retirement home. Plows came along and completely buried her car. My dad went and put a sign in the snow pile saying Buried Car because he was worried the plows or front end loaders would do some further cleaning up and hit it. Once the storm was over, we went and shoveled it out. It started right up. Would have made a good commercial for the battery company.
I used to walk to school in the snow. They had little sidewalk plows but then the street plows would sling more snow back on the sidewalk. I think it was probably a mile to school but it beat sitting on that bouncy cold bus for 45 minutes.
When we visited my aunt/uncle's place after some sticky snow, we went down a 2 mile long road that was lined with large white birch trees. They would hang over the road nearly touching each other. With the road still covered in snow, it made it a white tunnel. I was hooked.
I'm sure if I drove somewhere right now, I'd be the first set of tire tracks for the 6 miles to the state hwy. I usually am after some snow because I do still love the scenic drive and it only happens once or twice a year here. Might have to go sweep off the truck and warm it up. You know, just in case of emergency. Maybe pull it forward a little too see if it will. Wonder how the neighbors are getting along?
My son goes to his mom's most weekends including this one so with no one too keep the home fire burning, it was chilly in here when I got home yesterday. Had plenty of coals and as I built up the fire, I opened the blinds so I'd have a nice view of all the white snow. Made it feel warmer in here. High tunnel is covered with a few inches but I'm not worried about it.
Had another load of firewood delivered a couple of days ago. It was dark when they showed up as usual. Loaded a bunch in the back of the truck the next day and saw that they brought me nothing but red oak. Nice. Little greener than I like but it burns and lasts a while. I still have plenty of the last load of drier stuff to keep this greener stuff going good and to make it rip roar to burn off the creosote BEFORE it gets built up and can turn into a burn your house down stove pipe fire. I pretty much do that every morning with these low temps.
Oh boy, the wood stove is running at cooking temperature. Time to break out the cast iron and do some cooking and re-seasoning. Just measured the bacon. I finally got a square cast iron skillet. I was hoping to find a 12" square and they did make them once upon a time but it's a rare find. Ended up with a new Lodge 10-1/2" square but haven't used it yet. Bacon is 10-1/2" long. Cool. Will have to break out the Dutch Oven that I've also yet to use. It's a steel plate stove and has a 16" x 20" flat area up front. Been a while since I've cooked on it. We're on the grid now. Have to go out and find the 16" round smoker lid that I use to turn it into an oven. I use the round smoker grates to keep things up off the steel plate surface in oven mode. That thing's had homemade pizza and a lot of corn bread made on it.
No-Knead Crusty Bread? 
Noticed 4-5 pickup trucks hanging out at the volunteer fire house in town last night. Yeah I made a beer run after dark in the snow. Just me and a bunch of other crazies who drive in it because we can. Prayers for all the people running wood stoves.
Seems like there's always 1-2 per year that burn their house down because they didn't check their stove pipes to make sure they're solid and/or don't know to get that fire hot every day or three to keep the creosote burned off. I always have to rake a spot where leaves collect right below the edge of the roof that has the stove pipe straight up from it. Couple of embers come down and I'll have a leaf pile burning up against the 100% wood house, aside from the metal roof.
I've got two little pieces of wood in here. Time to get dressed and go play in the snow.
Sounds like a perfect Winter Day up here! Aside from burning down the house, though. ;)
Front end loaders and dump trucks and dump it in the Charles River. Every city up North has to do “snow removal” because there’s no place to push it with plows at some point and it goes to the closest body of water or large empty lots etc.
I have enough body fat, LOL, but it could be that my blood isn’t very thick. I’ve always wondered if that was real or not.
I do get hot sometimes, but winter isn’t usually one of those times. When it’s as cold as it’s been these last few days, I do bundle up when I go anywhere. I owe it to growing up in the Sunshine State, even though I’ve been in the Midwest for more than half of my life. I’ve just always been a cold person in winter.
I’m sure the kids are liking it. 8-10” of powder. Plenty to turn into 3-4” of packed powder and not hit patches of grass when sledding.
Our water line to the barn would eventually freeze, even though it was buried (winters were much colder then). We had an old fashioned hand pump on our well which was shallow, no submersible pump. I had a couple of large trash cans & a wagon so I would have to hand pump water into the trash cans & pull them on the wagon to the barn ... at least it was downhill! We had an electric heater that floated in a large stock tank & kept ice from forming on top. I had black rubber buckets in the stalls & water would freeze overnight in them, but being rubber, I could take them outside & stomp the ice out of them.
If it wasn’t precipitating, the horses were outside all the time & could access the stock tank for water & I spread hay flakes out on the ground in various places because some of the horses would run less bossy horses off of the hay piles. If it was rain/snow in cold weather, then they were in stalls & I had to deal with frozen buckets & cleaning stalls.
Every fall, I had to get 150-200 bales of hay in the hayloft & have a sufficient pile of shavings to keep the stalls clean & bedded about the time the weather turned & there was no more pasture grass - December 1 was the latest I went one year before I had to feed hay due to a mild start to winter. The Day I had all of the hay & shavings stockpiles for winter accomplished was a really good day & I could breathe a sigh of relief, knowing I could get the horses through until Spring when we had grass again.
Well, it took me longer than I expected to write this up properly. Actually doing the mod would be quicker, I suspect!!
If you are handy with screwdrivers, a soldering iron, and possibly a Dremel tool, this could be a cheap way to get a lot of light, IF you want to spend a couple hours at it.
Note that this modification WILL void the warranty, BUT, it greatly decreases the chance of an early failure, a common LED light problem, as MOST are not properly heat sunk. [Note 4]
PRODUCT INFO.:
Was on sale for $14.99, but did not qualify for Menards 15% off “bag sale”. $17.99 regular.
Rated at 12,500 Lumens. That’s possibly “generous, but, this light IS bright, and the rating seems “possible” for the power draw rating of 130 watts.
44” long.
4000K light “color”.
CRI = 80.
The 130 watts drawn mean the reasonably generous heat sink on the back WILL get fairly warm.
Up to 4 units can be linked with ordinary 3-wire 14 ga. or 16 ga. copper wire extension cords of pretty much any desired length. [Note 1]
5 ft. long 3-wire (grounded) power cord. [Note 2]
Pull switch. This switch controls both the light and any downstream / linked light or attachment. [Note 3]
Comes with hanging chains and hardware, plus an instruction manual.
TOOLS NEEDED:
#1 Philips screwdriver w/ shaft “ diameter or less.
Small ziplock bag to stash small screws temporarily.
Small diameter shaft sharp “pick”. (I found a “J” style small pick, similar to that style dental pick, to be easiest to use, but YMMV. A very large fishing hook, such as used for “snagging”, can also work.)
Handheld (preferably light) power / battery power drill and drill bits.
Dremel tool with cutting disc or small (2”) cutting disc type tool.
Medium soldering iron (30 watt?) or small soldering gun.
Good quality std. pliers.
Black fine tip permanent marker.
A cheap volt-ohm meter may be handy. ;-)
A good, bright, head worn flashlight may also be handy! ;-)
Vacuum with brush attachment.
^^^^^^^^^^^^^^^^^^^^^^^^^^^^^^^^^^^^^^^^^^^^^^^^^^^^^^^^^^^^^^^^^^^^^^
If you are not comfortable with using the above tools, do not proceed!
^^^^^^^^^^^^^^^^^^^^^^^^^^^^^^^^^^^^^^^^^^^^^^^^^^^^^^^^^^^^^^^^^^^^^^
PARTS LIST:
60/40 flux core solder. (Leaded solder is best; just wash your hands B4 eating, etc.)
Painters’ masking tape. (Almost any easy-release tape or label will do — the tops of a couple 3” Post-It cards will work , I suspect.)
2x #6 x 1/4” sheet metal screw or #6 x 1/4” machine screw with #6 nut.
Heat sink compound or, automotive metal filled silicone “gasket maker” [NOTE 5], or high temperature metal or oxide filled anti-seize compound, or in a pinch, non-flammable “low dropout” high temperature grease*, or, in a pinch, silicone cement / caulk[NOTE 5]. Theoretically JB Weld might work, but, I don’t know if it will retain adhesion to the surfaces involved, under temperature cycling. Basically, we have a slight gap to fill with something besides air, and electrical conductivity will not matter.
MODIFICATION PROCEDURE:
Unbox unit. Plug it in and power it up for 5 minutes, check the switch function, etc.
Unplug unit. Work in a clear, well lit work space.
Remove the 2 small screws holding an end cap to the fixture. Save the screws in a small ziplock bag or similar. (They are easy to lose!
Repeat for opposite end.
Gently remove the endcaps. You may need to wiggle them a bit, but do not “yank” them off. They will still be attached by the short wires.
GENTLY pull up the label on the housing ONLY where it attaches to the translucent front “lens” / cover. Cover the exposed adhesive side with “blue” painters’ masking tape. (Weak adhesive std. masking tape may be ok too. Basically, we just don’t want debris, dust, etc., getting on the label adhesive, as it will be needed later in good shape to re-secure the front “lens” to the rear housing / heat sink.)
Carefully slide the lens off the rear housing. Be careful from here on out not to bend the round capacitor’s leads (outlet end).
Mark the pc board on the OUTLET end with the black marker, beside the black wire’s small metal “socket” on the pc board. This is so you know where to reinsert the black wire, later.
Insert the pick into the “back end” of the socket just “tagged”: Wiggle the pick end in to release the stripped and tinned end of that black wire. Pull the wire out using MODERATE force at most. (If using a large fish hook, don’t insert it too far and get it hooked in the socket!!!)
Repeat for the white wire in its socket on the pc board.
Drill out the rivet holding the outlet end ground wire to the housing. Pull the wire lug free, but save the small lockwasher in the “screws” bag.
It is NOT necessary to pull the black wires out of the small sockets on the CORD end of the pc board.
Drill out the rivet holding the CORD end ground wire to the housing. Pull the wire lug free, but save the small lockwasher in the “screws” bag. (I found both of the “attachments” of the ground wires to the rear housing / heat sink to be slightly loose.)
Slide the LED PCB (strip) out of the heat sink / housing.
You will need to either bend one of the two retainers rails “up” (very tedious) OR cut away most of one, leaving perhaps 4 or 5 equally spaced 1/4” wide “tabs” that you will bend vertical.
Vacuum up any metal bits, dust, and debris. Examine the LED PCB very carefully too, both sides, and particularly around the small ICs and so on.
Spread a THIN layer of whatever gap filler / heat sink compound you want to use into the “channel” between the rails.
Reinstall the LED PCB between the rails, pressing it in gently but firmly, a few inches at a time, giving the filler plenty time to “squeeze thin”, but with only minor “squeeze out”. A suggestion if not using silicone cement or gasket maker is to do a trial run with only, say, 4” at one end “gooped up”. (A trial run with silicone cement or gasket maker can be done too, but you may want to pull things back apart and clean any partially set silicone out before final “assembly” of the PCB to the heat sink.) The key is maximizing “gap” fill under the PCB, but minimizing squeeze out.
Carefully clean away any squeeze out if using non-curing gap filler, or excessive squeeze out of any kind. Curing type will likely be easier to cut away after it is cured.
Push down the rail tabs on the modified rail side onto the PCB. A few spots on the other side can be pushed down slightly too: In both cases, do not push so hard as to risk damaging the PCB. It’s fairly tough but not indestructible!
If using or if you have STANDARD (not metal filled) silicone cement on hand, shoot a “glob” underneath that wobbly round capacitor. One the cement cures, it will help support the capacitor. I do not recommend trying to reseat the capacitor by heating its solder joints and pushing it down, unless you are very confident about this step.
Reattach the ground wires with the #6 screws & lockwashers. If using machine screws and nuts, but no lockwashers, a small dab of silicone base glue will work nicely as a removable threadlocker. Lockwashers are best though, and the “teeth” should “bite” into the heat sink.
Re-insert the black and white wires at the outlet end into their sockets.
At this point, without touching any electrically conductive parts, or to be extra safe, wear rubber gloves, you can CAREFULLY plug the partial assembly into a std. 120 VAC power outlet and test operation for a five seconds maximum. (We don’t want the LED PCB strip to heat up if any curing adhesives are not yet cured.)
If using curable adhesives, set the partial assembly aside in a warm spot until the adhesive appears to have cured.
(Optional) If you wish, since it is fairly unlikely you will never be fully disassembling this fixture again, solder those black and white wires into the sockets. This will prevent any chance of a poor connection developing, long term. The black wires at the cord end are a “ditto”, unless you think you may want to reconfigure the switch at some point. [Note 3]
Slide the lens back on.
Pull the masking tape (off the label) and press the label back down smoothly and firmly.
Reinstall the end caps. Be sure no wires are pinched.
Reconnect the power cord to a 120 VAC power outlet and test operation. After a few minutes, the heat sink should be nice and toasty, but not dangerously hot.
Voila! You now have a MUCH longer life / reliable and quite bright, light.
Install the light as desired [Note 2], keeping all surfaces at least 2” away from any plastic or flammable surfaces.
[1] 18 ga. is ok, but longer lengths may incur small losses.)
Most low power devices drawing 130 watts or less can be the last item on the chain if they are not RFI sensitive.
[2] The power cord conductor material is not known at this time. Anymore, I always assume the worst, copper clad aluminum, unless I know differently, especially with Chinese made products. CCAL has higher resistance and lower current capability than std. copper wire, and has much poorer flex resistance. DO NOT USE THIS PRODUCT IN SITUATIONS WHERE THE POWER CORD WILL EXPERIENCE SIGNIFICANT REPEATED FLEXING.
[3] Rewiring this unit to make the outlet “pass through” and independent of the pull switch is possible, but not covered here. Using external splitters and cords is probably easier, anyway, if one wants independent switching. Otherwise, when setting up your lighting, just keep in mind that upstream units control downstream units.
[4] Unfortunately, most Chinese LED light fixture manufacturers, and some others, fail to adequately / properly heat sink their LEDs. This will cause failures long before the rated life, which is usually based on when the output brightness decreases by 50% due to degradation of the phosphors, not by when heat kills the fixture. BAH!!!
[5] Automotive metal filled silicone “gasket maker” may be the best option for most people, esp. if one has other uses for it. You will not need a lot - even a 3 oz. tube should be much more than enough. This is available at most any automotive parts store. Just look for any brand gasket maker with metallic fill, formulated for high temperature use. BEST of course is heat sink compound, and even a low grade will do. We are not trying to cool an expensive gaming PC CPU, here!
Links:
https://www.amazon.com/Permatex-81878-Maximum-Temperature-Silicone/dp/B0002UEOPA
(Heat Sink Compound)
https://www.amazon.com/Super-Lube-98003-Silicone-White/dp/B0044NI2M2/ref=sr_1_2?s=automotive&sr=1-2
Disclaimer: Opinions posted on Free Republic are those of the individual posters and do not necessarily represent the opinion of Free Republic or its management. All materials posted herein are protected by copyright law and the exemption for fair use of copyrighted works.