Skip to comments.
Microsoft finally admits almost all major Windows 11 core features are broken
neowin ^
| 11 20 2025
| Sayan Sen
Posted on 11/21/2025 4:15:26 PM PST by yesthatjallen
It has been a troublesome week or two for Microsoft, for sure. Earlier today, the company fixed a Microsoft 365 outage that made files unusable; downtimes like this seem to happen on a fairly regular basis.
Meanwhile on the Windows side, it has probably been worse. The tech giant got blamed by Nvidia today as the latest Patch Tuesday is leading to performance issues in games. The GPU maker has released an emergency hotfix driver to resolve the problems.
This comes hot on the heels of the massive backlash that the company's Windows boss recently faced due to the evolution of the operating system into an agentic OS as unveiled earlier this week.
On the positive side though, following all that backlash, Microsoft acknowledged Windows has issues, and as if on cue, the company in a new support article has admitted that there are problems on almost every major Windows 11 core feature. The issues are related to XAML and this impacts all the Shell components like the Start Menu, Taskbar, Explorer, and Windows Settings.
Interestingly, while Microsoft is only acknowledging the issue in November 2025, this has been a problem since the July 2025 Patch Tuesday update (KB5062553), so that is four months. Also since Windows 11 25H2 shares the same codebase as version 24H2, the newest Windows 11 feature update is also impacted.
In the support article Microsoft explains:
"After provisioning a PC with a Windows 11, version 24H2 monthly cumulative update released on or after July 2025 (KB5062553), various apps such as StartMenuExperiencehost, Search, SystemSettings, Taskbar or Explorer might experience difficulties.
SNIP
(Excerpt) Read more at neowin.net ...
TOPICS:
KEYWORDS: core; microsoft; update; windows; windows11; windowspinglist
Navigation: use the links below to view more comments.
first previous 1-20, 21-35 last
To: Bayard
You’ll like it, but it doles take some getting used to. I loaded it on to an older laptop over a year ago, and for the most part it’s fine. (The great thing about it is does not keep requiring you to buy newer machines all the time.) There are some things it doesn’t do as well. Personally, I really like Outlook and some other features of Office. Libre is adequate, but not as good in my estimation.
To: yesthatjallen
a Microsoft 365 outage that made files unusable; I don't use Microsoft 365. LibreOffice instead.
got blamed by Nvidia today as the latest Patch Tuesday is leading to performance issues in games.
I don't use Nvidia (Ryzen integrated graphics instead), and do not play computer games.
issues are related to XAML and this impacts all the Shell components like the Start Menu, Taskbar, Explorer, and Windows Settings.
I use Explorer patcher which enables customized W/10 Taskbar and Open Shell for the Start Menu. And have delayed/not upgraded from 23H2 to the latest W/11 version.
Best to wait till bugs are worked out.
22
posted on
11/21/2025 8:01:55 PM PST
by
daniel1212
(Turn 2 the Lord Jesus who saves damned+destitute sinners on His acct, believe, b baptized+follow HIM)
To: yesthatjallen
My cat videos are still good.
23
posted on
11/21/2025 8:12:08 PM PST
by
dynachrome
(“They don’t kill you because you’re a Nazi; they call you a Nazi so they can kill you.”)
To: july4thfreedomfoundation
Ditto that. Win7 is rock stable. No need for anything else yet.
To: matt04
Which Mac processor do you have? One of the newer Apple M’s, or is it an older intel?
To: Notthemomma
Currently a 14” MacBook Pro with the M1 Pro chip. Works fine for all the tasks for my normal work load. If was was doing lots of processor intensive tasks, like Adobe Premiere video editing or running CAD software in Windows I would upgrade but other wise no complaints.
26
posted on
11/21/2025 9:55:41 PM PST
by
matt04
( )
To: yesthatjallen
The first step to recovery is Microsoft realizes they have a problem......
They will have to go to ‘operating system anonymous’ and take the 10 step recovery program.
27
posted on
11/22/2025 12:21:42 AM PST
by
minnesota_bound
(Making money now. Still want much more.)
To: minnesota_bound; dayglored
Windows is spying on you and most people will not even know this. Does it prevent you from doing a simple Internet search such as, How do I turn off all windows telemetry?
When Bitlocker shows up because of some problem most will not know their microsoft account or the bitlocker key.
I searched how to prevent bitlocker from ever being activated
Preventing BitLocker Activation
To stop BitLocker from being activated automatically on your Windows device, you can use several methods depending on your system configuration.
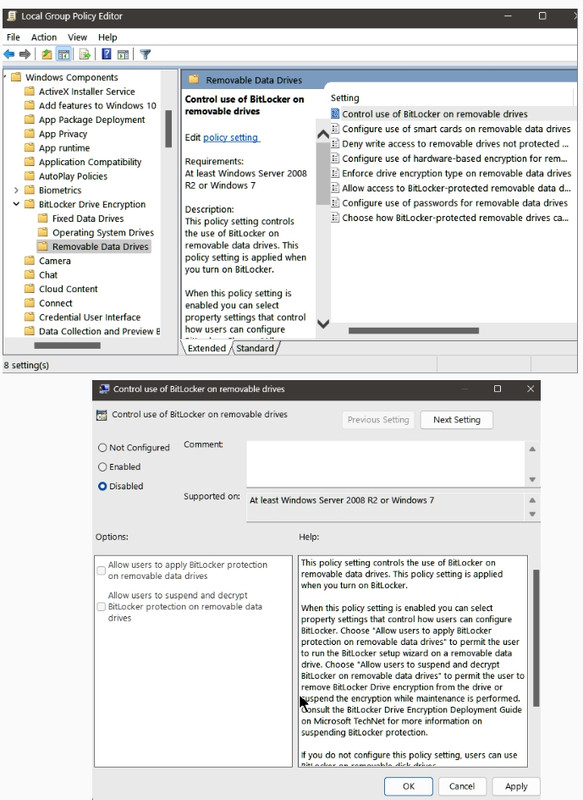
Group Policy Method
Access Group Policy Editor:
- Press
Windows + R, type gpedit.msc, and hit Enter.
Navigate to BitLocker Settings:
- Go to Computer Configuration > Administrative Templates > Windows Components > BitLocker Drive Encryption.
Disable Automatic Encryption:
- Find the policy named Control use of BitLocker on removable drives and set it to Disabled.
Registry Method
Open Registry Editor:
- Press
Windows + R, type regedit, and press Enter.
Navigate to the Key:
- Go to
HKEY_LOCAL_MACHINE\SYSTEM\CurrentControlSet\Control\BitLocker.
Modify the Value:
- Create or modify the value PreventDeviceEncryption and set it to True (1).
Disable Device Encryption
For devices running Windows 11 Home or Pro, you can turn off device encryption:
Open Device Encryption Settings:
- Search for Device encryption in the Windows search bar.
Turn Off Device Encryption:
- Set the option to Off and confirm your choice.
Additional Considerations
- OEM Settings: Some manufacturers allow disabling BitLocker through their own settings or tools. Check your device's documentation.
- Clean Install: If you perform a clean installation of Windows, you can use an unattended file to set PreventDeviceEncryption to True during setup.
By following these steps, you can effectively prevent BitLocker from being activated on your device.
 GitHub
 asus.com
See also, Is bitlocker automatically turned on during an upgrade from a previous version of Windows?
One response:
BitLocker is enabled by default in Windows 11 version 24H2 during a clean installation if you sign in with a Microsoft account. However, it is not [normally] automatically turned on during an upgrade from a previous version of Windows.
However, M
icrosoft warns Windows 11 25H2, 24H2 October update triggers BitLocker recovery on PCs for businesses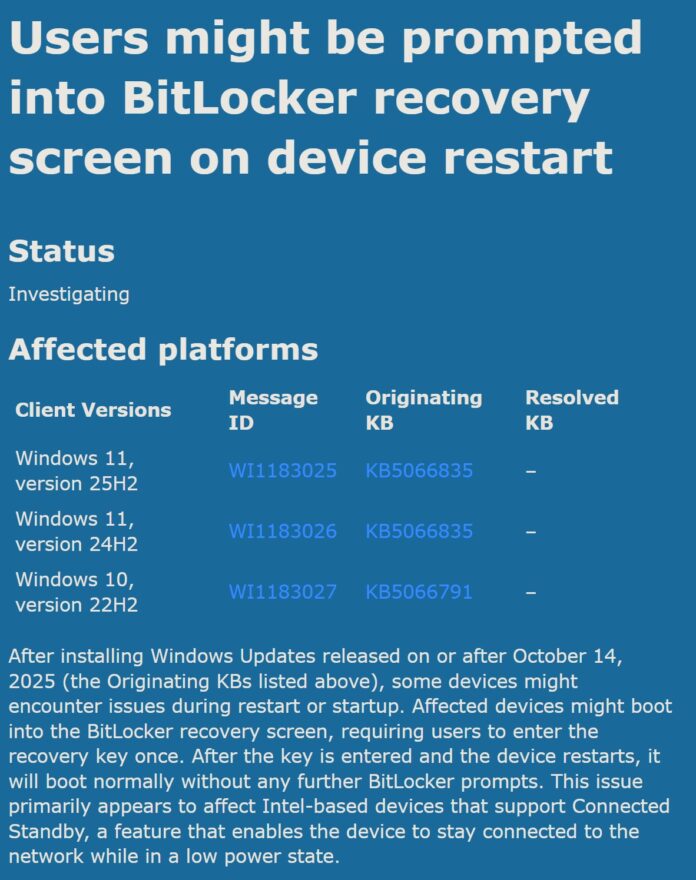
To check if BitLocker is turned on your PC, open Settings > System > Storage > Disk & Volumes. Select ‘Properties’ under one of the volumes, and if it says ‘Encrypted’ under BitLocker, it means the feature is turned on.
But it is dangerous, thus I intend to unplug all but the system drive when updating, but again, what is to prevent you from searching or How to prevent BitLocker from being turned in Windows 11
Using a computer is like driving. There are some things you should know or find out, by the grace of God. They have now lost everything on that pc.
So you search How to back up bitlocker key Which is what I intend to do.
And, How do I recover files if i lose my bitlocker key
28
posted on
11/22/2025 3:07:47 AM PST
by
daniel1212
(Turn 2 the Lord Jesus who saves damned+destitute sinners on His acct, believe, b baptized+follow HIM)
To: daniel1212
29
posted on
11/22/2025 3:36:21 AM PST
by
daniel1212
(Turn 2 the Lord Jesus who saves damned+destitute sinners on His acct, believe, b baptized+follow HIM)
To: daniel1212
30
posted on
11/22/2025 3:53:57 AM PST
by
daniel1212
(Turn 2 the Lord Jesus who saves damned+destitute sinners on His acct, believe, b baptized+follow HIM)
To: yesthatjallen
I’ve been using 11 without issues yet, but decided to try Mint on a USB 3 stick. I set up Cinnamon for external boot. It started but couldn’t deal with my dual monitors, giving me just the logo on the main screen and nothing on the secondary. I tried booting in safe mode but got one monitor in 1024 x 768 and no way to make changes. It did not recognize my Viewsonic 27” monitor.
Is there another version of Mint that can detect and adjust for common 27” monitors from a USB boot or do I have to do a clean install on my primary hard drive?
31
posted on
11/22/2025 7:17:20 AM PST
by
Poser
(Cogito ergo Spam - I think, therefore I ham)
To: MikelTackNailer
“I’m going over tutorials for installing duel booting Linux Mint next to Windows 10 ioT Enterprise LTSC right now (guaranteed updates until 2032).”
“Mint Cinnamon” is the go to for a first time user. I have been using Linux for ten years now and have test driven just about all of the best major players. It operates almost like Windows 7. If you have used Win 7 you will be able to fly right away.
1. First download and install a program called “Rufus”.
https://rufus.ie/en/
It is the top option: rufus-4.11.exe
2. Download the Mint Cinnamon .iso file from the Mint site. The “James Madison University” Mirror source is known to be a clean download.
https://www.linuxmint.com/edition.php?id=322
3. Insert a USB stick that is empty or that you do not mind being wiped clean of current data.
4. Start Rufus and go select the Mint .iso from your downloads. It should autodetect the USB stick as the destination for the .iso to be installed, MAKE SURE THE TARGET DRIVE “IS” THE USB STICK!. The default settings in Rufus are all fine. Just answer yes to any options it asks and then select create.
(* Default Rufus settings are fine for just test driving Linux. But it will not remember any changes you make, it will revert back to default when shut down. But you can make it have “persistent storage” with with Rufus per these instructions:
https://thelinuxcode.com/rufus-persistent-storage-debian-live-usb/
5. When done close Rufus and power your computer off.
Now here is where the only challenge can arise. You now have to make the computer boot from that external Linux stick. There should be no problems doing this. But on some computers Windows has locked out the ability to see that external Operation System and so it will not boot from it. So there is a process of elimination that has to be done sometimes. But 9 times out of 10 the following does indeed work...
6. With the Linux stick inserted power on your Computer, stay right there and be ready to hit the key that will give you your boot options for that computer make. When the Manufacturer’s logo comes up tap that key. Depending on make it might be the Esc key. F2 key, F9 key, or on a Dell it is the F12/Star key. Select the USB as the boot option.
7. Be patient because the screen may go Black a few times as the Linux boots up. And from a stick it is a bit slower to do this.
8. If it does not boot from the stick as it should then there will need to be some configuration in the bios that needs to be done. That can be addressed later as a separate issue.
But it should Boot for you if you did everything above step by step. Now you will be in Linux and running from off the stick completely isolated from your internal drive and Windows. It should auto detect your internet connection and you will have to put in your password to access your internet source. Bottom right in the same place it is in Windows 7.
It will tell you when it makes the connection. Then you can use the Firefox browser to access the net if you like and check out all the stuff it comes with and what can be done with it. Basically you are in test drive mode. But nothing can be installed, and while you can make temporary changes they will be forgotten and it will go back to default when you shut down.
Run it for awhile from off the stick when you have extra time and check it out, Go explore and discover what the apps are and what they do, go look at the System Settings and how they work. Then after you feel comfortable with it then you can install it if you like. There are two options, wipe the drive completely and install only the Linux, or you can install it “Along Side” (Dual Boot) the existing windows and have both. Although I have NEVER had a Mint dual boot install fail, you might want to back up your existing important stuff first in case.
The installer will do all of the partitioning and disk work for you during the install. So no need to worry about complicated partitioning and disk preparation first, it does it all for you. Just take your time and read the options well as you step through it. Just one note when it asks you if you want to “unmount” the target drive agree.
32
posted on
11/22/2025 9:50:45 AM PST
by
Openurmind
(AI - An Illusion for Aptitude Intrusion to Alter Intellect. )
To: Poser
You have to go into the display settings and tell it to use both and how you want it displayed or it will default to only one display.
33
posted on
11/22/2025 9:53:38 AM PST
by
Openurmind
(AI - An Illusion for Aptitude Intrusion to Alter Intellect. )
To: daniel1212
After turning off bitlocker you can go into the bios and disable the TPM 2 chip so bitlocker never works again. See the video before on how to.
Windows 11 Bitlocker isn’t there to Protect YOU
Rob Braxman Tech
https://www.youtube.com/watch?v=iX3a-goiE2c
Most people will not even know about this until they lose all their files because microsoft is selling you.
34
posted on
11/22/2025 11:10:38 AM PST
by
minnesota_bound
(Making money now. Still want much more.)
To: dayglored
35
posted on
11/24/2025 6:01:10 AM PST
by
Red Badger
(Homeless veterans camp in the streets while illegals are put up in 5 Star hotels....................)
Navigation: use the links below to view more comments.
first previous 1-20, 21-35 last
Disclaimer:
Opinions posted on Free Republic are those of the individual
posters and do not necessarily represent the opinion of Free Republic or its
management. All materials posted herein are protected by copyright law and the
exemption for fair use of copyrighted works.
FreeRepublic.com is powered by software copyright 2000-2008 John Robinson