To: nw_arizona_granny
http://www.designspongeonline.com/2008/06/diy-project-janes-doily-bowl.html diy project: jane’s doily bowl
designer jane schouten’s lace doily bowl was a bit hit during this year’s d*s diy contest- and today jane is sharing her instructions for making your own doily bowl at home. it’s a great way to spend a steamy summer day (when staying inside with your air condition is the only option) and allows for all sorts of personal customization. click here for the full instructions or just click “read more” below. also, you can click here to view jane’s portfolio, here to visit her new online shop packed with vintage finds, and here to view her last diy project, an incredible patchwork chair.
[ps: thanks to domino for posting the d*s scholarship winners on their homepage today!]
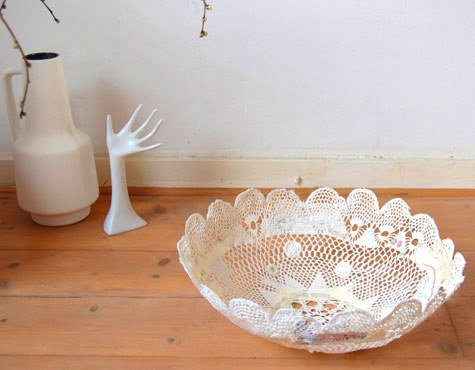
DOILY BOWL
Materials
fabric doily
masking tape
interesting pieces of paper
buttons
anything else you want to sew on the bowl
embroidery thread
a large bowl to use as a template
paint brush
PAVERPOL (online here) or a similar fabric hardener.
1. “Mend” the doily with masking tape and paper (add tape and paper where you like)
2. Stitch the paper (machine stitching is easiest) and masking tape to the doily
3. Sew on everything else (an extra paper, fabric, etc.) making sure both sides look interesting
4. Add some embroidery and a few buttons.
5. Cover the template bowl with plastic foil to protect it, then lay the doily over it.
6. Apply a layer of Paverpol with the paint brush. Correct the bowl form and let it dry for at least a day.
7. When dry, remove the doily bowl from the template bowl and apply a layer of Paverpol on the inside. Dry again for a few days or until the bowl is hard enough.
8,857 posted on
12/18/2008 4:21:32 AM PST by
TenthAmendmentChampion
(Join us on the best FR thread, 8000+ posts: http://www.freerepublic.com/focus/chat/1990507/posts)
To: TenthAmendmentChampion

From:

Thse festive tree cards are a decorative and fun way to share photos of the kids -- and, they're yet another wonderful craft made using our handy circle cutter.
Tools and Materials
Card template
Light-green card stock
Circle cutter
Ruler
Bone folder
Craft knife
Gold trim
Wide-tip glue pen
Glitter
Dove craft punch
Personal photo
Double-sided tape
Christmas Tree Photo Card How-To
1. Print the card template on light-green card stock.
2. Line up the center of the circle cutter with the logo in the center of one of the circles, and cut according to the measurement marked. Repeat for the second circle on the template.
3. Score inner lines of template, using a ruler and bone folder. Cut out card.
4. Embellish edges of card by attaching gold trim with craft glue.
5. Cover a small square of card stock with thin glue (we used a wide-tip glue pen). Sprinkle with glitter and allow to dry. Punch the glittered card stock with a dove craft punch.
6. Secure glittered dove to card with glue, placing its beak over the branch on the front of the card.
7. Cut a photo with the circle cutter slightly larger than the inner circle of the card. Secure photo to the inside of the card with double-sided tape so that it shows through the two circle windows of the card.
Resources
Gold trim is available at crafts and fabrics stores. All other tools and materials are available from Martha Stewart Crafts. For other holiday inspirations, visit our Christmas Workshop.
8,858 posted on
12/18/2008 8:04:21 AM PST by
TenthAmendmentChampion
(Join us on the best FR thread, 8000+ posts: http://www.freerepublic.com/focus/chat/1990507/posts)
To: TenthAmendmentChampion
In the old days we used a sugar starch to make the crocheted bowls.
Or Elmer’s glue, diluted with water will work.
I have used Elmers on lace and cloth, to make it stiff.
Electric went out, it was a very bad night, Scott answered my call and will get me an emergency supply of oxygen for the next time.
My computer is acting up again, took 2 hours to get on the internet, monitor does strange things and goes black, then works for a period of time..........so if I disappear, don’t get worried.....yet.
8,861 posted on
12/18/2008 1:22:27 PM PST by
nw_arizona_granny
(http://www.freerepublic.com/focus/chat/1990507/posts?page=7451 [Survival,food,garden,crafts,and more)
FreeRepublic.com is powered by software copyright 2000-2008 John Robinson
