To: nw_arizona_granny; All

From:

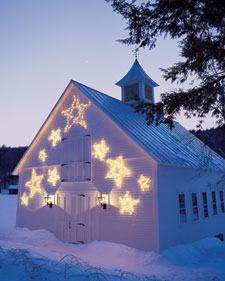
Shooting Star Christmas Lights
Tool and Materials
Bamboo
Hand pruner
Small zip ties
Large zip ties
Scissors
Drill
A 44-inch length of 1-by-2-inch pine
Measuring tape
Finishing nails or brads
Light strand
Binder ring
Blackout caps
Part 1: Shooting Star Christmas Lights How-To
1. Cut bamboo to size with hand pruner.
2. Arrange stakes in a 5-pointed star.
3. Secure the inner 5 points with small zip ties.
4. Secure the outer 5 points with large zip ties.

5. Cut ends of zip ties.
6. Secure plug end of strand to point of star with small zip tie. Drape strand along length of stake; secure at end with small zip ties. Pass it along next stake; secure at end with small zip ties. Repeat until every point is done; trim ends of zip ties.

Part 2: Shooting Star Tail How-To
1. Drill 5 holes into the 44-inch length of 1-by-2-inch pine, spacing first hole 2 inches from the top and other holes 10 inches apart.
2. Place binder ring in each hole.
3. Place binder ring on inner point of star.
4. Hang star on tree with finishing nails or brads and hang the wood strip on another tree, lower than star.
5. Secure prong end of lights to top binder ring with zip ties.
6. Trim tie ends.
7. Pass light strand through binder ring on star and back toward strip, plugging in more light strands as needed.
8. Insert strand through next binder ring down on strip, and loop it back through star's ring. Repeat, finishing at strip's bottom ring.
9. Use blackout caps to conceal the lights between each star.
Resources
The blackout caps came from stnickschoice.com. For more information on this craft, visit marthastewart.com/living.
7,489 posted on
12/01/2008 2:54:15 PM PST by
TenthAmendmentChampion
(The best thread on FreeRepublic is here: http://www.freerepublic.com/focus/chat/1990507/posts)
To: TenthAmendmentChampion
From:
Shimmering Stacked Trees
This shimmering stacked tree will add a festive -- and eco-friendly -- touch to your home this holiday season. These magnificent trees can also be stacked using any leftover aluminum foil, felt, or crepe paper.
Tools and Materials
4 ounces Sculpey clay
10-inch, 6mm thick knitting needle
Felt
Craft glue
Clear glass glitter
Receipt spike (optional)
2 pieces 6-by-6-inch card stock
Newspaper
Utility knife
Bone folder
Adhesive spray
Hot-glue gun and glue
2 paper Dresden stars
Stacked Tree How-To
1. Roll and flatten 4 ounces sculpting clay to form dome shape. Poke knitting needle horizontally through flat area of clay dome. Remove knitting needle.
2. Bake clay in oven at 275 degrees for 15 to 20 minutes. Reinsert needle into baked clay. Glue felt on bottom of base for surface protection.
3. Apply glue, then glitter, to the base. A receipt spike can be used to create a smaller tree instead of building a base using the above instructions.
4. To form tree, place 2 pieces of 6-by-6-inch card stock onto spike for stability.
5. Cut newspaper into 50 sheets of each size:
-6 by 6 inches
-5 1/2 by 5 1/2 inches
-5 by 5 inches
-4 1/2 by 4 1/2 inches
-4 by 4 inches
-3 1/2 by 3 1/2 inches
-3 by 3 inches
-2 1/2 by 2 1/2 inches
-2 by 2 inches
-1 1/2 by 1/2 inch
6. Cut 25 1-inch sheets of newspaper.
7. Begin poking pieces of newspaper onto spike in descending order, folding and unfolding each piece of paper using a bone folder.
8. Spray tree with adhesive and immediately sprinkle with diamond dust. Set aside and let dry for 10 minutes.
9. Using a hot-glue gun, adhere 2 paper Dresden stars back-to-back to top of tree.
Resources
Paper Dresden stars and clear glass glitter can be found at D. Blumchen and Company, Martha's Secret Source for vintage-inspired holiday decorations and crafting supplies. A receipt spike can be found at restaurant-supply stores. Knitting needles and clay can be purchased from most crafts stores.
MarthaStewart Living Stacked Trees
7,490 posted on
12/01/2008 5:14:32 PM PST by
TenthAmendmentChampion
(The best thread on FreeRepublic is here: http://www.freerepublic.com/focus/chat/1990507/posts)
To: TenthAmendmentChampion
I think that is the first time that I realized a star was made up of ‘A’ shapes.
That would have been one that tempted me to make, imagine suspending it [somehow] and having it floating free in the breeze.
7,499 posted on
12/01/2008 9:27:08 PM PST by
nw_arizona_granny
(http://www.freerepublic.com/focus/chat/1990507/posts?page=7451 [Survival,food,garden,crafts,and more)
FreeRepublic.com is powered by software copyright 2000-2008 John Robinson