|
 are acknowledged, affirmed and commemorated.
|
Posted on 12/29/2002 12:03:19 AM PST by SAMWolf
|
are acknowledged, affirmed and commemorated.
|

| Our Mission: The FReeper Foxhole is dedicated to Veterans of our Nation's military forces and to others who are affected in their relationships with Veterans. We hope to provide an ongoing source of information about issues and problems that are specific to Veterans and resources that are available to Veterans and their families. In the FReeper Foxhole, Veterans or their family members should feel free to address their specific circumstances or whatever issues concern them in an atmosphere of peace, understanding, brotherhood and support.
|
|
|
|
On November 13, 1942, Rear Admiral Daniel Callaghan was patrolling near Ironbottom Sound in an unusual formation. The destroyers Cushing, Laffey, Sterett, and O’Bannon were in the lead, followed by the Atlanta, San Francisco, Portland, Helena, and Juneau, with the remaining ships trailing. What was odd about this force was that the majority of the ships with the best radar systems equipped were in the center or rear of the formation. However, this would form Task Group 67.4, which would be responsible for patrolling the entrance to Ironbottom Sound that night. The Japanese force didn’t look any better either. The ships were arranged in a diamond formation with the main striking force in the center, which consisted of the battleships Hiei and Kirishima as well as several cruisers, leaving the destroyers to form the corners of the diamond. Once the forces neared Guadalcanal, the Hiei and Kirishima loaded their 14-inch guns with Type 3 shells, designed to bombard Henderson Field. At 1:24 a.m., the Helena picked up the Japanese ships. Twenty minutes later, Cushing visually sighted a pair of enemy destroyers and made a left turn, followed by the other three leading destroyers. In order to avoid hitting the turning destroyers, the Atlanta turned left as well. The battle then began, and for the next 40 minutes, many ships on both sides would be sunk or damaged. The battleship Hiei spotted the Atlanta directly ahead and once the searchlights homed in on the incoming cruiser, the Atlanta opened fire on the battleships searchlights and several other destroyers nearby. The Atlanta hit the Akatsuki before being damaged by several torpedoes and shells from Akatsuki started fires raging throughout the ship. The crippled Atlanta drifted away from the battle. 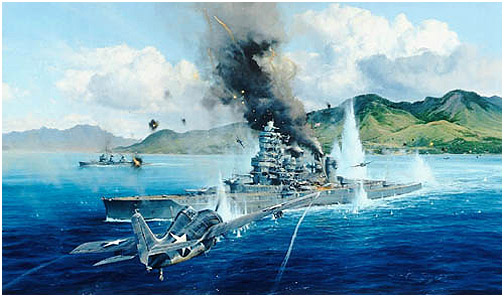 Next, the destroyer Cushing came as the lead attacker. The Cushing fired 6 torpedoes and several 5-inch shells at Hiei and Amatsukaze, but none of them hit the enemy ships. The Hiei then crippled Cushing with 10 direct hits from 14-inch guns. The Laffey was next, and began hitting Hiei with machine guns. One of these hits killed Hirokai Abe’s chief of staff, Masakane Suzuki. Laffey then fired a torpedo at Hiei, but the torpedo didn’t arm and bounced harmlessly off Hiei's hull. The Laffey was then sunk by a torpedo fired from the destroyer Teruzuki, which blew off the stern, and a 14-inch shell from Kirishima that exploded in the boiler room. The order to abandon ship was given, and many of the crew were in the water when the Laffey exploded, killing most of the crew both on the ship and in the water. Several more ships charged the Japanese formation. The Sterett lined up to hit Nagara before it lost its radio and radar capabilities. The Sterett then used its last torpedo to destroy the Akatsuki before drifting away. Next came the destroyer O’Bannon, which passed Sterett and open fire on Hiei. The San Francisco switched to engage another Japanese destroyer. However, the drifting Atlanta drifted near the enemy destroyers and the shells from the San Francisco exploded on the Atlanta's superstructure, destroying it and killing Admiral Scott. After seeing this, Admiral Callaghan ordered a cease fire to re-group. Then, once all ships were regrouped, Callaghan ordered his ships to focus on the larger ships first. The San Francisco advanced on the Hiei, and the ships exchanged fire. The Hiei’s first salvo were Type 3 shells, which were high explosives and not designed to penetrate armor, and as a result, did little damage except for killing most of the crew on the deck. The third salvo hit the bridge, killing Admiral Callaghan and most of the bridge crew. While damage crews worked on repairing the damaged ship, Lieutenant Commander Bruce McCandless turned the ship to rejoin the battle, knowing that if the flagship San Francisco left, the rest of the force may follow.  The Portland was next in line, following the San Francisco. Portland was hit in the propeller by a torpedo that locked the cruiser in a right turn. After the Portland’s first loop, the Hiei was waiting and the two ships exchanged fire. The Portland hit the battleship several times before continuing around on its loop. The Helena followed Portland, with the Juneau afterwards. Helena engaged the Akatsuki, which was too busy firing at the disabled San Francisco to see the Helena approaching. The Helena pummeled the Japanese destroyer until the cruiser was driven off by three other Japanese destroyers. Next came the cruiser Juneau. The Juneau attempted to engage enemy ships. While searching for a target, the cruiser was hit by a torpedo that removed the cruiser from the battle. The four trailing destroyers came next. The Aaron Ward was hit 9 times by enemy shells while trying to avoid the crippled Sterett. The Barton also had to avoid a wreck, and was almost immediately sunk by two torpedoes, one of which was launched from Amatsukaze After Barton sank, the Monssen took on two destroyers . Two starburst shells exploded, lighting the area. The captain of the Monssen, believing that the shells were fired from American ships, turned on the recognition lights and was sunk by 47 Japanese shells. Fletcher managed to escape damage altogether.  The Japanese also took heavy damage. Yudachi, like the Monssen, lit the regonition lights, but stayed afloat until survivors get picked up. Akatsuki was sunk after severely damaging the Atlanta. The Amatsukaze was damaged by the Helena while the Japanese crew was busy firing at the crippled San Francisco, which had lost all of the weapons aboard and couldn’t fire back. Hiei took over 85 hits and stayed afloat. It took an additional torpedo and three bombs before the Hiei was ordered sunk by Admiral Isoroku Yamaoto. The destroyers Amatsukaze, Ikazuchi, and Murasame were also damaged. Admiral Hara and the Amatsukaze made a safe return, although Hara was deeply disturbed by the deaths aboard his ship. Four sailors from the San Francisco were awarded the Medal of Honor, more than any other ship would receive in a single battle yet today. All ships returned for repairs in their home ports. The undamaged forces would again collide in Ironbottom Sound the next day.
|
On the eve of Saddam-free in 2003, our thoughts, our prayers, and our flag flying 24/7 are for our troops, our veterans and their families.
Mohammad Atta met with Saddam's agents--payback's a bitch, and Saddam is about to discover that first-hand.
Swift victory and safe return to our men and women in the finest fighting force on earth.
Another great thread building the historic foundation for understanding America's success is in its valiant military.


*SCOTT, NORMAN
Rank and organization: Rear Admiral, U.S. Navy. Born: 10 August 1889, Indianapolis, Ind. Appointed from: Indiana. Citation: For extraordinary heroism and conspicuous intrepidity above and beyond the call of duty during action against enemy Japanese forces off Savo Island on the night of 11-12 October and again on the night of 12-13 November 1942. In the earlier action, intercepting a Japanese Task Force intent upon storming our island positions and landing reinforcements at Guadalcanal, Rear Adm. Scott, with courageous skill and superb coordination of the units under his command, destroyed 8 hostile vessels and put the others to flight. Again challenged, a month later, by the return of a stubborn and persistent foe, he led his force into a desperate battle against tremendous odds, directing close-range operations against the invading enemy until he himself was killed in the furious bombardment by their superior firepower. On each of these occasions his dauntless initiative, inspiring leadership and judicious foresight in a crisis of grave responsibility contributed decisively to the rout of a powerful invasion fleet and to the consequent frustration of a formidable Japanese offensive. He gallantly gave his life in the service of his country.

Disclaimer: Opinions posted on Free Republic are those of the individual posters and do not necessarily represent the opinion of Free Republic or its management. All materials posted herein are protected by copyright law and the exemption for fair use of copyrighted works.
