You were spot-o in your discussion, but what I learned from creating a clone of the Kos image, is that the forger never had a real, paper COLB in his or her possession. Although the forger received several scan images, one of them had been converted (or saved as) a bitmapped, color-indexed image, and the overlays were done in a bitmapped format before it was compressed and saved, not once, but twice: the high amount of image compression coupled with the large image size and high color count (about 70% or lower could only have been achieved in this sequence. I made about 415 test images until I got it right - but the intermediary step involving a bitmapped image was the hicker because every other combo did not obliterate the green pixels to the degree as they weere shown.
I'll email to you the steps I took, to see if you can also recreate the forged Kos image.
Please do add me as a supporting expert.
I know for certain that’s the cause of that pixilation, and why it happens with regard to the image editor.
Your discovery that it was bittmapped is impressive, never would have probably find that out myself.
Usually, it’s a quick and dirty job with an existing JPG or GIF.
It’s mind-boggling how many people are clueless to this.
“Digital forgery” has been around for years, but is getting more common.
When Obama first posted on his website, my first though was “You can’t be serious, this will never fly”.
But low and behold, it has for the most part! Unbelievable.
The evidence you presented is proven in a scientfic manner, there is no “theory” about it.
Email if you like the steps, would be interested in seeing that. One of my acconts is jetxnet@yahoo.com.
Something I wrote up about the pixilation
********************************************************
It really is amazing how many people don’t think BO could’ve forged his online Certificate of Birth. Digital forgery is nothing new and has been around for years.
Before this, no one has either been bold and/or dumb enough to take it to such a magnitude in attempting to fool the masses.
Myself, I have done some digital forgery. As a programmer, I never had time to play with graphics much, but still wanted my stuff to look nice. So what did I do? I just did an image search on the web and found banners, logos and borders I liked. Most of them had text already on them, so I just replaced that text with my own. Good as new, you can’t tell the difference, at least not from afar.
But, zoom in and whooaa Nelly, that ugly dithered, granulated, washed-out coloring of pixels between the text on the forged graphic. Needless to say, it annoyed me, but then thought to myself “well I couldn’t tell until I zoomed in alot, and most people don’t zoom in on the graphics, so no-one will notice”.
Sure enough, I even got compliments on a few! I had the last laugh i guess.
You see, on a non-forged image with text, the text is crisp, and there is no “color bleeding” of the text onto the background. I’ll explain why this is but may get a bit technical, so please try to visualize the concepts laid out here and apply what you learn.
I’m sure you have heard of image editors like Adobe Photoshop. These editors allow you to create and manipulate images. In order to allow you to edit any part of an image, the image editor reserves it’s own file extension to keep track of all that image’s properties. In this example, Adobe Photoshop has the file extension .PSD.
Image properties and attributes are things like how many pixels the image has, along with what each color of a pixel is. When you pull an image into Photoshop for editing, it detects the file format. If it is .PSD, the editor knows everything about the image. You can add text to the background and it will make perfect calculations as to what pixels should be colored to create the text, giving you a clean, clear-cut, color transition from the text to the background.
Over the years, image editors have become more sophsticated and now most allow you to directly scan images into the editor as the native file format to minimize “image loss”. In other words, the image editor will take an inventory of the scanned image’s attributes such as shape, size, colors and more. It does an OK job, but there is and always will be “image loss”, because the image being scanned isn’t native to the editor.
It’s great if you have an image where you do not need to alter or replace text. The image looks fine, but if you try to remove and/or replace the text on the orignal scanned image, low and behold, you were warned about “image loss”, now you get to it see up close and personal (but only if you zoom in).
The image editor creates a separate layer to super-impose that text onto the original foreign image layer. Think of an image layer as a separate, yet, transparent new image that will lay over the top of an existing one. Only if the text and background are part of the same image layer, will you not have “pixilation” abnormalties. Only the device that created the image originally can know the true properties of that layer, and this why the image editor automatically creates a new layer, because it doesn’t know enough about the existing one.
If you type the new text onto the scanned or imported image from a foreign source or of a different image format, it looks pretty-good. But, as stated before, if you zoom in, you will see this “glow” and pixelized discoloration around the text.
The glow is created because the image editor makes a guess as to what the original existing image layer’s pixel locations are. Remember, when you create/type text, the editor selects the pixels it will color to make that text. When you scanned or imported the non-native image into the editor, it made a calculation as to what the pixel size and locations were, relative to the properties and size demensions it discovered. It isn’t perfect though, so it makes a guess based on what it found selects the pixels on the new layer to color.
The distorted glow is the difference in “image loss” or mis-matching between the two layers. Think of it as the remainder of a math equation. Everything doesn’t compute perfectly, so it guesses and does a pretty-good job, but you still get the glow. If the text were part of the same layer as the original image, therer is no glow, because the math is nearly perfect in caculating which pixels to color.
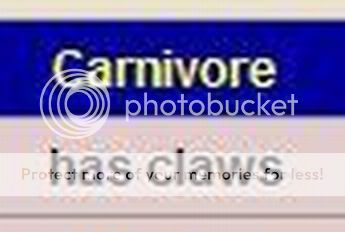
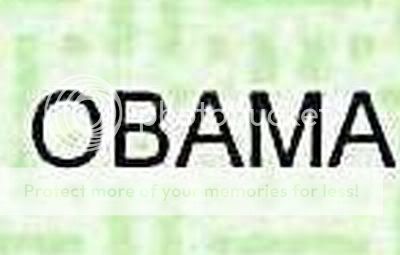
Now, apply what you have learned. Of the two images (A and B) below, what image is forged and what one is not?
Image A: http://i282.photobucket.com/albums/kk248/jamie83pics/bc19.jpg
Image B: http://i282.photobucket.com/albums/kk248/jamie83pics/bc22.jpg
If you guessed, image B, then a Cigar for you.