Manhattan Rooftop Garden Project
[A nice in pots garden]
http://nycroofgardenproject.blogspot.com/
Varieties of Vegetables for container gardening
http://www.garden.org/urbangardening/?page=container-veg
Growing Corn on a 4th floor patio, in containers
http://www.thestar.com/article/246381
Container Gardening
Beautiful Gardens Herbs Pests and Diseases Square Foot Gardening
Container Gardening Organic Gardening Reference Edible Plants
Garden Tips, Forums And Newsgroups Perennials Roses House Plants
Home Page
AddFreeStats
Home Page
Gardener’s Guide to Container Gardens Create a movable feast of color to match your needs — whether you live in a country cottage or a New York skyrise.
Fernlea Flowers Ltd - Container Gardens
Container Gardening This forum is meant for the discussion of gardening in containers
Container Gardening2 If you don’t have space for a vegetable garden or if your outdoor space doesn’t provide the necessary elements to produce the flower garden you’ve always wanted, consider the possibility of “container gardening.” A patio, deck, balcony, or doorstep can provide enough space for a productive, attractive display
Container herb gardening for beginners
Container Vegetable Gardening
Designing a container garden When one thinks of a garden, the first image to come to mind is likely to include manicured lawns and spacious flower beds. Yet in the world of the twenty-first century, where many living spaces lack the space to create such a natural panorama, the popularity of smaller, mobile, and more creative expressions of the love of nature is on the increase. Container gardens are, for many, the preferred approach to bringing to life plants of all descriptions.
Vegetable Gardening In Containers
MEL Container Gardening
buds (fine perennials & bulbs),Perennials for Containers
Container Herb Gardening
Pioneer Thinking - Gardening - Herbs - Flowers - Insects - Plants
Home Page
http://www.mnsi.net/~jhlavac/gardening/container.htm
Container Gardening Tips
http://www.containergardeningtips.com/
Links to Garden sites, good set of links
http://www.mnsi.net/~jhlavac/gardening/
http://www.vmga.net/glick’s_pick.htm
[photo]
Wild Ginger Hexastylis virginica
Its a blazing hot Summer afternoon and you’ve decided to go botanizing. Hiking up one of the steepest, rockiest slopes that you’ve ever ventured upon, your parched throat feeling like sandpaper, you reach for your canteen and...Oh no, its empty. Geez, you’re two hours up the mountain, past the point of no return. Watcha gonna do, who ya gonna call. How bout Ginger???
No, I don’t mean the Ginger that you buy at the supermarket, the one that they make ginger ale from or that you use in your stir-fry. I’m talking about Asarum or Hexastylis-our wild Gingers.
Long known and used by Native Americans for it’s stimulant effect, members of these genera have a pungent aroma when you snap their firm roots that’s reminiscent of the tropical Ginger. In fact you can easily substitute it for the culinary ginger in your favorite Thai or Chinese recipe.
I frequently chew a piece of the root of our most common Ginger, Asarum canadense (http://www.sunfarm.com/images/med/asarumcanadense-m.jpg) whenever I stumble across a patch, which is almost every time I go hiking in the woods. Its very easy to identify as its foliage is among the largest of our native plants,
Wild Gingers are members of Aristolochiacea or the Birthwort family. This is a very small family of five genera, most of the species being of tropical origin. The common name of the family seems to be derived from two Greek words, Aristos, meaning best and Lochia, meaning delivery. This name pertains to the Genus Aristolochia which is supposed to be of value as a medicinal herb in childbirth.
In West Virginia, we have five species of Wild Ginger. According to C. Ritchie Bell, author of the Flora of the Carolinas, only the deciduous species are still in the genus Asarum, the evergreen types are now placed in the genus Hexastylis. Asarum canadense is most common in moist rich woods in light to dense shade. I have seen leaves as big as your head under favorable conditions. You have to get down on your hands and knees to see the curious, pendulous flowers which hang down under the foliage. The flowers are pollinated by ants and other small insects that crawl into the flowers and move the pollen from the open pollen sacs on the anthers to the sticky receptive stigmas.
Hexastylis virginica is the only evergreen type that I’ve found in West Virginia. It seems to favor the higher elevations of Greenbrier County on mainly Northern facing slopes. According to Flora of West Virginia, it occurs in 16 of our 55 counties. You can tell it by the glossy, round to cordate (heart shaped ) leaves 4-6cm ( 1-1.5” ) wide. The plant is very prostrate reaching from 8-24cm (2-6” ) in height. The foliage is silvery mottled and like snowflakes, no two are alike.
Also noted are H. memmingeri, named for Edward Read Memminger, and supposedly similar to H. virginica but with a more rounded leaf and smaller calyx ( the outer part of the floral structure), H. heterophyllum (heterophyllum means diverse leafed ) which can be found in five Western counties and H. shuttleworthii, (http://www.sunfarm.com/images/med/hexastylisshuttleworthii-m.jpg) named for Robert James Shuttleworth 1810-1874, which is much larger than any of the others and has been seen at only four stations in West Virginia. It’s more common in the mountains of the Carolinas and down through Georgia and Alabama.
Fred Galle of Callaway Gardens in Georgia discovered a particularly beautiful variegated plant and named it ‘Callaway’. I have seen leaves of H. shuttleworthii approaching 6” long.
There are several other Asarum and Hexastylis species in the U S, another more Southern species is H. arifolium, (http://www.sunfarm.com/images/med/hexastylisarifolium-m.jpg ) native from Southern Virginia down through Florida and West to Alabama, the specific epithet refers to the arrow shaped leaves which are evergreen and can be up to 20 cm ( 5” ) long. On the West Coast there are two species, both considered evergreen so that would put them into the genus Hexastylis, H. caudatum which grows from British Columbia to California and H. hartwegii said to grow in Oregon and California.
I also grow some of the Asian species such as H. splendens, (http://www.sunfarm.com/images/med/hexastylissplendens-m.jpg) which has the most silvery markings of any plant that I have seen, on huge arrow shaped leaves. In Japan people fanatically collect these plants. There are several societies and many exhibitions. One of my Japanese trading partners recently send me two books, each with over 400 color photos of cultivated Asarum and Hexastylis. One book focused on the various leaf types and the other on the bizarre flowers.
In the garden these plants, Asarum canadense in particular, make great ground covers for the shade. If conditions are favorable they spread quickly and vigorously. I use them under trees and in the front of taller plants. If they get too much sun they will burn a little, so the more shade, the better. In cultivation they usually get 8”-12” tall. Plants can be divided in the Early Spring by slicing the thick rhizome which grows very close to the soil level, sometimes exposed. You can also collect the seeds which ripen in mid-late Summer. Sow them on the surface of 4” pots and cover with a layer of granite grit. Place the pots outside for the winter and the seeds will germinate the following Spring.
Another well known species is Asarum europaeum (http://www.sunfarm.com/images/med/hexastyliseuropaea-m.jpg) or what should, because of its evergreen nature, should be called Hexastylis europaea. Its been called Asarum for so long that it will probably hold on to that name for generations. This is a very fast growing plant and a prolific self seeder. It seems to handle more sun than most other Gingers.
As briefly mentioned earlier, another genus in the Aristolochiacea family is Aristolochia. We have two species in these mountains,
A. macrophylla, ( named for its large leaves ) formerly known as A. durior, and A. serpentaria ( named for its reputed value in curing snakebites ).
A. macrophylla is common in rich moist woods throughout the state. The common name, Dutchmans Pipe Vine refers to the unusually shaped curved flowers that resemble a Dutch Pipe. The leaves on this vining plant are very large, I’ve seen them approaching 20cm-25cm ( up to 12” ). The vine can climb 5m-10m (15’-30’) up a tree. They make a great addition to the garden where you have a porch or trellis to cover. If you look in the woods, you can find old vines that are 3cm-6cm ( 1”-2” ) thick and perfectly coiled around tree branches.
The other species, A. serpentaria, which grows from 12 cm to 45 cm ( 4” to 18”) tall has oblong leaves, cordate at the base that are 4 cm to 12 cm ( 1.5” to 5” ) long. It has a history of use as a bitter tonic since pioneer times.
The key to successful gardening with native plants is to replicate the growing conditions found in their natural habitat. I hope that everyone gets a chance to enjoy these plants both in the wild, and in their gardens.
A complete set of back issues of “Glick Pick of the Week” is available for the asking. If you would like me to send them, or if you would like to first see the list, send me an email. Also, if you’re getting more than one copy of this weekly mailing, or would like to subscribe a friend, or for some crazy reason, to unsubscribe, let me know.
© 2000 Barry Glick and Sunshine Farm & Gardens
Sunshine Farm and Gardens
Rare and Exceptional Plants for the
Discriminating Gardener and Collector
http://www.sunfarm.com/plantlist/plantlist.phtml
Sale ends 5-31-08
Home page Appears to be Native American plants sold here:
Native Plants, info and history, as the Ginger post above.
Index for Glicks Picks:
Horticulture Societies and Organizations
http://www.sunfarm.com/links/associations.phtml
North American Rock Garden Society
http://www.nargs.org/sitemap.html
On-Line Gardening Catalogs
http://www.ahs.org/publications/on-line_gardening_catalogs.htm
Horticulture links:
http://www.vmga.net/resources.htm
Gardening links:
http://www.folksonline.com/folks/hh/tours/1998/smgarden.htm
Garden info:
http://www.gardengatemagazine.com/extras/index.php
Gardening links and tips:
http://www.mnsi.net/~jhlavac/gardening/tips.htm
Container gardening links:
http://www.mnsi.net/~jhlavac/gardening/container.htm
http://www.containergardeningtips.com/
Edible Landscaping & Gardening
Plant Descriptions, Cultivation Tips, Lore, Trivia, Cultivars
by Ben Sharvy
“God Almighty first planted a garden. And indeed it is the purest of human pleasures.”
—Francis Bacon
This database lists every perennial plant that is worth growing for the sake of its produce, and that is hardy in at least 3 USDA hardiness zones; it also contains a selection of the most popular perennial herbs. Every plant listed here will survive temperatures down to at least 15 F without special care, and to at least 10 F with special care.
http://members.efn.org/~bsharvy/edible.html
[Do take time to consider some of these plants, granny]
The term hydroponics is derived from Greek, and this literally means “working water”. In today’s world, the term hydroponics is often used to describe the methodology of growing plants without the used of soil. Since the beginning of civilization, ancient people such as the Aztecs, Babylonians and other people from that era have made use of a form of hydroponics, this in the sense that the methods that they used as simple as they were did not utilize soil. The mineral solutions that these ancient people had used although not the same as it is today made it viable for them to be able to cultivate the growing of plants without soil, and their form of hydroponics became part of their way of life and is still remembered today.
hydroponic_gardens_flowers.jpgR
About Plants
Just twenty plants provide the majority of food eaten, yet there are thousands of other useful plants which have not reached mainstream attention. You can find details of many of them here.
* Edible Plants Alternative Fruits, Roots, Leaves and flowers.
* Medicinal Plants
* Other Plant Uses Soap, Dyes, Lighting ...
* Top 20 Plants Some of our favourite plants
A daylily
The Edible Daylily
About Gardening
We advocate a style of gardening mimicking a natural woodland system using perennial plants and following vegan organic and ecological principals
* Woodland Gardening
* Vegan Organics and conservation gardening.
* Perennial Plants
* Diverse Habitats useful plants in ponds, lawns and hedges
A woodland garden
A woodland garden
Plant Database
You can search our database of 7300 edible medicinal and useful plants. If you want to use the database at home without using the internet then you can download a copy or get it on CD-ROM for a small donation to the project.
Medicinal Uses
There are many hundreds of medicinal plants that can be grown in temperate climates and there are probably a great deal more with properties as yet undiscovered.
Just to look at a few of our more common herbs: thyme has been shown to slow down the ageing process by maintaining the vigour of our body cells; sage is an excellent antiseptic for treating mouth ulcers and sore throats; camomile is a safe treatment for childrens’ stomach upsets and garlic contains fungicides and is used in the treatment of Candida.
The following leaflets examine the heath and nutritional benifits of plants in more detail:
http://www.pfaf.org/leaflets/med_uses.php
Useful garden links:
http://www.vmga.net/links/Useful%20Links.htm
Garden links:
http://www.ahs.org/horticulture_internet_community/index.htm
http://www.pfaf.org/database/plants.php?Benincasa+hispida
Benincasa hispida - (Thunb.)Cogn.
Wax Gourd
Author (Thunb.)Cogn. Botanical references 200, 266
Family Cucurbitaceae Genus Benincasa
Synonyms Benincasa cerifera - Savi.
Cucurbita hispida - Thunb.
Known Hazards None known
Range Tropical Asia.
Habitat Not known in a truly wild situation.
Edibility Rating apple iconapple iconapple icon 3 (1-5) Medicinal Rating apple iconapple iconapple icon 3 (1-5)
Physical Characteristics
icon of man icon of perennial/biennial/annual Annual growing to 6m.
It is hardy to zone 10 and is frost tender. It is in leaf from June to October, in flower from July to September, and the seeds ripen from August to November. The flowers are monoecious (individual flowers are either male or female, but both sexes can be found on the same plant) and are pollinated by Bees. The plant is self-fertile.
The plant prefers light (sandy), medium (loamy) and heavy (clay) soils and requires well-drained soil. The plant prefers acid, neutral and basic (alkaline) soils. It cannot grow in the shade. It requires moist soil and can tolerate drought.
Habitats
Cultivated Beds;
Edible Uses
Edible Parts: Flowers; Fruit; Leaves; Seed.
Fruit - raw or cooked[74, 114]. Used as a vegetable, and in pickles, curries and preserves[1, 2, 27, 61, 183]. The fruit can be eaten when it is young or old[116], it can be picked as early as one week after fertilization[206]. A juicy texture with a mild flavour, the flavour is somewhat stronger in younger fruits[206]. Because of its waxy coating, it will store for several months, sometimes as long as a year[116, 206]. Mature fruits can vary in weight from 2 - 50 kg[206]. A nutritional analysis is available[218]. Young leaves and flower buds are steamed and eaten as a vegetable, or are added as a flavouring to soups[183, 200]. Seed - cooked[74, 114, 177, 183]. Rich in oil and protein.
Composition
Figures in grams (g) or miligrams (mg) per 100g of food.
Fruit (Fresh weight)
* 13 Calories per 100g
* Water: 96.1%
* Protein: 0.4g; Fat: 0.2g; Carbohydrate: 3g; Fibre: 0.5g; Ash: 0.3g;
* Minerals - Calcium: 19mg; Phosphorus: 19mg; Iron: 0.4mg; Magnesium: 0mg; Sodium: 6mg; Potassium: 111mg; Zinc: 0mg;
* Vitamins - A: 0mg; Thiamine (B1): 4mg; Riboflavin (B2): 0.11mg; Niacin: 0.4mg; B6: 0mg; C: 13mg;
* Reference: [218]
* Notes:
Medicinal Uses
Anthelmintic; Antiperiodic; Aphrodisiac; Cancer; Demulcent; Diuretic; Expectorant; Febrifuge; Laxative; Salve; Tonic; VD.
The wax gourd has been used as a food and medicine for thousands of years in the Orient. All parts of the fruit are used medicinally. The rind of the fruit is diuretic[218, 238]. It is taken internally in the treatment of urinary dysfunction, summer fevers etc[238]. The ashes of the rind are applied to painful wounds[218]. The seed is anthelmintic, anti-inflammatory, demulcent, diuretic, expectorant, febrifuge, laxative and tonic[218, 238]. A decoction is used internally in the treatment of vaginal discharges and coughs[238, 254]. In combination with Rheum palmatum it is used to treat intestinal abscesses[254]. In Ayurvedic medicine the seed is used in the treatment of coughs, fevers, excessive thirst and to expel tapeworms[254]. The oil from the seed is also used as an anthelmintic[240]. The fruit is antiperiodic, aphrodisiac, diuretic, laxative and tonic[240]. It is used in Ayurvedic medicine in the treatment of epilepsy, lung diseases, asthma, coughs etc[238]. The fruit juice is used in the treatment of insanity, epilepsy and other nervous diseases[240]. Recent research has shown that the fruits contain anti-cancer terpenes[238]. An infusion of the root is used in the treatment of gonorrhoea[218]. Demulcent, salve. Facilitates pus drainage[147, 176, 178].
Other Uses
Rootstock.
A wax that coats the fruit is used to make candles[2, 27, 238]. The roots have considerable resistance to soil-borne diseases and they are sometimes used as a rootstock for melons and other cucurbits[206].
Cultivation details
Requires a warm sunny position in a rich well-drained soil and plenty of moisture in the growing season[1, 200, 238]. Established plants are reasonably drought tolerant[206]. Tolerates a pH in the range 5.8 to 6.8. This species is not very frost hardy, it is best grown in a greenhouse in Britain[86] but can succeed outdoors in good summers if started off in a greenhouse and planted out after the last expected frosts. Plants require stable temperatures in excess of 25°c if they are to do well[200]. Short daylengths and lower temperatures stimulate female flower development, higher temperatures stimulate male flower production[200]. Plants take 5 months from seed to produce a mature crop, though the fruits can be eaten when immature[206]. The wax gourd is frequently cultivated for its edible fruit in the tropics, there are many named varieties[183]. One group, sometimes classified as B. hispids chieh-gua, is known as the hairy melon or jointed gourd. This form is grown for its immature fruit in much the same way as courgettes are used[206]. Mature fruits of this form do not develop a waxy coating[206]. The fruit can be harvested about 3 months after sowing[206].
Propagation
Seed - sow March/April in a greenhouse. Germination should take place within 3 weeks. When they are large enough to handle, prick the seedlings out into individual pots and grow them on fast in a rich compost in the greenhouse. Try to maintain a minimum night temperature of at least 10°c for the seedlings first few weeks[206]. Plant out in May/June after the last expected frosts[1].
Cultivars
No entries have been made for this species as yet.
Links
References
[1] F. Chittendon. RHS Dictionary of Plants plus Supplement. 1956 Oxford University Press 1951
Comprehensive listing of species and how to grow them. Somewhat outdated, it has been replaces in 1992 by a new dictionary (see [200]).
[2] Hedrick. U. P. Sturtevant’s Edible Plants of the World. Dover Publications 1972 ISBN 0-486-20459-6
Lots of entries, quite a lot of information in most entries and references.
[27] Vilmorin. A. The Vegetable Garden. Ten Speed Press 0 ISBN 0-89815-041-8
A reprint of a nineteenth century classic, giving details of vegetable varieties. Not really that informative though.
[61] Usher. G. A Dictionary of Plants Used by Man. Constable 1974 ISBN 0094579202
Forget the sexist title, this is one of the best books on the subject. Lists a very extensive range of useful plants from around the world with very brief details of the uses. Not for the casual reader.
[74] Komarov. V. L. Flora of the USSR. Israel Program for Scientific Translation 1968
An immense (25 or more large volumes) and not yet completed translation of the Russian flora. Full of information on plant uses and habitats but heavy going for casual readers.
[86] Organ. J. Gourds. Faber 1963
Deals with squashes and their relatives. Interesting and readable, it gives cultivation techniques and some details of plant uses.
[114] Chakravarty. H. L. The Plant Wealth of Iraq. 0
It is surprising how many of these plants can be grown in Britain. A very readable book on the useful plants of Iraq.
[116] Brooklyn Botanic Garden Oriental Herbs and Vegetables, Vol 39 No. 2. Brooklyn Botanic Garden 1986
A small booklet packed with information.
[147] ? A Barefoot Doctors Manual. Running Press 0 ISBN 0-914294-92-X
A very readable herbal from China, combining some modern methods with traditional chinese methods.
[176] Yeung. Him-Che. Handbook of Chinese Herbs and Formulas. Institute of Chinese Medicine, Los Angeles 1985
An excellent Chinese herbal giving information on over 500 species. Rather technical and probably best suited to the more accomplished user of herbs.
[177] Kunkel. G. Plants for Human Consumption. Koeltz Scientific Books 1984 ISBN 3874292169
An excellent book for the dedicated. A comprehensive listing of latin names with a brief list of edible parts.
[178] Stuart. Rev. G. A. Chinese Materia Medica. Taipei. Southern Materials Centre 0
A translation of an ancient Chinese herbal. Fascinating.
[183] Facciola. S. Cornucopia - A Source Book of Edible Plants. Kampong Publications 1990 ISBN 0-9628087-0-9
Excellent. Contains a very wide range of conventional and unconventional food plants (including tropical) and where they can be obtained (mainly N. American nurseries but also research institutes and a lot of other nurseries from around the world.
[200] Huxley. A. The New RHS Dictionary of Gardening. 1992. MacMillan Press 1992 ISBN 0-333-47494-5
Excellent and very comprehensive, though it contains a number of silly mistakes. Readable yet also very detailed.
[206] Larkcom J. Oriental Vegetables John Murray 1991 ISBN 0-7195-4781-4
Well written and very informative.
[218] Duke. J. A. and Ayensu. E. S. Medicinal Plants of China Reference Publications, Inc. 1985 ISBN 0-917256-20-4
Details of over 1,200 medicinal plants of China and brief details of their uses. Often includes an analysis, or at least a list of constituents. Heavy going if you are not into the subject.
[238] Bown. D. Encyclopaedia of Herbs and their Uses. Dorling Kindersley, London. 1995 ISBN 0-7513-020-31
A very well presented and informative book on herbs from around the globe. Plenty in it for both the casual reader and the serious student. Just one main quibble is the silly way of having two separate entries for each plant.
[240] Chopra. R. N., Nayar. S. L. and Chopra. I. C. Glossary of Indian Medicinal Plants (Including the Supplement). Council of Scientific and Industrial Research, New Delhi. 1986
Very terse details of medicinal uses of plants with a wide range of references and details of research into the plants chemistry. Not for the casual reader.
[254] Chevallier. A. The Encyclopedia of Medicinal Plants Dorling Kindersley. London 1996 ISBN 9-780751-303148
An excellent guide to over 500 of the more well known medicinal herbs from around the world.
[266] Flora of China 1994
On-line version of the Flora - an excellent resource giving basic info on habitat and some uses.
One of the world’s largest collections of botanical and horticultural
databases, Plant Information Online has recently made their extensive
resources available for free.
plantinfo.umn.edu
[I did not check this link..granny]
Listing of Useful Plants of the World
[Previously Listing of Potential New Crops for Australia]
http://www.newcrops.uq.edu.au/listing/listingindex.htm
Introduction to Permaculture: Concepts and Resources
By Steve Diver
NCAT Agriculture Specialist
Published 2002
ATTRA Publication #CT083
http://www.attra.org/attra-pub/perma.html
[Links and information on gardens and plants, links to books, and growing info of the world and so much more......granny]
About and for sale Spices:
One of the oldest and largest herbal information sites on the web.
http://www.henriettesherbal.com/
Interesting links:
http://www.pfaf.org/links/links.php
New Book: 101 Uses for Nettles
http://www.wildeye.co.uk/stinging-nettles/uses.html
Nettles in the Garden
1. Butterfly and Moth Food
2. Pest Control
3. Bird Food
4. Compost
5. Mulch
6. Liquid Plant Food
7. House Plant Food
8. Insecticide
9. Fungicide
10. Companion Plant
Nettles in the Kitchen
11. As a Vegetable
12. Nettle Soup
13. Creamed Nettles
14. Nettle Pie
15. Rennet Substitute
16. Cheese Additive
17. Cheese Ripener
18. Salt Substitute
19. Nettle Pasta
20. Pasta Sauce
21. Nettle Omelette
22. Nettle Cake
23. Nettle Pudding
24. Nettles on Toast
25. Nettle Pizza
26. Nettle Bread
27. Nettle Beer
28. Nettle Wine
29. Nettle Tea
Medicinal Nettles
30. Arthritis and Rheumatism
31. Gout
32. Bronchitis
33. Whooping Cough
34. Pleurisy
35. Hay Fever
36. Allergies
37. Asthma
38. Colds
39. Influenza
40. Sore Throat
41. Sore Mouth
42. Scurvy
43. Neuralgia
44. Sciatica
45. Anaemia
46. Exhaustion
47. Stress
48. Milk Flow
49. Pregnancy Tonic
50. Birth Pain
51. Premenstrual Tension
52. Vaginal Yeast Infections
53. Blood Pressure
54. Urinary Tract Conditions
55. Kidney Stones
56. Poor Circulation
57. Haemorrhage
58. Cuts and Wounds
59. Burn Relief
60. Depression / Melancholia
61. Haemorrhoids
62. Diarrhoea
63. Fevers
64. Digestion
65. Prostate
66. Weight Loss
67. Blood Sugar / Hypoglycaemia
68. Acne
69. Eczema
70. Insect Bites / Bee Stings
71. Sting Relief
72. Dog Bite
73. Worms
74. Head Lice
75. Dandruff Treatment
76. Hair Shampoo/Conditioner
77. Hair Restorer
Nettles and Animals
78. Livestock Fodder
79. Horse Tonic
80. Poultry Food
81. Bull Stimulus
82. Budgie Improver
83. Pet Food
84. Beehive Protection
Nettle Fibre
85. Nettle Cloth
86. Nettle Clothes
87. Nettle Cord
88. Fishing Nets
89. Nettle Weaving
90. Nettle Jewellery
91. Nettle Paper
Miscellaneous Uses
92. Waterproofing
93. Insect Repellent
94. Dye
95. Burning Oil
96. Keeping Warm
97. Stinging Nettle Day
98. Nettle Celebrations
99. Nettle-Eating Competitions
100. Magical Uses
101. Erotic Uses
_______________________________________________
from:
http://lists.ibiblio.org/pipermail/permaculture/2008-April/031110.html
http://lists.ibiblio.org/pipermail/permaculture/2008-April/subject.html
Index :
http://lists.ibiblio.org/pipermail/permaculture/
Granny does not agree with the Gore crowd, but will consider any good information on gardens and animal health that they accidentally publish...........LOL, I am and have been cold for several days, so much for the earth warming folks .....warning.
I would like to see more food grown, and less lawns and other useless areas.
There are many food plants that we never hear of, both wild and being developed/found.
The genetic altered seeds make me nervous, which is not surprising as I do not like most of the hybrids and bought the old varieties.
Maybe I am lucky that the old varieties grow better here.
granny
http://www.attra.org/attra-pub/perma.html
In the broadest sense, permaculture refers to land use systems which promote stability in society, utilize resources in a sustainable way and preserve wildlife habitat and the genetic diversity of wild and domestic plants and animals. It is a synthesis of ecology and geography, of observation and design. Permaculture involves ethics of earth care because the sustainable use of land cannot be separated from life-styles and philosophical issues.
Many different garden links to info:
http://www.ibiblio.org/intergarden/
So much information on food growing and plants:
http://www.pfaf.org/links/links.php
activists against traditional plants being patented:
http://ip.aaas.org/tekindex.nsf/TEKPAD?OpenFrameSet
Welcome to Marian’s Medieval Garden
The plants in this garden are gathered primarily from Appendix Three: Plants of the Middle Ages: a Dated List, contained in John Harvey’s Medieval Gardens (see Sources, etc. page for more information). The illustrations were culled from many different web sites; unfortunately, I did not note where I got them.
Each plant is identified for each author as “yes” if identification is certain (or nearly so); “maybe” shows doubt as to the identification. This information is taken primarily from Harvey’s work.
The lists are searchable; one can find (for example) all the plants listed by Crescenzi, or all those that are vines/climbers or all those used for dyes. Or in the information boxes, search for strewing in Miscellaneous Uses. [continues and has links]
http://www.buttery.org/marian/Garden_Welcome.html
[Book is here and ready to read on line]
Lost Crops of the Incas
Little-Known Plants of the Andes with Promise for Worldwide Cultivation
Report of an
Ad Hoc Panel of the Advisory Committee on Technology Innovation
Board on Science and Technology for International Development
National Research Council
National Academy Press
Washington. D.C.
1989
http://books.nap.edu/openbook.php?isbn=030904264X
Web sources:
Culpeper, Nicholas. Culpeper’s Complete Herbal,1649. Taken primarily from http://www.bibliomania.com/2/1/66/113/frameset.html, cited as [CCH].
Gerard, John. Gerard’s Herball,1597. Edition of 1633, revised and enlarged by Thomas Johnson. Culinary quotes culled by Cindy Renfrow at http://www.thousandeggs.com/gerardp1.html, cited as [GH].
Plants for a Future, http://www.pfaf.org/index.html, cited as [PFAF].
Acknowledgments:
Thank goodness my husband, Mark Dulcey, could figure out how to get this on line! I certainly couldn’t.
Links:
Besides the sites mentioned above, some good ones are:
Medieval and Renaissance Gardens (notes from a class) by Jadwiga Zajaczkowa, aka Jennifer Heise
East Kingdom Herbalists’ and Apothecaries’ Guild, a group within the Eastern Kingdom of the SCA.
Bibliography of material available on agricultural practices in the Middle ages by Lady Pegasus Devona of the Barony of Bryn Gwlad, Ansteorra.
Apothecary gardens in history, an article from The Herbalist, newsletter of the Canadian Society for Herbal Research. © March 1989.
A BBC feature on Period Gardens
[live links at site:]
http://www.buttery.org/marian/Garden_Sources.html
Links to the worlds finest herbal sites:
http://www.henriettesherbal.com/goodlink.html
http://lists.ibiblio.org/pipermail/permaculture/2008-February/030500.html
Cattails are probably the best wetland plant for water purification,
used as such in John Todd’s Living Machines
(http://www.toddecological.com/ecomachines.html and
http://www.oceanarks.org) and some progressive sewage treatment
facilities in the US.
They are also an excellent and tasty edible (roots, young shoots,
and green seed head) and probably the best feedstock for ethanol
production there is, yielding 1500 gallons of ethanol per acre with no
fertilizer, pesticides, or herbicides, and over 2500 gallons an acre
with the added nutrients from a sewage plant. See David Blume’s
fantastic book “Alcohol Can Be A Gas” (http://www.permaculture.com).
Welcome to Far Far Away Farm
Far Far Away Farm is nestled in a lovely little valley in the southwest corner of Oregon. We breed and sell fine quality Dexter cattle, Shetland and Jacob sheep.
http://farfarawayfarm.blogspot.com/
Worth a visit to this blog, to see the photos of their animals..
and below a post that I found from the owner of this blog, that reminds me of what I hear listening to the police scanner in several western cities, we are in great danger from gangs, even in small towns, you do not know, if you do not listen day and night to the battle the Police are waging.
go to google and search for:
listen to police scanners on internet
[you can add your city]
I prefer the San Diego scanner, as I lived there 30 years.
Scan San Diego.net
granny
Just my $.02
I just came home from a month in Los Angeles, parts of S. California and SE
Arizona. I just got a good dose of reality. I had forgotten how bad it
really is. I am a former peace officer (CA State Humane Officer) and my son
is a city cop in California. You need to educate yourself about gangs. I
am, personally, very well-armed and believe me I do not have the firepower
of the gangs in the cities. The biggest reality is that gangs do not exist
only in the cities. They are fueled and funded by Meth and it is
everywhere. It is cheap and easy to make. It is the scourge of rural
America.
I live in the “whitest” area that I have ever lived in. Our local news had
a series on the growing gang problem here. There was not a person of color
shown in the entire program. They were all white/Caucasian. It is a very
complex issue and I have no easy answers. I grow enough food to share with
my neighbors as well as for my loved ones that live in the cities. I also
have a “pack” of big dogs that gives me security from the local druggies
that steal to support their addictions.
Margaret
http://farfarawayfarm.blogspot.com/
http://lists.ibiblio.org/pipermail/permaculture/2008-February/030631.html
Changed the name to protect the innocent:
Was: seedsavers@
Now: Seed Keepers (seedkeepers@)
http://lists.ibiblio.org/mailman/listinfo/seedkeepers
This list will help those interested in developing and using a non-gmo seed saving and seed exchange network.
Seeds Create.
The Seed Keepers list is a forum for individuals interested in and practicing techniques of keeping non-gmo seeds. All
are welcome to join and exchange ideas, skills and harvested seeds. There are no limitations besides civility and
constructive participation. This list is not affiliated with any organization and does not tolerate inflammatory
behavior. Welcome and please introduce yourself!
-Seed Keepers Exchange Network
The message archives for the old seedkeepers (called seedsavers) mailing list are at the following location:
Go Here: http://www.ibiblio.org/ecolandtech/seedkeepers/seedkeepers-archives/maillist.html
To see the collection of prior postings to the list, visit the seedkeepers Archives at the following location:
Go Here: http://lists.ibiblio.org/pipermail/seedkeepers/
Feel free to subscribe, browse and download. There’s quite a lot of good seed source info here with much more
anticipated in the future.
http://www.ibiblio.org/ecolandtech/seedkeepers/seedkeepers-archives/maillist.html
A quick look and there could be interesting info in this new group...
granny
http://chla.library.cornell.edu/
The Core Historical Literature of Agriculture (CHLA) is a core electronic collection of agricultural texts published between the early nineteenth century and the middle to late twentieth century. Full-text materials cover agricultural economics, agricultural engineering, animal science, crops and their protection, food science,forestry, human nutrition, rural sociology, and soil science. Scholars have selected the titles in this collection for their historical importance. Their evaluations and 4,500 core titles are detailed in the seven volume series The Literature of the Agricultural Sciences, Wallace C. Olsen, series editor.
Current online holdings: Pages: 850,264 Books: 1,849 (1,910 Volumes) Journals: 6 (288 Volumes)
For a related collection of core texts in the disciplines of home economics, see Home Economics Archive: Research, Tradition and History (HEARTH) at http://hearth.library.cornell.edu/
Click here to visit the Cornell University Home Page
Albert R. Mann Library. 2008 . Core Historical Literature of Agriculture (CHLA). Ithaca, NY: Albert R. Mann Library, Cornell University. http://chla.library.cornell.edu (Version January 2005).
© 2008 Cornell University Library. Questions? Comments? Please contact us.
http://chla.library.cornell.edu/c/chla/browse.html
Browse CHLA
Also try Simple Search
This is a complete bibliography of books and journals in CHLA, organized by both author and title or by publication year:
A | B | C | D | E | F | G | H | I | J | K | L | M | N | O | P | Q | R | S | T | U | V | W | X | Y | Z | Non-alphabetic
1800-1819 | 1840-1859 | 1860-1879 | 1880-1899 | 1900-1919 | 1920-1939 | 1940-1959 | 1960-1979
Journal Title List | Articles by Author : A-C | D-H | I-M | N-S | T-Z
You may also browse a list of recent additions.
Click here to visit the Cornell University Home Page
Albert R. Mann Library. 2008 . Core Historical Literature of Agriculture (CHLA). Ithaca, NY: Albert R. Mann Library, Cornell University. http://chla.library.cornell.edu (Version January 2005).
http://chla.library.cornell.edu/c/chla/browse/recent.html
Recent Additions
* The apples of New York Beach, S. A. J.B. Lyon Company, Albany : 1905.
* The cherries of New York Hedrick, U. P. J.B. Lyon Company, Albany : 1915.
* Experiments and observations on the gastric juice and the physiology of digestion Beaumont, William. Harvard Univ. Press, Cambridge : 1929.
* Farm appliances; a practical manual Martin, George A.. Orange Judd Company, New York : 1892 [1887].
* The grapes of New York Hedrick, U. P. J.B. Lyon Company, Albany : 1908.
* History of the Massachusetts Horticultural Society; 1829-1878... Printed for the Society, Boston : 1880.
* Life-histories of northern animals; an account of the mammals of Manitoba Seton, Ernest Thompson. C. Scribner’s Sons, New York : 1909.
* The Myxomycetes; a descriptive list of the known species with ... Macbride, Thomas H. Macmillan, New York : 1934.
* The peaches of New York : Hedrick, U. P. J.B. Lyon Company, Albany : 1917.
* The pears of New York Hedrick, U. P. J. B. Lyon company, Albany : 1921.
* The plums of New York Hedrick, U. P. J.B. Lyon Company, Albany : 1911.
* Proceedings Department of State Washington : [1949].
* The response of crops and soils to fertilizers and manures Andrews, William Baker. W. B. Andrews, State College, Miss. : 1947.
* The small fruits of New York Hedrick, U. P. J. B. Lyon company, Albany, N.Y. : 1925.
* Soil culture; containing a comprehensive view of agriculture, ... Walden, J. H. R. Sears, New York : 1858, c1857.
* A stake in the land Speek, Peter Alexander. Harper & Brothers, New York ; 1921.
http://hearth.library.cornell.edu/
HEARTH is a core electronic collection of books and journals in Home Economics and related disciplines. Titles published between 1850 and 1950 were selected and ranked by teams of scholars for their great historical importance. The first phase of this project focused on books published between 1850 and 1925 and a small number of journals. Future phases of the project will include books published between 1926 and 1950, as well as additional journals. The full text of these materials, as well as bibliographies and essays on the wide array of subjects relating to Home Economics, are all freely accessible on this site. This is the first time a collection of this scale and scope has been made available.
“Home Economists in early 20th century America had a major role in the Progressive Era, the development of the welfare state, the triumph of modern hygiene and scientific medicine, the application of scientific research in a number of industries, and the popularization of important research on child development, family health, and family economics. What other group of American women did so much, all over the country, and got so little credit? ... We must do everything we can to preserve and organize records and materials from this important female ghetto.”
- Joan Jacobs Brumberg, Stephen H. Weiss Presidential Fellow and Professor, Cornell University College of Human Ecology and author of The Body Project: an Intimate History of American Girls.
Additional information, images and readings on the history of Home Economics are also available at the Cornell University Library’s Rare and Manuscript Collections site, “From Domesticity to Modernity: What Was Home Economics?”as well as the Human Ecology Historical Photographs collection.
Current online holdings: Pages: 399,732 Books: 950 (1003 Volumes) Journals: 9 (222 Volumes)
http://hearth.library.cornell.edu/h/hearth/browse.html
This is a complete bibliography of books and journals in HEARTH, organized by both author and title or by publication year:
A | B | C | D | E | F | G | H | I | J | K | L | M | N | O | P | Q | R | S | T | U | V | W | X | Y | Z | Non-alphabetic
1820-1839 | 1840-1859 | 1860-1879 | 1880-1899 | 1900-1919 | 1920-1939 | 1940-1959 | 1960-1979
Journal Title List | Articles by Author : A-C | D-H | I-M | N-S | T-Z
You may also browse a list of recent additions.
http://hearth.library.cornell.edu/h/hearth/browse/recent.html
Recent Additions
* Catering management; a comprehensive guide to the successful management... Waverly Book Co. , London : [1919?]
* Color and its applications Luckiesh, Matthew. D. Van Nostrand Co., New York : 1915.
* [Cornell bulletin for homemakers] [Ithaca, N.Y, (1901 - 1950)
* Costume silhouettes Evans, Mary. J.B. Lippincott, Philadelphia : [c1923]
* Handbook of furniture styles Dyer, Walter A. Century, New York : 1918.
* A history of design in painted glass; by N.H.J. Westlake... Westlake, Nat Hubert John. J. Parker and Co., London : 1881-94.
* How to build, furnish and decorate Co-operative Building Plan Ass’n, New York, N.Y. : c1897.
* How to furnish a home Church, Ella Rodman. D. Appleton and Co., New York : 1882.
* Meals that cook themselves and cut the costs Frederick, Christine. Sentinel Maufacturing Co., New Haven, Conn. : [c1915]
* Mental development in the child Preyer, William T.. D. Appleton and Co., New York : 1893.
* The next-to-nothing house Carrick, Alice van Leer. The Atlantic Monthly Press, Boston : [c1922]
* Period furnishings; an encyclopedia of historic furniture, decorations... Clifford, C. R. Clifford & Lawton, inc., New York : [c1922]
* Silk manufacturing and its problems Chittick, James. J. Chittick, New York : 1913.
* Woman’s Institute library of dressmaking. The Institute, Scranton, Pa. : 1923.
* Youth in conflict Van Waters, Miriam. Republic Pub. Co., New York : 1925.
Click here to go to the Cornell University Home Page
Albert R. Mann Library. 2008. Home Economics Archive: Research, Tradition and History (HEARTH). Ithaca, NY: Albert R. Mann Library, Cornell University. http://hearth.library.cornell.edu (Version January 2005).
© 2008 Cornell University Library. Questions? Comments? Please contact us.
http://hearth.library.cornell.edu/h/hearth/subjects.html
Here you can browse a list of subjects in HEARTH. Each subject features an essay, images and a bibliography of core titles for the discipline. Listed after each are some of the main sub-topics. Some of the accompanying bibliographies are quite large, hence the file size for each is listed. All bibliographies are in Adobe Acrobat PDF format. The free Adobe Acrobat Reader for PDF’s is freely available for download from Adobe Corporation.
Applied Arts and Design (essay | bibliography - 89kb PDF file)
Applied Or Decorative Art
Crafts
Furniture (Design, Upholstery, Refinishing, Repair)
Child Care, Human Development and Family Studies
(essay | bibliography - 322kb PDF file)
Child Care
Parenting
Child/Human Development
Family Relations/Studies
Human Sexuality
Public Policy Related To The Above Topics
Clothing and Textiles (essay | bibliography - 247kb PDF file)
Clothing Production And Upkeep (Including Sewing And Laundry Work)
Fashion And Clothing Choice
Textile/Fiber Science
Fashion Design
Food and Nutrition (essay | bibliography - 165kb PDF file)
Cookery / Home Cooking (Including Home Processing And Experimental Foods, But Excluding Cookbooks)
Nutrition And Dietetics
Food Science
Marketing And Food Purchasing
Home Management (essay | bibliography - 71kb PDF file)
Family Economics (Including Budgets)
Home Management
Efficiency (Ergonomics, Motion Studies)
Management Of Domestic Employees
Economics Of Household Production/Rural Enterprise
Economics As An Academic Discipline
Standard Of Living
Housekeeping and Etiquette (essay | bibliography - 255kb PDF file)
Housekeeping Manuals (Not Including Laundry)
Etiquette
Housing, Furnishing and Home Equipment
(essay | bibliography - 101kb PDF file)
Housing (Architecture, Siting, Construction, But Only Publications Aimed At A Lay Audience)
Interior Design (As Related To Efficiency And Health)
Home Equipment
Housing Policy
Hygiene (essay | bibliography - 134kb PDF file)
Household Sanitation
Care Of The Sick
Personal Hygiene And Grooming
Public Health
Institutional Management (essay | bibliography - 33kb PDF file)
Hospitality Industry
Institutional Nutrition
Service Agency Administration
Retail and Consumer Studies (essay | bibliography - 18kb PDF file)
Marketing/Merchandising (Including Communicating With Consumers, Home Service Merchandising)
Other Retail Activities
Consumer Education, Protection, And Advocacy
Consumer Co-Operatives
Teaching and Communication (essay | bibliography - 72kb PDF file)
Home Economics Education
Home Economics Textbooks
Home Extension (As A Topic In Itself-Extension Publications Are Excluded)
Photo of dress on mannequin
Measuring an apartment baby.
Photo © Division of Rare and Manuscript Collections, Cornell University Library.
http://www.bigmedicine.ca/americas.htm#New_Mexico:_Investigation_into_salmo
USA: FDA warns consumers against using Mommy’s Bliss Nipple Cream [May 23 Rockville MD]—The U.S. Food and Drug Administration is warning consumers not to use or purchase Mommy’s Bliss Nipple Cream, marketed by MOM Enterprises, Inc., because the product contains potentially harmful ingredients that may cause respiratory distress or vomiting and diarrhea in infants.
The product is promoted to nursing mothers to help soothe and heal dry or cracked nipples. Product labeling specifically states that there is no need for mothers to remove the cream prior to nursing. However, the ingredients contained in the product may be harmful to nursing infants.
Potentially harmful ingredients in Mommy’s Bliss Nipple Cream are chlorphenesin and phenoxyethanol. Chlorphenesin relaxes skeletal muscle and can depress the central nervous system and cause respiratory depression (slow or shallow breathing) in infants. Phenoxyethanol is a preservative that is primarily used in cosmetics and medications. It also can depress the central nervous system and may cause vomiting and diarrhea, which can lead to dehydration in infants.
Mothers and caregivers should watch for a decrease in an infant’s appetite. More serious signs would be difficulty in awakening the child, limpness of extremities or a decrease in an infant’s strength of grip and a change in skin color. Please seek immediate medical attention if your child is showing these signs and symptoms.
“The FDA is particularly concerned that nursing infants are being unwittingly exposed by their mothers to this product with dangerous side effects,” said Janet Woodcock, M.D., director, FDA’s Center for Drug Evaluation and Research. “Additionally, these two ingredients may interact with one another to further compound and increase the risk of respiratory depression in nursing infants.”
Though the FDA has not received any reports of injury to infants, the agency is alerting the public because of the potential harm this product can have on a child.
Chlorphenesin can also harm the mother by causing dermatitis, a skin condition that can worsen the drying and cracking of nipple skin.
MOM Enterprises, Inc. is based in San Rafael, Calif. The company has stated that it has discontinued marketing the nipple cream with the potentially harmful ingredients. The FDA is advising consumers to discontinue use of Mommy’s Bliss Nipple Cream and to consult a health care professional if they experience problems or believe that their infant may have experienced problems due to this product. Nursing mothers with cracked, painful nipples, which is often a side effect of nursing, should speak with their health care professional or a certified lactation consultant if the problem is severe or for other treatment options.
Consumers are strongly encouraged to report adverse events related to this product or any FDA approved product to MedWatch, the agency’s voluntary reporting program, by e-mail at www.fda.gov/medwatch/report.htm, or by phone at 800-332-1088, or by fax to 800-332-0178. Consumers may also mail reports of adverse events to MedWatch, Food and Drug Administration, 5600 Fishers Lane, Rockville, MD, 20852-9787.
http://www.wikihow.com/Survive-a-Riot
How to Survive a Riot
What do college tuition increases, soccer games, institutionalized oppression, editorial cartoons, and a movie star’s death have in common? They’ve all ignited riots in the past few years.
It’s no secret that angry mobs can be as dangerous and unpredictable as just about any natural disaster. As many as a million people in India and Pakistan died in the civil unrest that followed India’s independence, for example, and thousands are killed in riots around the world each year. What may be surprising, however, is that riots can break out anywhere. What’s more, as the above examples suggest, while the underlying causes of civil unrest are often the “usual suspects” of racial, religious, economic,or political divisions, seemingly inconsequential events can suddenly trigger mass violence. Fortunately, while you may not always be able to avoid riots, there are steps you can take to protect yourself from harm.
[edit] Steps
1. Be prepared. If you know an area is ripe for a riot but you can’t avoid traveling there, take some simple precautions to help protect yourself. Wear clothes that minimize the amount of exposed skin—long pants and long-sleeve shirts, for instance—when going out, and think about your possible escape routes and safe havens before anything actually happens. Carry some cash with you in case you need to quickly arrange transportation, pay off looters, or bribe police at a checkpoint. If you’re traveling abroad, register with your country’s consulate and carry your passport and/or visa with you at all times.
2. Remain calm. Riots bring intense emotions boiling to the surface, but if you want to survive one you’d be better off keeping yours in check. Your adrenaline and survival instincts will kick in, but try to think rationally and pursue safety methodically.
3. Get inside and stay inside. Typically riots occur in the streets or elsewhere outside. Being inside, especially in a large, sturdy structure, can be your best protection to weather the storm. Keep doors and windows locked, avoid watching the riot from windows or balconies, and try to move to inside rooms, where the danger of being hit by stones or bullets is minimized. Try to find at least two possible exits in case you need to evacuate the building in a hurry. Try to contact police or your country’s consulate to let them know where you are, and be on the lookout for signs of fire. If the building is set on fire get out quickly. If rioters are targeting the building and gain entry, try to sneak out or hide.
4. Stay on the sidelines. If you’re caught up in a riot, don’t take sides. Try to look as inconspicuous as possible, and slowly and carefully move to the outside of the mob. Stay close to walls or other protective barriers if possible.
5. Avoid being hit by riot control chemicals. Police may deploy riot control agents (tear gas, for example) to disperse a crowd. These chemicals can cause severe pain, respiratory distress, and blindness. Try to stay away from the front lines of a riot, and learn to recognize the signs that a riot control agent has been used and how to handle exposure.
6. Move away from the riot. The more time you spend in the midst of a riot, the greater your chance of being injured or killed. That said, in most circumstances it’s better to move out of a riot slowly. If you run, you will draw attention to yourself, so it’s usually best to walk. It can also be dangerous to move against a crowd, so go with the flow until you are able to escape into a doorway or up a side street or alley. It may also be advantageous to stay with the crowd until you are certain you can safely escape because it will help you remain inconspicuous and improve your odds of survival if shots are fired.
* Think of crowd movement like currents in the ocean. In a large riot, the crowd in the middle will be moving faster than the people on the perimeters. As such, if you find yourself in the middle, you should not try to move in a different direction, but follow the flow and slowly make your way to the outside. This requires patience in order to work properly.
* Avoid major roads. Major roads, squares, and other high traffic areas are likely to be crowded with rioters. If possible, stick to less-traveled side streets to avoid the mobs.
* Avoid public transportation. Buses, subways, and trains will likely be out of service, and stations and depots will probably be packed with people. Even if you succeed in getting on a train or bus, rioters may stop it. Subway stations are particularly bad places to be, both because they are generally difficult to escape and because riot control agents are generally heavier than air and may drift down into subway stations and accumulate there.
* Don’t stop your car. If you’re lucky enough to have a car that you can drive away from the riot, drive quickly and try not to stop for anything until you’ve reached someplace you know is safe. If people seem to block your escape route; honk your horn, and carefully drive through or around them at a moderate speed, and they should get out of the way.
o Driving towards Police lines can be interpreted by the Police as a preparation to use the car as a weapon against them. Police are trained and prepared to protect themselves against deadly threats meaning that you may be shot at if they think you are going to run them down with a car.
o Activist fear of cars can be a reality as there have been numerous cases of irate non-participants running down protesters. Any pushing though the crowd should be done with the demeanor of patience, aggression may lead to an attempt to disable your car before it is used as a weapon.
7. Get to a safe place, and stay put. Choose a safe haven carefully. Sometimes it can be as close as your hotel room, but other times you’ll need to get out of the country entirely. If you’re abroad, you will generally want to head to your country’s embassy or the airport. Try to contact the embassy before going there, however, to let them know you’re coming and to find out if it is safe to go there. If a mob is gathered outside, embassy staff may be able to direct you to a safer place. In any case, just try to put as much distance as possible between yourself and the riot.
[edit] Tips
* If you find yourself caught and being led in a stampeding crowd, to avoid being crushed, try to climb up by digging your elbows into the shoulders of those around you. The crowd will carry you, possibly saving you from tripping and being crushed or trampled.
* Try to figure out why the riot is occurring. Knowing the cause of a riot can help you determine an appropriate response. That said, don’t waste too much time trying to investigate the cause, and don’t venture into a riot just to find out why the rioters are mad.
* Dress appropriately. If the anger of the rioters is directed toward foreigners, try to look like a local. Choose clothing that will help you blend in. If the rioters are divided into factions, however, try to appear neutral. Don’t wear clothing or carry accessories that might mark you as belonging to one faction or another. In either case, try to avoid looking conspicuously wealthy, as you are likely to draw the unwanted attention of opportunistic thieves.
* If a riot breaks out in a stadium, your response should be different depending on where you are in relation to the rioters. If you are in the midst of a riot, you should try to quickly move to an exit. Don’t run, however, and try not to jostle others. If you are at some distance from the action, stay where you are unless instructed to move by police or security personnel. Don’t rush for the exits unless you’re in imminent danger. People are frequently trampled by stampeding crowds near exits.
* When in the middle of a tear gas attack, stay out of the fire line of Police. Gas canisters fired from launchers will cause significant injury upon impact.
* Sometimes however, there can be lot of gas that you can not find a place to go before finding yourself within the cloud. Run across the wind, try to breathe as little as possible, do quick eye shots to figure out where to go and try to keep low. After coming into contact with tear gas, keep your eyes open to let the gas dissipate, and flush your eyes with clean water.
* Gas is not very heavy so you can find clearer air nearer the floor. Never touch your eyes or try to clean your tears; you will only smear them in your face causing yourself more pain.
[edit] Warnings
* Do not try to confront rioters or looters to prevent property damage. No material thing is worth your life.
* Do not approach police lines to attempt to cross to safety. Police are in place to confine the unrest and prevent its spread. Their orders are not to allow anyone to pass, and there are no exceptions except for injured officers to be evacuated. The use of riot control measures, including rubber bullets, tear gas, and water cannons originate from the police line, and the likelyhood of injury is greatest there.
* Watch your footing in a mob situation. If you stumble and fall to the ground you’re likely to be trampled. This is especially dangerous in stadiums and other enclosed areas, where many unfortunate victims have been crushed to death.
* If you fall down, pull yourself up into a ball. Protect your face, ears and internal organs. In this position you are a smaller object that can be avoided. You will receive less damage if you are stepped on. If others trip on you they will help create a larger “pile” that rioters will avoid.
* Try not to negotiate with a crowd. It is impossible. If a crowd suddenly turns their violence against you for some reasons, don’t try to convince them that you are innocent. Run!
http://www.seabeecook.com/cookery/recipes/creamb1969.htm
Creamed Ground Beef
1969 Armed Forces Recipe Service
Card no. L-30
Yield: 100 portions
Portion: 1 cup
INGREDIENTS WEIGHTS MEASURES
Beef, boneless, ground 24 lb -—
Flour, wheat, hard
Pepper, black
Salt
Soup and Gravy base, beef 2 lb
Method:
1.
Brown beef in its own fat in steam-jacketed kettle or roasting pan. Drain excess fat.
2.
Add flour, pepper, salt, and soup and gravy base to beef; mix thoroughly and cook about 5 minutes until flour is absorbed.
3.
Reconstitute milk; add to beef mixture.
4.
Add Worcestershire sauce; heat to a simmer, stirring frequently. Cook until thickened.
Notes:
1.
35 lb beef, carcass, chilled A.P. will yield 24 lb beef, boneless.
2.
Other types of milk may be used in Step 3. See Recipe Card A-9.
3.
Alternate method of preparation. In Step 2, combine flour with 1 qt (2 lb) drained fat or butter and cook 5 minutes. Add to hot milk and cook until thickened. Combine browned beef and sauce. Heat to serving temperature.
http://www.diggers.org/diggers/digbread.html
Digger Bread
(Made With Love)
Digger Bread was immediately recognizable for the shape of the one- and two-pound coffee cans that the Diggers used to bake it. I interviewed Walt Reynolds who introduced baking to the Diggers. (Some day, I hope to transcribe that interview and put it here.) Walt told me the story of Grey, the Mad Baker, a metaphor of the sixties. The guy flipped out with his day job in a suburban mall bakery, and one morning the police found him naked, throwing dollar bills and flour into the air by his mixing bowls. He only wanted to make bread, but the business angle was too much to handle. He called Walt and told him to take away the equipment. Walt had come to the Haight and hooked up with the All Saints Church group of Diggers. He used the church kitchen to teach the Diggers how to bake whole wheat bread. Fifteen years later, when I was doing non-violence trainings, we got a hold of the church for one of our sessions in preparation for occupying the Livermore Labs. I went into the kitchen and there were those beautiful ovens that the Diggers had used.
Walt told me that the Diggers were responsible for the advent of whole wheat into the hippie/counterculture. This is a remarkable assertion. I would like to know more about this hypothesis. If anyone has done any research along these lines, “sign in please.” The book Appetite for Change: how the counterculture took on the food industry, by Warren J. Belasco, certainly attributes an important role to the Diggers. However, I don’t know if anyone has specifically shown that digger bread was the first instance of using whole wheat bread (and actually proselytizing for it as demonstrated in the following leaflet).
This leaflet was two-sided, 8-1/2” by 11”. I found it in my collection after Ramon Sender sent me an email message requesting any information about recipes for digger bread. I had remembered seeing at least this leaflet (and perhaps others) so went searching. This leaflet was in one of my un-cataloged folders, with a date that indicated when I acquired it but not where. One of these days, I must ask IR to see that collection I put together and left behind so precipitously when I moved out of the commune. Until then, I have to use the xerox copies that are fading after twenty years.
Enjoy this leaflet, which is just as current today as 25 years ago. If someone was interested in setting up a Free Bakery, here are the instructions. The only things you’d need to change would be the wholesalers who aren’t around anymore (Oh’s only closed in the past few years, I live two blocks from Mission Street.)
Most inspiring quote from this leaflet:
Please take this recipe home and start making bread. The only stipulation is that you always give it away.
Free Bread
This is the recipe for the bread that is made in coffee cans at the Free Bakery. The Bakery is at All Saints Episcopal Church, 1350 Waller, on Tuesdays and Fridays from 9 a.m. on. For information or to make donations, call Mary McClain, 362-6374, or Father Harris at the Church, 621-1862. Contributions can be mailed to Father Harris at 1350 Waller.
We get our flour in 100-lb sacks from several sources. The first we try is Whitman’s Salvage, 1350 Egbert, Hunter’s Point. They sell flour from damaged sacks, very cheaply. Then, if they don’t have the whole-wheat flour we use, we go to two wholesale places: Fisher’s Flouring Mills, 1566 Carroll, and Coast-Dakota, 1588 Carroll (two blocks from Whitman’s). Another place that sells flour in 100-lb sacks, but retail, and open on Saturday’s, is Oh’s (California Direct Importing Co.), 2651 Mission at 23rd. Finally, many whole grains and special mixes are available at the Food Mill, 3033 MacArthur, Oakland (near Fruitvale). Some grains can be found at health food stores such as Far Fetched Foods (1915 Page, SF) and Sunset Health Foods (9th Avenue, SF). We also use quantities of dry milk, brown sugar, honey, molasses, margarine, jam, and tea. These things can be bought cheaply at Whitman’s, Big Bonus (Howard St. near 7th or Potrero Hill)), or Co-op on Third St. near Paul Ave.
We bake in 2-lb coffee cans and sometimes 1-lb cans. This recipe makes one loaf in the 2-lb can and two in the 1-lb cans.
WET MIXTURE:
2-1/2 cups warm water (not over 85 degrees - it it’s too hot it will kill the yeast, which can survive at freezing but not at high temperatures)
1 cake or package of yeast (this is still enough if recipe is doubled, tripled)
1 tablespoon flour 1 tablespoon sugar, honey, molasses (more may be added, or some of each - we like to use molasses because it’s so rich in minerals and vitamins)
This can be mixed in your 1-lb coffee can - 2 cups water fills it to the middle line.
Let the wet mix stand while preparing the dry ingredients.
DRY MIXTURE:
1 level 1-lb coffee can whole-wheat flour, or 4 cups
2 teaspoons salt, or to taste
1/4 to 1/2 cup dry milk
MIXING THE TWO: In a large bowl mix the wet mixture into the dry mixture. Let the dough stand in the bowl until it rises by half, about two hours. The bowl should be put in a warm place, such as over the pilot light on top of your stove, and it should be covered. Again, too much heat will kill the yeast, but at about 80 degrees it is at peak activity.
THEN KNEAD (see below), drop into a greased coffee can - the 2-lb can takes 2-1/2 lbs dough, the 1-lb can about 1-1/4 lbs - after shaping the dough into a ball making sure no flour is on the surface. Let rise again until it’s just getting to the top of the can, about 45 min.
BAKE at 390 degrees for the 1-lb can, 55 minutes; or 400 degrees for the 2-lb can for 60 minutes. Oven should be preheated.
KNEADING AND GLUTEN: This is what bread is all about. Yeast is not necessary for bread (macrobiotic and many other kinds of bread, especially Middle Eastern and Indian, do not contain yeast) but kneading, which causes gluten to develop, is. Gluten is a protein substance contained in the grain and released by milling and increased by kneading. It is elastic (same root as glue) and makes the fibers of dough able to stretch without breaking; these stretched fibers make little pockets to hold in bubbles of gas formed by the action of the yeast, and thus the bread rises. If yeast is not used, you still notice that kneading changes the character of the dough, makes it “breadlike” and not crumbly.
HOW TO KNEAD: Turn out the dough after it has risen two hours in the bowl onto a floured surface. Work it with the heels of your hands, pushing and stretching it. Keep just enough flour on the board and your hands to prevent sticking. Push at it until it begins to push back - in other words until it has developed gluten and gets elastic. Keep on until it doesn’t stick any more, looks shiny, stretches without breaking when you pull it apart, holds the indentation made when you poke your finger in, instead of closing up on it. Caution: several of these tests can be passed by dough that has had too much flour added. Keep the dough soft, adding only enough flour to prevent sticking. But it may take another 3/4 cup of flour in the kneading, depending on the kind of flour you used, etc. The whole thing should take 10 to 15 minutes.
NOTE ON FLOUR: The freshest flour makes the best bread. Besides tasting best, it has more gluten. You can mill the grain yourself if you have an electric coffee grinder. It comes out slightly coarse, with all the wheat germ in it (commercial flour has the oily wheat germ removed because it can go rancid if it is stored for a long time) and needs very little kneading because of the high gluten content.
Whole wheat flour will make a loaf of bread without any additions. Coarsely-ground flours, such as stone ground, can be used for all the flour in a loaf but unless they are very fresh they don’t develop quite as much gluten and so are often mixed with a fine-ground wheat flour. Rye flour hardly has any gluten at all, so must be mixed in order to rise. White flour, or bleached whole-wheat, is not allowed for Free Bread.
We generally put in one or two of several additions: wheat germ, soy flour (high in protein), various kinds of meals. You can experiment, starting out with perhaps 1/4 to 1/3 by weight of germ, other flours, meals. And then there are raisins, other kinds of fruit, honey, and so on.
Milk: If you use regular milk, scald it first (bring it to a boil) to kill bacteria, then cool to lukewarm (so it won’t kill the yeast). Be sure to change it to a wet ingredient and adjust proportions accordingly.
Please take this recipe home and start making bread. The only stipulation is that you always give it away.
If you wish to start your own bakery, here is the recipe for twelve loaves. At the Bakery we mix up about ten or twelve of these batches during the day, keeping two ovens going with loads of twelve loaves coming out every half hour.
WET MIX:
6 quarts water (80 degrees)
1/5 pound yeast
1/2 cup flour
1/2 cup sugar
Molasses, if you have it, is added to wet mix.
Alternative for at least 5 batches: Mix 1 pound yeast with 10 quarts water, 1 cup flour, 1 cup sugar. Take 2 quarts of this yeast water for every batch, adding 4 quarts lukewarm water.
DRY MIX:
15 lbs flour (5 2-lb coffee cans or 3 Co-op 5-lb sacks)
1 lb sugar (3-1/2 cups)
1 lb dry milk (3 cups)
6 heaping T salt
Substitute other flours, meals here. Brown sugar works fine. Wheat germ too. 2 cans of substitutions for the flour is about right.
Let rise in the mixing container (we use plastic garbage pails) for two hours (same as for small recipe), then get in 5 or 6 friends to help knead. We use a scale to weigh the finished balls of dough (2-1/2 or 1-1/4 lbs) to be dropped in the cans. Rising and baking times the same as for small recipe.
[Document uploaded May 18, 1996]
Last updated May 25, 2007
Home page located at: http://www.diggers.org
http://www.foodtimeline.org/foodcookies.html#lemonbars
Chocolate chip cookies
Ruth Wakefield [June 17, 1903-January 10, 1977], Whitman Mass., is credited for inventing chocolate chip cookies at her Toll House Restaurant in the early 1930s. According to the story, Ruth used a Nestle candy bar for her chips. We will probably never know if Ruth was the very first person to put chocolate pieces in cookies, but she is certainly the one who made them famous. Nestle began marketing Ruth’s chocolate chip cookies to the general public in 1941. The caption under the photograph printed by the New York Times (January 2, 1985 I 12:5) describing the fire that destroyed Ruth Wakefield’s kitchen the reads “Wreckage of Toll House Restaurant in Whitman, Mass. It was where the chocolate chip cookie was invented.” In the July, 1997 Governor Weld signed legislation that declared chocolate chip cookies to be the *official cookie of the Commonwealth* in honor or Ruth Wakefield (much to the dismay of the Fig Newton faction).
Mrs. Wakefield’s original recipe
“Toll House Chocolate Crunch Cookies
Cream 1 cup butter, add 3/4 cup brown sugar, 3/4 cup granulated sugar and 2 eggs beaten whole. Dissolve 1 tsp. Soda in 1 tsp. Hot water, and mix alternately with 2 1/4 cups flour sifted with 1 tsp. Salt. Lastly add 1 cup chopped nuts and 2 bars (7-oz.) Nestles yellow label chocolate, semi-sweet, which has been cut in pieces the size of a pea. Flavor with 1 tsp vanilla and drip half teaspoons on a greased cookie sheet. Bake 10 to 12 minutes in 375 degrees F. Oven. Makes 100 cookies.”
-—Toll House Tried and True Recipes, Ruth Wakefield [M. Barrows:New York] 1947 (p. 216)
The Hershey’s 1934 Cookbook contains a recipe for “Chocolatetown chip cookies” (p. 75) that includes a 12 ounce package of Hershey’s Baking Chips.
Ms. Wakefield’s cookbook collection is currently located at the Henry Whittemore Library of Framingham State College (MA).
http://www.foodtimeline.org/foodcookies.html#lemonbars
MEXICAN WEDDING CAKES
The cookie is old, the name is new. Food historians place the first recipes named “Mexican wedding cakes” in the 1950s. Why the name? Our books and databases offer no explanations. Perhaps timing is everything? Culinary evidence confirms Mexican wedding cakes are almost identical to Russian Tea Cakes. During the 1950s and 1960s relations between Russia and the United States were strained. It is possible the Cold War provided the impetus for renaming this popular cookie. Coincidentally? This period saw the mainstreaming of TexMex cuisine into American culture.
“Mexican wedding cake. A buttery, melt-in-your-mouth cookie that’s usually ball-shaped and generally contains finely chopped almonds, pecans or hazelnuts. It’s usually rolled in confectioners’ sugar while still hot, then again after the cookie has cooled. Many countries have their own rendition of this rich cookie. Two versions are Russian tea cakes and Spain’s polvornes.”
-—Food Lover’s Companion, Sharon Tyler Herbst, 3rd edition [Barron:New York] 2001 (p. 385)
“Mexican wedding cakes. These cookies masquerade under several names—Butterballs, Russian Tea Cakes, Swedish Tea Cakes, Moldy Mice. “Butterballs” is easy enough to explain—these little balls are buttery—but I have no idea how they came by their other pseudonyms. The are also known sometimes as Pecan Sandies, although true sandies are nearer shortbread. Mexican Wedding Cakes were a community cookbook staple throughout the 50s and 60s...”
-—American Century Cookbook: The Most Popular Foods of the 20th Century, Jean Anderson [Clarkson Potter:New York] 1997 (p. 481)
[NOTE: Ms. Anderson provides a recipe in her book.]
The oldest recipe we have for Mexican wedding cookies was published in 1951.
[1951]
“Mexican Wedding Cakes
1/2 cup butter or margarine
1/4 cup confectioners’ sugar
1 cup sifted all-purpose flour
1/2 cup chopped nuts
1 teaspoon vanilla
Cream butter with sugar. Add flour gradually, beating well after each addition. Add nuts and vanilla and blend. Shape into crescents, place on an ungreased cooky sheet. Bake in slow oven (325 degrees F.) for 15 to 18 minutes. Approximate yield: 4 dozen crescents. Crisp little things, ready to break in the mouth, melting richly on the tongue.”
-—”Quick-as-a-Wink Dishes,” Clementine Paddleford, Los Angeles Times, April 29, 1951 (p. G27)
[1955]
“Mexican Wedding Cakes (a variation of Nut Butter Balls)
Nut Butter Balls
1 cup soft butter or margarine
1/4 to 1/2 cup granulated or confectioners’ sugar
1/2 teaspoon salt
1 teaspoon almond extract; or 2 teaspoon vanilla extract
2 cups sifted all-purpose flour
1 to 2 cups finely chopped or ground walnuts, pecans, almonds, black walnuts, Brazil nuts, or filberts.
Mix butter with sugar until very light and fluffy. Add salt, extract, flour, nuts; mix well. Refrigerate until easy to handle. Start heating oven to 350 degrees F. Shape dough into 1” balls or 1” to 2” X 1/2” rolls, triangles, or crescents. Place on ungreased cookie sheet. (Or drop by level tablesoonfuls onto cookie sheet.) Bake 12 to 15 minutes, or until light brown. While cookies are warm, roll in granulated or confectoners’ sugar, fine cookie crumbs, or cinnamon and sugar. Makes 4 to 5 dozen.
Mexican Wedding Cakes: With bottom of tumber dipped into flour, flatten each 1” ball. Bake at 325 degrees F. 12 minutes. While cookies are warm, sprinkle with confectioners’ sugar.”
-—Good Housekeeping Cook Book, Dorothy B. Marsh editor [Good Housekeeping Book Division:New York] 1955 (p. 479)
[NOTE: this book does not contain a recipe for Russian Tea Cakes.]
[1956]
“Russian Teacakes, Crunchy, sugared, nut-filled snowballs
This favorite with men came to us from a man. Carl Burkland, an eastern radio executive, often makes them himself at Christmastime.
Mix thoroughly...1 cup soft butter, 1/2 cup sifted confectioners’ sugar, 1 teaspoon vanilla
Sift together and stir in....2 1/4 cups sifted Gold Medal Flour, 1/4 teaspoon salt
Mix in...3/4 cup finely chopped nuts
Chill dough. Roll into 1” balls. Place on ungreased baking sheet (cookies to not spread). Bake until set, but not brown. While still warm, roll in confectioners’ sugar. Cool. Roll in sugar again.
Temperature: 400 degrees F. (Mod. Hot oven).
Time: Bake 10 to 12 minutes
-—Betty Crocker’s Picture Cook Book, Revised and Enlarged, Second Edition (Third Printing) [McGraw-Hill Book Company:New York] 1956 (p. 220)
[1963]
“Russian Teacakes
Sometimes called Mexican Wedding Cakes
1 cup butter or sifted margarine
1/2 cup sifted confectioners’ sugar
1 tsp. Vanilla
2 1/4 cups Gold Medal Flour
1/4 tsp. Salt
3/4 cup finely chopped nuts
Mix butter, sugar, and vanilla thoroughly. Measure flour by dipping method...or by sifting. Stir flour and salt together; blend in. Mix in nuts. Chill dough. Heat oven to 400 degrees F. (Mod.hot). Roll dough in 1” balls. Place on ungreased baking sheet. (Cookies do not spread.) Bake 10 to 12 min., or until set but not brown. While still warm, roll in confectioners’ sugar. Cool. Roll in sugar again. Makes about 4 doz. 1” cookies. Note: Do not used Gold Medal Self-Rising Flour in this recipe.”
-—Betty Crocker’s Cooky Book, General Mills, facsimile 1963 edition [Hungry Minds:New York] 2002 (p. 25)
A survey of historic American recipes indicates sand tarts, as we know them today, may have descended from simple sugar cookies. Food historians do not offer definative information regarding the genesis of the recipe’s name. Perhaps it was inspired by the color of the finished product?
[1886]
“Sand Tarts
1 pound of granulated sugar
Yolks of three eggs
1/2 pound of butter
Whites of two eggs
Flour enough to make a stiff paste
Beat the butter and sugar together; add the yolks beaten to a cream, then the whites well beaten; mix all well together, and add the flour. Roll out on a baking-board, cut with a round cutter, and bake in a moderate oven until a light brown.”
-—Mrs. Rorer’s Philadelphia Cook Book, Mrs. S.T. Rorer [Arnold and Company:Philadelphia] 1886 (p. 498)
[1896]
“Sand tarts, Boston Cooking School Cook Book, Fannie Merritt Farmer
[1931]
“Sand tarts
1/2 cup butter
3/4 cup light brown sugar.
1 egg.
2 cups sifted flour.
2 teaspoons baking powder.
1/4 teaspoon salt.
1 teaspoon cinnamon.
3 tablespoons granulated sugar.
Halved almonds or pecans.
Cream together the butter and brown sugar, and add the well-beated egg. Sift together the flour, baking powder, and salt, and add to the first mixture. On a lightly floured board make a roll of the dough about 3 inches in diameter. Wrap in waxed paper and let stand for several hours or overnight in a cold place. In the morning slice wafer thin with a sharp knife, and sprinkle with a mixture of the cinnamon and granulated sugar. Press a nut in the center of each cookie. Bake in a moderate oven (350 degrees F.) For about 10 minutes, or until lightly browned. Store in air-tight containers.”
-—Aunt Sammy’s Radio Recipes Revised, Bureau of Gome Economics, U.S. Department of Agriculture [United States Government Printing Office:Washington DC] 1931 (p. 119)
Russian tea cakes
The typical Russian Tea Cake recipe calls for butter, eggs, flour, salt, vanilla, nuts (walnuts, almonds, pecans, hazelnuts) and confectioner’s sugar. This particular combination of ingredients essentially dates back to the Jumbles baked in Medieval Europe (minus the vanilla).
Noble Russian cuisine (along with every other facet of noble life) was influenced by prevailing French customs during the 18th century. Tea was first introduced to Russia in 1618, but the Russian tea ceremony of samovars and sweet cakes was a legacy of Francophile Catherine the Great in the 18th century. It is interesting to note that A Gift to Young Housewives, Elena Molokhovet [1870s popular Russian cookbook] contains plenty of recipes for a variety of small baked goods, none specifically entitled Russian tea cakes. There are, however, several recipes which use similar ingredients. If you want to examine these recipes you are in luck. Gift fo a Young Housewife has recently been reprinted [in English with extensive notes provided by Joyce Toomre] by Indiana University Press (1992). Your librarian can borrow a copy for you.
If you want to contribute sweet treats for a traditional Russian tea ask your librarian to help you find The Art of Russian Cuisine, Anne Volokh. If you need something right now check out these recipes.
About Russian tea
http://www.rispubs.com/article.cfm?Number=193
Author: Linda DeLaine
Publication: Website
Date: Thursday, March 15, 2007
Summary: Tea was brought to Russia in the 1600s from China. Since then, the brew and its implements have become an enduring tradition of Russian society. The tea ceremony itself bonds families and communities
continued.
http://www.foodtimeline.org/foodcookies.html#lemonbars
No-bake cookies
Food historians tell us unbaked confections composed of nuts, dried fruit, seeds and sweeteners were made by ancient Middle eastern cooks. “No bake” candies, as we Americans know them today, surfaced in cookbooks published during the Great Depression. Like their ancient counterparts, contemporary “No Bakes” contain dried/desiccated fruit, nuts, and/or seeds glued together with a sugar (honey, Karo) or fat (peanut butter, butter, margarine). No bake cookies (generally pressed into a pan and cut in squares/bars) descend from the same tradition. These recipes appear in the 1950s. The primary difference between bake and no bake’ recipes (besides the obvious oven time, of course!) is the “no bakes” do not contain eggs or flour. They are not intended to rise.
A brief survey of American “no bake” recipes through time
[1936]
“Date Balls.
Stone: 1 pound dates, or use 1/2 pound seeded dates Put them through a food chopper with: 1 cup chopped pecan meats Add: 1/4 teaspoon salt Shape the candy into tiny balls. Roll them in: Powdered sugar.”
“Persian Balls.
Remove the seeds from: 1 pound dates, or use 1/2 pound seeded dates Cut the stems from 1 pound dried figs Put these ingredients thorugh the coarsest cutter of a meat grinder with: 1 pound seeded raisins, 1 pound pecan meats, 1/3 pound crystallized ginger Shape these ingredients into balls. Roll them in: Powdered sugar.
-—The Joy of Cooking, Irma S. Rombauer [Bobbs-Merrill:Indianapolis IN] 1936 (p. 543)
[1942]
“Fruit Cookies (Unbaked)
1 lb. raisins
1 lb. figs
1 lb. dates
1 lb. cooked prunes
1 c. nuts
1 lb. graham crackers
2 tb. lemon juice
2 tb. honey
Grind fruit and nuts; add lemon juice and honey. Mix thoroughly and make into roll. Keep in refrigerator. Serve thin slices.”
-—Granddaugher’s Inglenook Cookbook [Bretheren Publishing House:Elgin IL] 1942 (p. 51)
[1952]
“Honey Bars
2 Cups Raisins
1 Cup Mixed Nuts
1/4 Cup Honey
Grind raisins and nuts. Mix with honey and press into sheet 1/2 inch thick. Cover, and place weight on top for 24 hours. Cut in bars. Roll in white or colored coconut.”
“Raisin Peanut Balls
1/2 Cup Peanut Butter
1 Cup Raisins
1 Tablespoon Lemon Juice
1/4 Cup Powdered Sugar
1/2 Cup Shredded Coconut
1/4 Teaspoon Salt
Plumb raisins by steaming. Drain and chop. Roll coconut into fine pieces. Toast to a light brown in moderate oven (370 degrees F.). Mix peanut butter, sugar, lemon juice, cinnamon, salt, and raisins. Blend thoroughly. Shape into small balls. Roll in toasted coconut.”
-—Searchlight Recipe Book, Ida Migliaria, et al [Household:Topeka KA] 1952 (p. 81)
[1962]
“No-Bake Cookie Balls
1 pkg. Semisweet chocolate pieces (1 cup)
3 tablesp. White corn syrup
3 cups sifted confectioners’ sugar
1 cup chopped walnuts
2 teasp. instant coffee
1/3 cup hot water
1 3/4 cups finely crushed packaged vanilla wafers (about 3 doz.)
1/2 cup sifted confectioners’ sugar.
In double boiler over hot, not boiling, water, melt chocolate; remove from heat. Mix in syrup, 3 cups sugar, nuts, coffee dissolved in hot water, wafer crumbs. Form into 1” balls. Roll in 1/2 cup sugar. Store in covered container a day or so to ripen. Makes about 5 doz.”
-—Good Housekeeping Cook Book, Dorothy B. Marsh [Good Housekeeping:New York] 1962 (p. 480)
[NOTE: It is interesting to note mid-1950s “no bake” recipes typically employ popular packaged/processed items. Perhaps the idea was a timely treat promoted by food companies? The earliest mention we find for “no bake” cookies was printed in the Good Housekeeping Cook Book, 1962 (copyright 1955).]
[1963]
Holiday Apricot Balls
1 pkg. (8 oz.) dried apricots, ground or finely cut
2 1/2 cups flaked coconut
3/4 sweetened condensed milk
1 cup finely chopped nuts
Blend apricots, coconut, and milk well. Shape in small balls. Roll in chopped nuts. Let stand about 2 hr. to firm. Makes about 5 doz. balls.”
-—Betty Crocker’s Cooky Book, facsimile 1963 edition [Hungry Minds:New York] 2002 (p. 135)
http://www.foodtimeline.org/foodcookies.html#lemonbars
Biscuits
The answer to where biscuits originated depends on the kind of biscuit you are thinking about. In some countries the word biscuit historically refers to a hard cookie or cracker. In the United States biscuits are generally small soft, yeast-based products served with breakfast or dinner. They perform a variety of functions including filling (hungry bellies), topping (eg. pies) and sopping (eg. biscuits & gravy). Cowboy-style biscuits were rustled up by pioneers and overland travelers in makeshift ovens. Cathead biscuits and beaten biscuits are two popular American regional favorites. Refrigerator biscuits (packed in a tube, ready to bake) debuted in 1931.
“Biscuit...The word derives from the Latin words “bis” (twice) plus “coctus” (cooked). In England a biscuit is what Americans usually call a cracker or cookie. The American meaning for biscuit was first noted by John Palmer in his Journal of Travels in the United States of North America, and in Lower Canada, (1818), and by 1828 Webster defined the confection as “a composition of flour and butter, made and baked in private families.” In general usage such puffy leavened little breads were called “soda biscuits” or “baking-soda biscuits,” in contrast to the unleavened cracker type....Recipes for soda biscuits are found in every ninetheenth-century cookbook, especially with reference to the cookery of the South...The South is also the home of the beaten biscuit, which was first mentioned in 1853...In 1930 General Mills began selling a packaged quick biscuit mix called Bisquick that was a great success and spawned many imitators.”
-—The Encyclopedia of American Food and Drink, John F. Mariani [Lebhar-Friedman:New York] 1999 (page 29) Cathead biscuits
Huge as a cat’s head, served up hot with with Sawmill Gravy. An Appalchian down-home favorite!
“There, in the Blackstone kitchen, Berry’s grand chefs, Vernie and Floyd Nabors, turned out Sunday morning biscuits that melted in one’s mouth. Particularly if you opened one up and added fresh butter along with the generous portion of the Berry-made apple butter...One of my classmates put it for me in hushed tones: “What you see there, Joe, is what we call the Cathead Bsicuit, the gift of an all-knowing and benevolent God.” Mountain people, he explained, were particularly partial to the giant-size biscuits, which were destined by the Almighty to go with milk-enhanced sawmill gravy, another mountain favorite...Indeed the “cathead”—an Applachian phenomenon—was the precursor to the even larger size biscuits offered today by chains such as Hardee’s and Mrs. Winner’s. The big difference between regular-size buttermilk biscuits and the catheads was that with most “cats,” the cook pinched off handfuls of dough rather than rolling it out and using a biscuit cutter...
Bryson City Cathead Biscuits
2 1/4 cups flour
1/3 teaspoon baking soda
1 teaspoon salt
2 teaspoons baking powder
5 tablespoons lard
1 cup buttermilk.
Sift and mix dry ingredients then blend with lard. Add buttermilk. For each biscuit, pinch off a portion of dough about the shape of a large egg and pat out with your hands. Bake in 350 degree F. oven in wood stove about 10 minutes. In a modern electric or gas oven, bake at 475 to 500 degrees.”
-—Smokehouse Ham, Spoon Bread, & Scuppernong Wine, Joseph E. Dabney [Cumberland House:Nashville TN] 1999 (p. 114-5)
“Sawmill gravy (or Logging gravy). In the years following the turn of the century, logging camps sprang up all over the Smoky Mountains where timber companies had bought up tracts of virgin timber. Lumberjacks and sawmillers by the hundreds came in to snake out the logs to nearby streams, sawmills, and newly built railheads. Entire families moved in with the men to the camps. To feed the multitude was a big challenge. Breakfasts usually consisted of coffee and meat plus flour-based gravies and large “cathead” biscuits. On e day, the story goes, the Tremont camp ran out of flour and had to substitute cornmeal in the gravy. Inquisitive loggers arriving before breakfast asked what kind of gravy was on the menu that day. “This gravy’s made out of sawdust!” the cooks replied. The name stuck. The cheap, easy-to-fix cornmeal gravy caught on. While “sawmill gravy” was the popular nickname, some called itn “Logging Gravy.” Others named it Poor Do or Life Everlasting, a reference to what many felt was its role in keeping them alive. This recipe adapation comes from Janice Miracle of Middlesboro, Kentucky...
“Life Everlasting” Sawmill Gravy
3 heaping tablespoons white cornmeal
1 tablespoon bacon drippings
1/2 teaspoon salt
2 1/4 cups milk
A dash of pepper
In a frying pan, combine cornmeal, bacon drippings, and salt. Stir until brown. Add milk and let boil until gravy thickens. Stir forcefully to keep gravy from pumping. Add pepper to taste.”
-—ibid (p. 207-8)
Cowboy biscuits
The two main types of biscuits made by chuckwagon cooks were soda and sourdough. Their only method for baking was the Dutch oven. This portable iron pot sat up from the fire on three small feet. This allowed air to flow through the bottom. The lid was lipped, making it easy to pile heated rocks on top for more even baking. It was reliable but had no scientific temperature controls.
“Baking powder biscuits
3 cups flour
6 teaspoons baking powder
3 tablespoon fat (lard or bacon drippings)
Approx. 1 cup of milk
1 teaspoon salt
1 tablespoon sugar
Sift together dry ingredients, then rub in lard with fingertips, until flaky. Pour about a cupful milk to moisten. Turn out on well floured board and pat about 1/2 inch tricknesss. Cut with biscuit cutter and place in greased dutch oven that has been slightly preheated. Biscuits should be touching but not crowded. Place preheated lid on oven and cover with hot coals. Place on bed of good red coals and let bake about twenty minutes or until brown on top and bottom.”
—Clair Haight, Hashknife Outfit, Winslow AZ, 1922 (reprinted in: Chuck Wagon Cookin’, by Stella Hughes [University of Arizona Press:Tuscon AZ] 1974 (p. 123))
“Mrs. E.’s soda biscuits
2 cups flour
1/2 teaspoon baking soda
1/2 teaspoon salt
1 teaspoon cream of tartar
2 tablespoons lard or margarine
3/4 to 1 cup milk
Sift dry ingredients together. Add and cut into flour mixture. Add milk, a little at a time, stirring with a fork. Add as much of the milk as necessary to make a very soft dough. Roll out 1/2 inch and cut with a small biscuit cutter. Bake at 425 degree for 15-20 minute. Makes 15 biscuits.”
The above recipe is adapted from this original text (notice the lack of oven temp!): “1 quart flour, 2 heaping tablespoonfuls lard, 2 cups sweet milk, or you can take can milk, 1 teaspoonful soda, 2 teaspoonfuls cream of tartar, 1 teaspoonful salt. Rub soda and cream of tartar into flour dry. Next the lard. Lastly the milk. Work with as little handling as possible. The dough should be very soft. Cut more than half inch thick and bake in a quick oven.”
-—An Army Wife’s Cookbook, Alice Kirk Grierson (recipes collected 1850s-1870s).
ABOUT BISCUITS & GRAVY
Biscuits and gravy is traditionally connected to the American South. Althought it can be served at any meal, the most popular meal appears to be breakfast. Historic cookbooks contain many recipes for biscuits but no information with regards to smothering them with gravy. Perhaps it was “understood.” Most cookbooks stress serving biscuits HOT from the oven, with butter. We find notes referencing the combination of biscuits and gravy in current southern-American cookbooks. Sadly, they do not impart much in the way of history. This book sums it up best:
“Eggs fried in bacon drippings, escorted by country ham, hot biscuits, grits with butter and red-eye gravy, and a cup of coffee so hot that the less acquainted might term it “scalding”—these aren’t merely the makings of a Southern breakfast, they’re the substance of a Southern lifeblood...Southerners can probably thank the English for their skepticism toward “fancy” food in general and for the notion that breakfast isn’t really breakfast unless it contains meat and grains—in quantity. The English colonists brought with them their preference for puddings, porridge, meat pies, beef, mutton, and pork. In fact , the appearance of ham on the breakfast plates of Southeners can probably be traced to the first pigs that were carried from England to Jamestown, Virginia in 1608...Even after the Civil War, when many Southerners were attempting to modify their image and also their food, pork and pone continued to be inextricably bound together on many breakfast tables...The Southern breakfast saw its heyday during the plantation era of the eighteenth and nineteenth centuries—when breakfast was the first and most substantial meal of the day. As Southern lore has it, planation owners generally would begin the day wiht a julep or brandy, then inspect the crops, and sit down to a large breakfast at ten AM...”
-—Around the Southern Table, Sarah Belk [Simon & Schuster:New York] 1991 (p. 335-6)
[NOTE: This is an excellent book full of history snippets and traditional recipes. Your librarian can help you find a copy.]
“Red-eye gravy served with ham and grits is arguably the most “Southern” of any Southern breakfast combination. The origin of the name of this gravy, however, is somewhat mythical. According to one theory, Andrew Jackson once asked a cook for gravy as red as the cook’s eyes. Another source purports that the appearance of a “red eye” in the middle of a pan of a correctly made ham gravy reduction is what gives this sauce its name. The propular way to make it is perhaps equally contentious...Served on hot toasted cornbread, this makes a delightful breakfast.”
-—ibid (p. 347)
About milk gravies
Sauce/gravy recipes were introduced to the New World by European settlers. These ranged from very simple fat & flour combinations to complicated French reductions. Milk/cream based gravy [aka white gravy] was among the simpler concoctions. This vesatile gravy adapted easily to “ingredients at hand” which made them popular with folks facing hard times. They were quick to make, easy to store, added flavor to otherwise basic foods, and filled the belly. Milk gravy recipes appear in American cookbooks from colonial days to present. This evidence suggests they were not “invented” during the Civil War. They were, however, likely adapted to incorporate whatever ingredients were available at the time. In modern times, milk gravy was sometimes made with manufactured products, such as dried/canned milk or cream. As with most gravy/sauce recipes, there are dozens of variations.
About milk gravy in Kentucky
“Even the name [sawmill gravy] suggests poverty. By some accountis, it derives from the fact that sawmill crews often subsisted on little more than coffee, biscuits, and gravy. In some parts of Kentucky, this dish was called poor-do—a little something on which the poor made do. Native Kentuckian Jane Brock Woodall recalls that her grandmother in Casey County made the gravy from sausage or chicken dregs, and when there was not enough food to go around, the men ate first and got whatever meat there was and the women and children got by on poor-do. Elsewhere, people would have shunned anything called poor-do or even sawmill gravy ate essentially the same thing and called it white gravy or cream gravy. By whatever name, it was and is a flavorful and familiar dish on many Southern tables.” -—John Eggerton, Southern Food ...In the years following the turn of the century, logging camps sprang up all over the Smoky Mountains...To feed the multitude was a big challenge. Breakfasts usually consisted of coffee and meat plus flour-based gravies and large “cathead” biscuits.”
-—Smokehouse Ham, Spoon Bread and Scuppernong Wine: The Folklore and Art of Southern Appalachian Cooking, Joseph E. Dabney [Cumberland House:Nashville TN] 1998 (p. 207)
[1839]
“White or Drawn Gravy.
This kind of gravy, to avoid expense and trouble, should be made of the liquor in which fresh meat, poultry or game has been boiled. Put it away in a covered vessel, and in cold weather it will keep good for several days: then, by adding the different catchups, &c., with a little butter, flour and cream to thicken it, you can have nice gravy in a few minutes’ warning; and besides that, it is saving what otherwise might be thrown away.”
-—The Kentucky Housewife, Mrs. Lettice Bryan (facimile 1839 reprint) [Image Graphics:Paducah KY] (p. 164)
General observations on biscuits & gravy. Interested in biscuits & chocolate gravy?
About beaten biscuits
These unusual biscuits are generally connected with the mid-Atlantic and southern Appalachian regions. Marlyand Beaten Biscuit recipes are good examples. Food historians trace the practice of “beating” bread to England, possibly as far back as the 16th century.
“Recipe for soda biscuits are found in every nineteeth-century cookbook, especially with reference to the cookery of the South, where biscuits with ham remain a specialty. The South is also home of the “beaten biscuit,” which was first mentioned in 1853. This curious confection, known in Maryland as a “Maryland biscuit,” is rarely made today, but was once common in the South,where the sound of a mallet beating the biscuit dough was a nostalgic morning sound.”
-—Encyclopedia of American Food and Drink, John F. Mariani [Lebhar-Friedman:New York] 1999 (p. 29) Mr. Mariani lists the sources he uses in The Encyclopedia of American Food and Drink at the end of his book. The 1853 reference for [Maryland Beaten Biscuits is this:
“1853 (1982) Lea, Domestic Cookery 69: MD, Maryland Biscuit. Rub half a pound of lard into three pounds of flour; put in a spoonful of salt, a tea-cup of cream, and water sufficient to make it into a stiff dough; divide it into two parts, and work each well till it will break off short, and is smooth; (some pound it with an iron hammer, or axe;) cut it up into small pieces, and work them into little round cakes.”
-—Dictionary of American Regional English, Frederic G. Cassidy chief editor, Volume III I-O [Cambridge MA:Belknap Press of Harvard University Press] 1996 (p. 528)
“Beaten biscuits are, like grits, very much of a mystery to the uninitiated. They may be the forerunner of the modern raised biscuit, but these chewy, unleavened morsels resmeble more the hard tack produced by early European bakers for armies and navies than anything else served up in the modern South. Pilot bread and sea biscuit are terms for similar breads that reflect their practical use. Country ham was for some time wedded the beaten biscuit in Southern cuisine. At the most traditional fancy parties and weddings, biscuits no bigger than a quarter are invariably served up with baked, cured ham sliced as thin as imaginable sandwiched inside and spiked with mustard. Otherwise, beaten biscuits are rarely seen anymore. They sound harder to make than they are...those who enjoy a physical relationship with their doughs should be in heaven here. There is no getting around the activity. Fifteen minutes of heavy, consistent abuse is the minimum. You can use a rolling pin, a hammer, the side of an axe; whatever, it must be heavy...In the old days, the dough was beaten on a tree stump in the yard. When properly beaten, the dough will blister at each blow. it will develop a strange plastic quality and be smoother than any other bread dough you have ever seen...The biscuits, when done, will be dry throughout, yet soft in the middle.”
-—Biscuits, Spoonbread, and Sweet Potato Pie, Bill Neal [Alfred A. Knopf:New York] 1996 (p. 39)
Culinary evidence confirms beaten biscuits (aka Maryland Beaten Biscuits, Maryland Biscuits, Apoquiniminc Cakes, Hard Biscuits) predate 1853. Early recipes required butter and likely produced specimens similar to plain biscuits (sugarless sugar cookies). Mid-19th century recipes employed lard, an economical alternative. This would have produced a cruder product, a little lighter than hard tack. What an interesting declination of food preparation!
Compare these recipes:
[1596]
“To Make Fine Biscuit Bread
Take a pound of fine flour, and a pound of sugar, and mingle it together [with] a quarter of a pound of aniseeds, four eggs, [and] two or three spoonfuls of rose water. Put all thse into an earthen pan and with a slice of wood beat it the space of two hours. Then fill your moulds half full. Your moulds must be made of tin. Then let it into your oven, being so hot as it were for cheat bread. Let it stand one hour and an half. You must anoint your moulds with butter before you put in your stuff. And when you will occupte [make use] of it, slice it thin and dry it in your oven, your oven being no hotter than you may abide your hand in the bottom.”
-—The Good Housewife’s Jewel, Thomas Dawson, with an introduction by Maggie Black [Southover Press:East Sussex] 1996 (p. 79)
[1817]
“Hard biscuits
“Warm two ounces of butter in as much skimmed milk as will make a pound of flour into a very stiff paste, beat it with a rolling pin, and work it very smooth. Roll it thin, and cut it into round biscuits; prick them full of holes with a fork. About six minutes will bake them.”
-—The Female Instructor: or Young Woman’s Guide to Domestic Happiness, [Thomas Kelly:London] 1817 (p. 473)
[1824]
“Apoquiniminc Cakes.
Put a little salt, one egg beaten, and four ounces of butter, in a quart of flour; make it into a paste with new milk, beat it for half an hour with a pestel, roll the paste think, and cut it into round cakes; bake them on a gridiron and be careful not to burn them.”
-—The Virginia Housewife, Mary Randolph, facsimile 1824 edition with Historical Notes and Commentaries by Karen Hess [Columbia:University of South Carolina Press] 1984 (p. 170)
[1853]
“Maryland Biscuit.
Take any quantity of flour you think the size of the family may require; put in salt, and a lump or table-spoonful of good lard; rub it well in the flour; then moisten it with new milk, work it well, and beat it with a rolling-pin until perferctly light. On the lightness depends the goodness of the biscuit. Bake rather slowly, a light brown.”
-—Cookery as it Should Be: A New Manual of the Dining Room and Kitchen, A Practical Housekeeper and Pupil of Mrs. Goodfellow [Willis P. Hazard:Philadelphia] 1853 (p. 184)
[1857]
“Maryland Biscuit
Take two quarts of sifted wheat flour, and add a small tea-spoonful of salt. Rub into the pan of flour a large quarter of a pound of lard, and add, gradually, warm milk enough to make a very stiff dough. Knead the lump of doung long and hard, and pound it on all sides with a rolling pin. Divide the dough into several pieces, and knead and pound each piece separately. This must go on for two or three hours, continually kneading and pounding, otherwise it will be hard, tough, and indigestible. Then make it into small round thick biscuits, prick them with a fork, and bake them a pale brown. This is the most labourious of cakes, and also the most unwholesome, even when made in the best manner. We do not recommend it; but there is not accounting for tastes. Children should not eat these biscuits-nor grown persons either, if they can get any other sort of bread. When living in a town where there are bakers, there is no excuse for making Maryland biscuit. Believe nobody that says they are not unwholesome. Yet we have heard of families, in country places, where neither the mistress nor the cook knew anyother preparation of wheat bread. Better to live on Indian cakes.”
-—Miss Leslie’s New Cookery Book, Eliza Leslie [T.B. Peterson:Philadelphia PA] 1857 (p. 432)
[NOTE: “Indian cakes” refers to bread products made with maize meal. They were generally regarded as inferior to wheat products.]
[1881]
“Maryland Beat Biscuit
Take one quart of flour, add one teaspoonful of salt, one tablespoonful of lard, half tablespoonful of butter. Dry rub the lard and butter into the four unitl well creamed; add your water gradually in mixing so as to make dough stiff, then put the dough on pastry board and beat until perfectly moist and light. Roll out the dough to thickness of third of an inch. Have your stove hot and bake quickly. To make more add twice the quantity.”
-—What Mrs. Fisher Knows About Old Southern Cooking, Mrs. Fisher, facsimile 1881 reprint with historical notes by Karen Hess [Applewood Books:Boston] 1995 (p. 9)
[1904]
“Beaten Biscuits
1 pint of flour
1 rounded tablespoon of lard
1 good pinch of salt
Mix with very cold sweet milk to a stiff dough. Work 150 times through a kneader. Roll into sheet one-half inch thick. Cut out or make out with the hands. Stick with a fork and bake in a hot oven about twenty minutes till a rich brown.”
-—The Blue Grass Cook Book, Minne C. Fox, fascimile 1904 reprint with an introduction by John Fox Jr. [University of Kentucky Press:Lexington KY] 2005 (p. 1)
[1932]
Maryland Beaten Biscuit
3 pints winter wheat flour, 1/4 lb. Lard, one-half ice water and milk to make a stiff dough, 1 heaping teaspoon salt. Work in the lard, add the liquid and beat with a club for twenty-five minutes. Make in small biscuits and bake in a hot oven.”
-—Eat, Drink and Be Merry in Maryland, Frederick Philip Steiff [G.P. Putnam:New York] 1932 (p. 186)
[1992]
“Beaten Biscuits
Beaten biscuits originated in Maryland more than 200 years ago, when a mixture of soda and cream of tartar was used as leavening. The dough was beaten to make it light and airy. These biscuits became such a necessity that a machine similar to a wringer was invented to manipulate the dough. Even in modern times, this type of biscuit dough is still beaten. By tradition the dough is beaten with a hammer, mallet, or an ax for about 30 minutes. Lard was originally used in the biscuit dough, but today either solid vegetable shortening, margarine, or butter is often substituted.
Makes 3 1/2 to 4 dozen biscuits
4 cups all-purpose flour
1 teaspoon baking powder
1/2 teaspoon salt
1 teaspoon sugar
1/2 cup lard, solid vegetable shortening, margarine, or butter
1/3 cup milk combined with 1/3 cup water
Combine the flour, baking powder, salt, and sugar in a bowl. Cut in the shortening until it resembles coarse meal. Add just enough of the liquid, a little at a time, to make a stiff dough. Knead the dough several times in the bowl and then turn it out on a lightly floured board. Beat the dough for about 30 minutes, turning it several times until it pops and is smooth and elastic. Shape the dough into smooth balls by hand. Place on a cookie sheet and prick each biscuit with a fork, making 3 rows of holes. Make in a preheated 400 degree F. Oven for 20 to 25 minutes, or until light brown.”
-— Taste of the States: A Food History of America, Hilde Gabriel Lee [Howell Press:Hong Kong] 1992 (p. 45)
* 1793—Ships biscuit, Admiral Nelson’s Royal Navy
* 1801—G.H. Bent, still selling hardtack and common crackers
* 1865—Hardtack in the U.S. Civil War
* 1931—Bisquick
See also crackers
http://www.foodtimeline.org/foodcakes.html#wackycake
“Devil’s food. A cake, muffin, or cookie made with dark chocolate, so called because it is supposedly so rich and delicious that it must be somewhat sinful, although the association is clearly made with humor. Its dark color contrasted with the snowy white of angel-food cake, an earlier confection. The first devil’s food recipe appeared in 1900, after which recipes and references became frequent in cookbooks. The “red devil’s food cake,” given a reddish-brown color by the mixture of cocoa and baking soda, is post-World War II version of the standard devil’s food cake.”
-—Encyclopedia of American Food and Drink, John F. Mariani [Lebhar Friedman:New York] 1999 (p. 111)
Angel food belongs to the nineteenth century but devil’s food to the twentieth. How this chocolate cake came to be called devil’s food no one knows alothough it may have been a play on opposites: it was as dark and rich as angel food was light an airy...In the early 1900s there were a number of bizarre variations on Devils Food Cake. Once called for mashed potatoes and a number for ground cinnamon and cloves in addition to chocolate...”
-—American Century Cookbook: The Most Popular Recipes of the 20th Century, Jean Anderson [Clarkson Potter:New York] 1997 (p. 452-3)
Some food historians believe this might be the first mention of Devil’s food. It appears in a memoir written by Caroline King’s of her childhood in 1880s Chicago. Ms. King was a popular food writer in the 1920s-1930s.
“Devil’s Food, though a new cake in our household, had made its dashing appearance in Chicago in the middle eighties, and by the time it reached our quiet little community, was quite the rage. Maud’s receipt was the original one, and made a large, dark, rich cake. Here it is:
Devil’s Food
1/2 cup butter
2 cups sugar
5 eggs
1 cup sour cream
2 1/2 cups flour
1 scant teaspoon soda
1 teaspoon baking powder
3 squares unsweetened chocolate
1 teaspoon vanilla.
Anna melted the chocolate over hot water while Maude creamed the butter and added the sugar gradually; then she whipped in the slightly beaten yolks of the eggs and the melted chocolate and vanilla. I was permitted to sift and measure the flour and then sift it again with the baking powder and soda. When this was done, Maude alternately added the flour mixture and the sour cream to the egg-sugar-butter-chocolate combination. Last of all, she folded in the stiffly beaten whites of the eggs and turned the delicious-smelling brown batter into three layer-cake pans which Anna had buttered and floured. The baking, in a very moderate oven, was carefully watched. According to a time-honored custom in our family, the cakes were tested with a clean broomstraw and when finished were turned, beautifully brown and entrancingly fragrant, from the pans onto a clean towel.
Now came the next important part, the icing and filling. The Watermans’ receipt called for a thick boiled icing made pleasantly piquant with a few drops of citric acid. But citric acid sounded dangerous to Maud, and besides, as Anna explained, we had no such article in our supply closet. Even Emily’s stock of special flavorings refused to yield it, so Maud used lemon juice, sparingly and judiciously, and the result was perfect.
Altogether it was a noble cake, nobly made.”
-—Victorian Cakes: A Reminiscence With Recipes, Caroline B. King, with an introduction by Jill Gardner [Aris/Berkeley:1986] (p. 35-6)
There is no recipe for Devil’s food in Favorite Dishes: A Columbian Autograph Souvenir Cookery Book, a collection of recipes contributed by prominent Chicago women in 1893. This book, originally compiled by Carrie V. Shuman, was recently reissued by the University Press, Chicago [2001].
What is the difference between chocolate cake and devil’s food?
This simple question has many answers, depending upon the period and cookbook. As noted above, the first 19th century American chocolate cake recipes were white/yellow cakes with chocolate icing. The addition of chocolate to the batter increased as the price of this ingredient declined, thus creating “chocolate cake” as we know it today. 20th century cookbooks often list chocolate cake and devils food on the same page. The most predominant difference between the two? Devil’s food usually contains a greater proportion of chocolate. Fannie Farmer [1923] doubles the amount of chocolate required for her devil’s food (4 ounces compared to 2 ounces for “regular” chocolate cake.). Irma S. Rombauer confirms: “When the larger amount of chocolate is used, it is a black, rich Devil’s Food.” (Joy of Cooking, 1931 p. 236)
Compare this chocolate cake recipe [1894] with Mrs. Rorer’s [1902] & Good Housekeeping’s [1903] devil’s food recipes (below):
Chocolate Cake, No. 3
One and a half cups of sugar, half cup of butter, three-quarters cup of milk, three eggs and yolk of another, two cups of flour, two teaspoons baking powder, one full cup of Baker’s chocolate. Break up the chocolate and put in a cup over the tea kettle until it melts. This will make four layers, and use the following recipe for boiled icing between the layers.
Boiled icing
One cup of sugar (granulated), quarter cup of water (cold), one egg (only white, beaten stiff). Put water on sugar in a saucepan and let it boil until it threads. Then remove from fire and pour over the stiff white, beaten until it thickens. Put on the cake at once.”
-—The Oracle: Receipts Rare, Rich and Reliable, The Woman’s Parish Aid Society of Christ Church, [Tarrytown:New York] 1894 (p. 88)
The earliest recipe we have for Devil’s Food printed in an American cookbook is dated 1902:
“Devil’s Food
1/2 cup of milk
4 ounces of chocolate
1/2 cup butter
3 cups pastry flour
1 1/2 cups of sugar
4 eggs
2 teaspoonfuls of baking powder
Put in a double boiler four ounces of chocolate and a half pint of milk; cook until smooth and thick, and stand aside to cool. Beat a half cup of butter to a cream; add gradually one and a half cups of sugar and the yolks of four eggs; beat until light and smooth. Then add the cool chocolate mixture and three cups of pastry flour, with which you have sifted two teaspoonfuls of baking powder. Beat thoroughly for at least five minutes; then stir in the well beaten whites of the eggs. Bake in three or four layers. Put the layers together with soft icing, to which you have added a cup of chopped nuts. The success of this cake depends upon the flour used.”
-—Mrs. Rorer’s New Cook Book, Sarah Tyson Rorer [Philadelphia: 1902] (p. 619)
[NOTE: Mrs. Rorer’s chocolate loaf cake recipe (p. 615) calls for 2 ounces of chocolate]
Devil’s Food Cake
Two and a half cups of sifted flour, two cups of sugar, one-half cup of butter, one-half cup of sour milk, one-half cup of hot water, two eggs, one-half or one -fourth cake of chocolate, one teaspoon of vanilla, one teaspoon of soda. Grate chocolate and dissolved with the soda in hot water. Use white icing.”
-—Good Housekeeping Everyday Cook Book, Isabel Gordon Curtis, [Phelps Publishing:New York] 1903 (p. 50); recipe attributed to Mrs. Nelson Ruggles.
[NOTE: This book’s recipe for chocolate cake (p. 50) is white cake with chocolate filling]
By 1913, devils food and devils cake were all the rage. How do we know? Anna Clair Vangalder’s Modern Women of America Cookbook [Modern Woodman Press:Rock Island] lists no less than 23 recipes! Some are simple, others are complicated. Sour milk and brown sugar seem to be the standard ingredients, though some recipes specified white sugar and sweet milk cut with boiling water. Melted/grated unsweetened chocolate (cake, bakers) was the norm, though some recipes used cocoa. Some cakes were layered, others were baked in simple loaf pans. About half of the early devils cakes were iced.
Recipes for devil’s food cake have changed over the years. Duncan Hines Dessert Book [New York:1955] lists three recipes for Devil’s Food Cake, and one each for Cocoa Devil’s Food Cake, Party Devil’s Food Cake, and Sour Cream Devil’s Food Cake (p. 37-41). Jean Anderson’s American Century Cookbook (p. 452-3) does a good job outlining the evolution of this particular recipe.
Red Devil’s Food
These recipes generally include both baking soda, baking powder and boiling water. Proportions vary. They begin to show up in North American cookbooks during the 1930s. Some are specifically called “red devil,” others are simply called devil and are undistinguishable unless the cook examined the ingredients.
[1946]
Red Devil’s Food
Generally popular—but not with me, which is not to be taken as a criterion.
Measure:
1 1/2 cups sifted flour
Resift with:
1 1/2 teaspoon tartrate phosphate baking powder or 1 teaspoon combination type
1/2 teaspoon salt
1 teaspoon soda
Cream until light and fluffy:
4 tablespoons butter
1 cup sugar
Add one at a time and beat well:
2 eggs
Melt: 2 ounces chocoloate in 1/2 cup boiling water
Cool slightly, then stir these ingredients into the egg mixture. Add the dry ingredients in about three parts alternately with:
1/2 cup sour milk
Add: 1 teaspoon vanilla
Stir the batter after each addition until it is well blended. Bake it in two greased 9 inch layer pans in a moderate oven 350 degrees for about 25 minutes. Spread the cake with Seven Minute Morocco Icing.”
-—Joy of Cooking, Irma S. Rombauer [Bobbs-Merrill:Indianapolis] 1946 (p. 542)
[1956]
“Real Red Devils Food Cake
A rich, moist cake...made with cocoa. Developed by Lorraine Kilgren of our staff...
Grease and flour: 2 8 or 9” layer pans or 13 X 9” oblong pan
Sift together into bowl: 1 3/4 cups Softasilk flour, 1 1/2 cups sugar, 1 1/4 tsp. soda, 1 tsp. salt, 1/3 cup cocoa
Add: 1/2 cup soft shortening, 2/3 cup milk
Beat 2 min.
Add: another 1/3 cup milk, 2 eggs (1/3 to 1/2 cup), 1 tsp. vanilla
Beat 2 more min.
Pour into prepared pans. Bake until cake tests done. Cool. Finish with White Mountain or Satiny Beige Frosting or with Chocolate Butter Icing. Temperature: 350 degrees F (mod. oven).
Time: Bake 8” layers 35 to 40 mon., 9” layers 30 to 35 min., oblong 45 to 50 min.”
-—Betty Crocker’s Picture Cook Book, Revised and Enlarged, second edition [McGraw-Hill:New York] 1956 (p. 151)
[NOTE: We can supply the icing recipe of your choice.]
Of course? There’s always chocolate angel food! (Joy of Cooking [1931] p. 234)
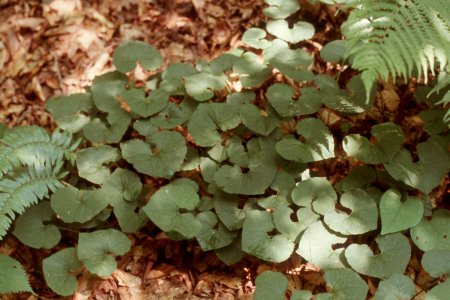
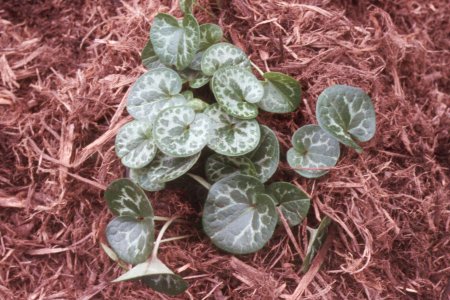
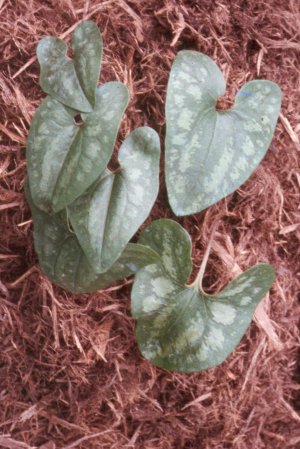
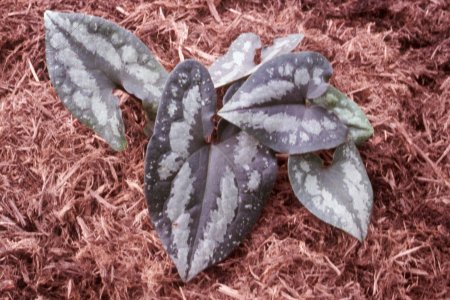