Mycroft Holmes
Since Dec 17, 1998
|
|
Mycroft Holmes
Since Dec 17, 1998
| |||||
|
| ||||||
Not really using this space so...
This first bit is somewhat FreeRepublic specific
FR HTML lite Paragraphs Positioning Lists Tables Characters Fonts Images Hot Links
This bit is Not useful on FR but is very useful elsewhere.
Xampp could even be thought of as revolutionary.
/FR Xampp HTML Heavy Forms Inputs PHP JavaScript.vl DOM MySQL Program JavaScript.vh VanityHTML lite: top
HTML is an acronym for HyperText Markup Language. It was born out of a need to format the presentation of text, images and data on screens of various and arbitrary sizes. A page of raw HTML can be thought of as having two types of information, text and formatting. Formatting appears between two angle brackets <formatting> and never literally appears on the rendered page. Formatting is used to control the appearance and placement of text and other objects on the page. Anything that isn't formatting is text and is on the page. Formatting can contain images, which also appear on the page and Hot Links which are clickable text pointing to other pages.
It is often interesting to look at the raw HTML when you see something amusing. Most browsers have a menu item that is something like View Source which allows you to look at the HTML directly. I am currently using Chrome as it provides a particularly sweet view of the tricks involved by right mousing over the item you wish to inspect and selecting Inspect Element. Firefox provides control-u as a quick way to get the entire page of HTML source and in Firefox 10 at least right mousing over an element will also allow you to Inspect Element. I haven't looked at IE in years, maybe you could tell me.
FreeRepublic posting software allows for the use of a subset of HTML 4.01 as well as plain text to get your point across. You can post text, images, hotlinks and I suspect I've seen applets, but maybe not. Forms and anything inside forms like Inputs are right out. CSS (Cascading Style Sheets) are not supported so the deprecated <font> must be used to control the appearance of text. This appears to be necessary to the forum software which itself makes extensive use of CSS.
Conventions: In general, anything that appears in bold between angle brackets as in <bold> is HTML and needs to be typed exactly including the angle brackets and any quote marks. If you see quoted text containing mumble it means this entire quoted bit is variable and you need to substitute the correct text for it.
Nearly all HTML tags (what we call the bits between the angle brackets) come in pairs. This makes sense as usually you want to do something, like make a chunk of text bold, and then not do it anymore. So we see a tag that opens the new formatting, some text, and then a closing tag. The closing tag generally looks like an opening tag with a forward slash in front of the text part, thusly: <tag>sample text</tag>. One exception to this is the paragraph <p> tag, which can be used on its own without a closing tag. Using a closing tag with <p> Your paragraph here </p> is considered good form though. The gods of HTML will smile on you if you do...
In this forum, if you are posting images it is beneficial to place the image in a paragraph of its own and use a closing tag with <p> </p> as it helps the forum software properly place images.
The tag-type is the first text after the left angle bracket that opens the tag. There must be no space between the angle bracket and the tag-type, if there is then HTML treats the whole business as text. There can be additional information in the opening tag that is not a part of the tag-type. This is shown as an attribute="value" pair following the tag-type separated by a space. The equal sign and the quotes are mandatory parts of the attribute/value pair. A common attribute is width="200" or height="15%". Distances on the screen can be specified as either pixels or as a percentage of the screen. Since the target screen is usually unknown percentages are the preferred style of dimension.
Anchors are tags which pin down a location. An anchor looks like <a name="sj29537_top">. This one is used to define the top of this page and is the first line in the raw HTML that renders into it. The tag-type is the a after the left angle bracket, the name="sj29537_top" is an attribute/value pair which serves as an identifier for this particular anchor so that it can be referred to by other bits of HTML. A closing tag would be nice, but it isn't required for this anchor. The current preferred form is <a name="sj29537_top" /> with the closing explicit in the opening tag. Adjacent to the major headings on this page there is another anchor <a href="#sj29537_top">top</a> which is also a hotlink. This does have a closing tag, which serves to delimit the text that is to be the clickable hotlink. The # in front of "sj29537_top" in the href tells the software that the anchor referred to is located on the current page. This is not optional. The second top is text which is being formatted into a hotlink by the HTML that surrounds it.
Another thing that it is good to know is how to nest (order so as to do what you want) the tag pairs. These examples:
<tag_A> some text </tag_A> or
<tag_A><tag_B> some text </tag_B></tag_A> or
<tag_A> some text <tag_B> some more text </tag_B> even more text </tag_A>
are all legal and useful nestings.
<tag_A><tag_B> some text </tag_A></tag_B>
and similar broken orderings are not legal or useful. In general, the rule is that you can not close a tag with an open tag inside. Most browsers will handle this gracefully and close all of the open tags inside the one being closed, but you won't see the behavior that you desire.Paragraphs & White-space: top
HTML eats excess white-space. If you type two or more spaces in a row between words HTML will reduce all of the spaces and tabs to a single space or tab. Carriage Returns (the Enter key) won't do you any good either. Without special care it is easy to end up with a wall of unreadable text. It's quite cruel. If you want white-space beyond a single space you need to insert it explicitly by typing <br> or <p> for a CRLF and a paragraph, respectively.
Break <br> works like you expect Enter (or Carriage Return) to work. It gets you a single LFCR (Line Feed Carriage Return, just like an ancient typewriter). Two styles of break are in use, the preferred version (used in HTML 5) is <br /> which contains its own closing tag. Paragraph <p> makes what follows into a paragraph set off by linefeeds. Neither <p> or <br> requires closing tag. The browser software will assume a paragraph is closed when it encounters the next <p>. Closing a paragraph actually makes good sense, closing a break seems like a waste of perfectly good characters.modulo the HTML gods referenced above.
Blockquotes are another useful trick. This entire paragraph has been enclosed in blockquotes. Anything you put between <blockquote> the example text <blockquote> gets indented and set off by linefeeds before and after. This example, rendered, will look likethe example textthe text above. Blockquotes can be nested (placed one inside another) and are a great way to distinguish the source of a quote from your own text.Preformatted, or the <pre> tag provides a way to grab a bunch of text that is already formatted with tabs and spaces and not have HTML eat all that lovely white-space. As usual a closing tag is required with this </pre>. You can use this trick on a webpage but you need to realize that if the text you are copying wraps because it runs into the edge of the page and not because there is a CRLF present it will behave the same way in the preformatted chunk.
Horizontal Rule <hr> generates a horizontal line the width of the page. People often use this to separate their comments from those being commented upon. This also does not need a closing tag. A width can be set with this element, <hr width="150"> looks like:
Note that it is automagically centered. You can align="right" or "left" to position it more explicitly.<hr width="50%" align="right">
Notice that you can specify the width in either pixels or as a percentage of the available screen. With the proliferation of device screen sizes the latter method is preferred.Positioning: top
Any element (anything between tags) can be explicitly positioned by either putting it in a table or centering it <center></center>. Beyond that, explicit positioning is purposefully made as difficult as possible so that you won't do it. Your page will be displayed on a variety of devices of differing sizes and the less you can constrain where the elements are positioned the better the general result will be across the broad spectrum of displays.
Lists: top
Lists are another way to order chunks of text and white-space. Lists can be either ordered, with numbers or letters preceding the list items or unordered with selected dingbats (disc, circle, square) fronting the text. The default dingbat is a disk; losing the dingbats is unfortunately not an option. An unordered list looks like:
<ul>
  <li>Coffee</li>
  <li type="circle">Tea</li>
  <li type="square">Milk</li>
</ul>
which yields:
- Coffee
- Tea
- Milk
Ordered lists are a only marginally more interesting. A number of numbering schemes are available. Here I have abused them as much as possible.
- Coffee
- Tea
- Earl Grey
- Oolong
- Milk
- Whole
- Skim
- Condensed
- Powdered
Tables: top
The Fool is always greater
than The Proof.<table border="2" cellpadding="10"> <tr> <td><center><font color="black" face="arial" size="5">The Fool is always greater<br /> than The Proof.</font></center></td> </tr> </table>A 3 x 3 table of images:
Who dat? <table border="0"> <tr> <td><img src="http://www.lairweb.org.nz/leonardo/monalisa.jpg" height="260" width="167"></td> <td><img src="http://desmond.imageshack.us/Himg218/scaled.php?server=218&filename=monalisa20apc1.jpg&res=medium" height="260" width="167"></td> <td><img src="http://fc02.deviantart.net/fs39/f/2008/319/7/8/Raptor_Mona_Lisa_by_Xfreakdom.jpg" height="260" width="167"></td> </tr> <tr> <td><img src="http://desmond.imageshack.us/Himg25/scaled.php?server=25&filename=monalisajudge.jpg&res=medium" height="260" width="167"></td> <td><center>Who dat?</center></td> <td><img src="http://fc06.deviantart.net/fs71/f/2011/054/7/1/art_class_mona_lisa_by_courtelle_k-d3a7ins.jpg" height="260" width="167"></td> </tr> <tr> <td><img src="http://desmond.imageshack.us/Himg96/scaled.php?server=96&filename=monalisarobocop.jpg&res=medium" height="260" width="167"></td> <td><img src="http://img714.imageshack.us/img714/4082/monalisamolly.jpg" height="260" width="167"></td> <td><img src="http://img24.imageshack.us/img24/9041/monalisamatrix.jpg" height="260" width="167"></td> </tr> </table>Tables are yet another means of generating white-space. Tables are used pretty broadly to control the placement of objects on the page. Any object can be placed in a table, images are shown above and text below but you can just as easily place any element in the table data. Without some method of placing objects explicitly HTML puts them where they use the least space on the screen. Tables allow you to fairly rigidly control where objects are placed relative to each other.
Month Food Fuel Rent January $104 $123 $500 February $93 $112 $500 <table border="1"> <tr> <th>Month</th> <th>Food</th> <th>Fuel</th> <th>Rent</th> </tr> <tr> <td>January</td> <td>$104</td> <td>$123</td> <td>$500</td> </tr> <tr> <td>February</td> <td>$93</td> <td>$112</td> <td>$500</td> </tr> </table>The opening tag <table border="1"> has an attribute "border" which defines the width of the border around all the table entries. The default is 1, zero yields no border. Note that there are two sets of borders, the one associated with the table as a whole, and a border for each of the individual table header and data entries. These are individually settable by including a border="n" attribute value pair in the opening tag of the table data or table header. If you set the table border to 0 the inner table data and header borders inherit that value and disappear as well. If the table border is non-zero the inner borders are set to the default of 1 unless explicitly over-ridden.
The first row is found between the first table row tags <tr> </tr> This row is special in that it contains headers and not table data and this is indicated by the <th> Value </th> tags with the value of the header between them. Headers need to be explicitly called out so that programs which sweep these files know where the data is and where the labels for the data are.
The subsequent rows are table data, indicated by the <td> Value </td> tag pair. Note that all of the opening tags have closing tags. The table ends with </table>
Backgrounds:
http://s43.photobucket.com/albums/e379/gantelle/satins/th_champagn.jpg http://www.freerepublic.com/memorial/Verdicch_wall.jpg http://i43.photobucket.com/albums/e379/gantelle/Blues/blueribbon349.jpg http://i68.photobucket.com/albums/i25/Conormacnessa/FReep/aquamauvecirclebg.jpg http://i68.photobucket.com/albums/i25/Conormacnessa/FReep/aquaturquoisbg.jpg http://i68.photobucket.com/albums/i25/Conormacnessa/FReep/aquasolidtexturebg.jpg http://www.freerepublic.com/images/american_flag.jpg The backgrounds above are a small sample of the images that are available around the web. Any image can be used as a background. A table with a moving .gif and backgrounds.
<table background="http://www.freerepublic.com/memorial/Verdicch_wall.jpg" cellpadding="20">
  <tbody><tr><td>
    <table bgcolor="#c0c0f0" cellpadding="30">
      <tbody><tr><td>
        <table background="http://www.freerepublic.com/images/american_flag.jpg" cellpadding="40">
          <tbody><tr><td>
            <img src="http://i758.photobucket.com/albums/xx221/B_Oceander/Miscellaneous/gadsdenanimated_revised.gif">
          </td></tr></tbody>
        </table>
      </td></tr></tbody>
    </table>
  </td></tr></tbody>
</table>
This is three tables, each inside another with an image at the center. One of the tables uses bgcolor=, the other two use image background= to set the backgrounds. Borders are all set to zero so they don't show. The similar table below has borders, and that code follows the table. Borders are kind of cool in that they look like they are lit from above and to the left giving the table a kind of 3-D look.
<table background="http://i43.photobucket.com/albums/e379/gantelle/Blues/blueribbon349.jpg" border="10" cellpadding="20">
  <tbody><tr><td>
    <table background="http://s43.photobucket.com/albums/e379/gantelle/satins/th_champagn.jpg" border="30" cellpadding="30">
      <tbody><tr><td>
        <img align="middle" src="http://i43.photobucket.com/albums/e379/gantelle/SAMS/bluelk.jpg" width="350">
      </td></tr></tbody>
    </table>
  </td></tr></tbody>
</table>
People used to make extensive use of tables to control placement of objects on a page. This has fallen out of favor among the cool kids with the proliferation of different sized screens. Rigid fixed tables that look good on a full sized computer screen are totally unmanageable on a smart-phone or fondleslab. It was really quite dreary and something had to be done so <div> was invented. If you want to play with div you really need to go here http://www.w3schools.com/html/default.asp . The use of div is not supported in this forum and you will find that it gets eaten by the forum software.
Characters: top
Quick things you can do with characters are bold and italic. You get bold with <b> bold stuff </b> which looks like bold stuff. Italic works the same way with a different letter: <i> italic stuff </i> gets you italic stuff. Other things you can do are <del> delete stuff </del>
delete stuff, which replaces the deprecated <strike>. There is an underline tag as well that should not be used as it confuses people who think it is a link.There is also a <big> bigger stuff </big> which yields bigger stuff and <small> smaller stuff </small> which rolls like smaller stuff. You can get your readers to really squint at your stuff by <small><small> really small stuff </small></small> really small stuff. If you are a fan of the typewriter there is also a <tt> typewritten stuff </tt> and it types out typewritten stuff as expected.
Superscripts and subscripts are also available. He<sup>3</sup> gets He3 H<sub>2</sub>O makes H2O
There are some characters that are special in HTML, like the left and right angle brackets <> and a few others. Obviously there has to be a way to render those characters on a page. This is done with another pair of special characters, the ampersand and semicolon ( & ; ). These are used as delimiters for either a numeric value or a short and specific reference to the character desired. See http://www.w3schools.com/tags/ref_entities.asp for a more complete treatment.
Another means of generating white-space is non-breaking spaces, This creates a space that HTML won't eat. You can put multiple of these in a row for spacing but it is considered poor form. Mostly because the spacing depends on the current font and if it is a proportional rather than a fixed pitch font it gets even more complicated. Notice that the ampersand and the semicolon are used as delimiters (boundaries) for the value between them. A variation on this technique is how these delimiters appear on this page.
Fonts: top
Fonts are deprecated since HTML 4.01 (the standards boffins are working on 5.0 now) CSS (Cascading Style Sheets) is the current preferred method for coloring and shaping text in HTML. Because of the way the forum software works CSS style formatting gets eaten and discarded so Fonts must be used here to manipulate text.
<font color="red" face="courier" size="5"> Red Courier slightly Larger </font> gets you Red Courier slightly Larger What you can change about a font is its color, the typeface and the size.
Color is the value contained in quotes after the color= part of the opening font tag above. Most normal names are supported, 147 total. For finer control hexadecimal values can be specified. For a full color treatment mash here.
Face is the typeface that you want the browser to render. Types available to most browsers include "arial" "times" "helvitica" and "sans-serif". You can specify multiple names with the preferred fonts first like this <font face="verdana,arial,sans-serif">
Size is a numeric value between 1 and 7 inclusive with 7 being largest. Three is the default value and is used in the majority of this document.
Images: top
<img src="http://upload.wikimedia.org/wikipedia/en/a/a3/Bobdobbs.png"><p>
<img src="http://upload.wikimedia.org/wikipedia/en/a/a3/Bobdobbs.png" width="30%">
<img src="http://upload.wikimedia.org/wikipedia/en/a/a3/Bobdobbs.png" width="15%">
<img src="http://upload.wikimedia.org/wikipedia/en/a/a3/Bobdobbs.png" width="7%">
<img src="http://upload.wikimedia.org/wikipedia/en/a/a3/Bobdobbs.png" width="4%">
<img src="http://upload.wikimedia.org/wikipedia/en/a/a3/Bobdobbs.png" width="2%">
<img src="http://upload.wikimedia.org/wikipedia/en/a/a3/Bobdobbs.png" width="1%"> .
gets you:

J. R. "Bob" Dobbs receding into infinity...
<img src="http://mumble.com/image.jpg"> substitute the actual source of the image for http://mumble.com/image.jpg This image must be out on a server on the web someplace, not on your machine. This is why people have flickr and picassa accounts. You can easily find out the URL of an existing picture on the web by right-mousing over it and selecting Open Image In New Tab. This will open a tab on your browser containing only that image. The URL of that tab is the one to use as your src="" value.
Some of the photo storage sites on the web (flickr) try to drive web traffic to their site to harvest advertising by providing a convenient pointer to their site that isn't a URL to a .jpg To get the proper URL try right mousing over the image and select Open Image in New Tab. This should get you the naked image itself, without all of the surrounding advertising. This is the URL you want to use.
Size: You can easily vary the size of a given image by specifying it. The native size of the J. R. "Bob" Dobbs picture above is 324x216 pixels. Typical screen pixels per inch numbers for normal displays are in the range of 75 to 150 so the original Dobbs'Head will likely appear on your screen somewhere between 2.88 to 1.44 inches wide.
The next row of Dobbs'Heads are scaled to the width of the enclosing container. We use the width because its value is mostly apparent on the screen. The value of the container's height is less so. The first Dobbs'Head is scaled to 30% of the width of the container. The next at about half that, and so forth... This produces a line of attractive Dobbs'Heads receding into infinity that occupies about half the width of your page, all without needing to know how wide your page is. The size of the images will change if you grab the edge of the page and make it wider or thinner. This is the reason you want to scale images (and anything else, really) by percentages rather than pixels.
In the past it was best to keep your scaling to powers of 2 to minimize scaling artifacts. Current smoothing algorithms and processor speeds make that pretty much unnecessary. Remember that scaling up will not introduce new detail into the existing picture.
Stationary images usually end with .jpg or some variation. Moving images on this forum are only possible using images which end in .gif The .gif format allows for short sequences of stationary images to be presented like a very tiny movie. Currently the forum does not appear to allow embedded video.
You can position an image relative to its surrounding elements by adding the attribute align="middle" to the tag. Recognized attribute values are top, bottom, middle, left and right.
<p><img src="http://jc-evans.com/wp-content/plugins/wp-o-matic/cache/61cb2_zQLMZ.gif" align="right" alt="Kittie doing its nails."></p> gets you:
This is some text to show how it flows around the image. This is before the image in the source HTML with a paragraph called out before the text. Isn't the expression of the cat's face just priceless? ♣
And this is text right after the image. I have found left and right attributes to be useful, the rest not so much. You really seem to have to have quite a bit of text for the behavior of the flow to come out. Dinking with the browser width seems to help illuminate the behavior of the flow. Perhaps a smaller picture in the x-axis? But it's sooo cute.
Does adding a paragraph move the text down below the image? Nope, sure doesn't. Think of the anchor as the upper left corner of the image and as far as HTML is concerned that corner goes right after the club following "priceless", but it is aligned right so it starts on the line with the club ♣ and hangs to the right.
In this forum, if you are posting images it is beneficial to place the image in a paragraph of its own and use a closing tag with <p> </p> as it helps the forum software properly place images. Preview is your friend, but you need to remember that that preview window is somewhat constricted in the x-dimension.
The alt="Kittie doing its nails." specifies the text that appears when you mouse over the image. Some folks use these descriptors by running them through vocal-synthesis software. The blind using computers find these descriptors quite helpful. It's important to remember that an image (as well as any other element) can be used as the clickable part of a hot-link.
Hot Links: top
<a href="http://mumble.com/index.html"> Hot Text </a> Here, mumble.com points to the page you want to link, Hot Text is the stuff you want to be clickable. Hotlinks are another form of anchor which is appropriate since they too define a location.
Here is a hot link for a Google search on "furlongs per fortnight" that opens in a new tab. <a href="http://www.google.com/search?q=furlongs+per+fortnight&btnG=Search" target="o" title="Search furlongs per fortnight"><b><font color="#0039b6">G</font><font color="#c41200">o</font><font color="#f3c518">o</font><font color="#0039b6">g</font><font color="#30a72f">l</font><font color="#c41200">e</font></b></a> gets you this cute little mashable text:
It's pretty and clickable. Let's look at the individual elements.
<a href="http://www.google.com/search?q=furlongs+per+fortnight&btnG=Search" target="o" title="Search furlongs per fortnight"> The first a is the anchor for this hotlink.href="http://www.google.com/search?q=furlongs+per+fortnight&btnG=Search" target="o" title="Search furlongs per fortnight"> The href points to the Google search page with the search term following ?q= with the spaces replaced by +. The &btnG=Search part is a directive to the Google website to push the Search button. target="o" is the bit that makes it open in a new tab. title= sets the text that appears when you linger your mouse over the pretty letters.
This next bit prettifies the clickable text. It's pretty because of all of the <font color="#0039b6">G</font> manipulation. It's clickable because it lies between the opening tag for the hotlink and the closing </a> tag. You can make a hotlink out of anything this way. If you put an image between the anchors of the link clicking on the image will take you to the target page. Regular contributers know this well.
If you want to go to a particular post use something like: Post 56. to get what you want.
<a href="http://www.freerepublic.com/focus/news/2883121/posts?page=56#56">Post 56.</a>Substitute the appropriate values for the thread and post id.Xampp: top
Xampp: Programming for the masses, C, MySQL, JavaScript & HTML together!
Or, learn to code the next Facebook™ in your spare time.
The story is that Facebook™ was initially written using this technology so that should give you some idea what is possible if you master this idiom. Admittedly, it doesn't scale to 800 million users, but it is pretty serviceable for most people and it's free.
Learning to program earns you power. Steadily all of the machines around us are morphing into computers surrounded by hardware that mediates the processor's interaction with the physical world. To change the behavior of any given machine all you need to do is change the software driving it. A remarkable number of machines are being built these days that explicitly include a function allowing a knowledgeable user to reprogram the device in total. Most of the routers for sale on the market today include this capability. See www.dd-wrt.com for complete details.
But you don't need to master the intricacies of hardware to write the next Facebook™. After all, you are just shuffling bits around on existing hardware that you need to know really nothing about other than it can store and manipulate data in predictable ways. Pretty cool.
What follows is a tutorial on Xampp, a package that installs everything you need to build complex database driven websites. It is targeted at a person competent in this forum. By competent I mean able to use fonts, images and hot links. People who are not able to do those things may learn them by mashing either my username or here for a tutorial on just those very things.
The first line of links at the top of the page is the FreeRepublic tutorial. The second line of links takes you to the Xampp tutorial, the one we will be doing here. The first one will be the installation of Xampp on your machine and serving up the world's simplest web page to your browser by a server on your machine. The tutorial is being copied to my FreeRepublic home page as it is being developed so if you want to read ahead it is available but it is a work in progress. The program that the tutorial will generate a skeleton of is complete and working very nicely, thank you. My task is leading you though the maze that is how one designs and implements such a thing to begin with.
What you make is up to you. Creation, especially under the current regime, is a revolutionary act. So get those Dewskies in the fridge and the coffee on the burner and let's code!
Xampp installation tutorial follows:
This is the beginning of a tutorial describing how to install software that will run a web server and a database on your personal machine. This will enable you to write and read web pages locally, without having to upload them to a server and these web pages will be able to read and write data to the database. You will also be able to program in C in a fairly convenient fashion, just by including it in the source.php file of the web page. The combination of persistent storage, programming in C and HTML & JavaScript as the user interface provides a convenient and free development platform for solving a rather wide range of problems.
The tutorial will proceed in a step by step fashion, using all of the elements described above. All of the actual code will be provided and each new piece will be explained along the way. It isn't my intent to provide an exhaustive reference to C, HTML, JavaScript or MySQL. Instead you will be pointed to those references when appropriate. I will try to explain each new thing as it occurs but if I miss one, feel free to rattle my cage.
Xampp is an acronym for X-platform, Apache, MySQL, PHP Preprocessor. You Windows people, don't run off; this works for you too. Xampp runs on Windows, Mac OS X, Linux and Solaris, sort of your full service package. It's a collection of programs that let you set up a database and a web server on your computer that enables you do interesting and useful things with data driven web-pages for free! Additionally, setting up an Apache server on your personal machine allows you to sharpen your HTML skills without a whole lot of unnecessary uploading to a server flap-doodle.
Why do this? Well, you can leverage your knowledge of HTML to configure a user interface which talks to a database which stores arbitrary information. Using PHP (which is a C preprocessor) you can do programming sorts of things inside webpages. For everyday manipulation and storage of data this works wonderfully. If it is your intention to do heavy math, say ray-tracing for optical design, well, there are probably better choices for programming that application. But for most purposes this technique is quite sufficient. If you are collecting a bunch of data and then pawing through it in a variety of ways and want to be able to do this from a variety of platforms in geographically disparate locations, well this is for you.
One of the beauty parts of programming this way is that the results are platform independent. You write the program once and it works anywhere that a web browser runs with any web browser. Given HTML 5 and Flash it is easy to incorporate video into your program as well, though for the life of me I haven't actually needed to do video yet. It's also a pretty neat way to learn C and Javascript which I will get into later.
The database we are using is MySQL. This is accessed by a preprocessor to the C programming language called PHP. PHP lets us embed C programs into web pages that run on the server side (which the user never sees) as opposed to scripts (like JavaScript) which runs on the user side and can be freely examined by the user. This is used to write web pages which are served up by a program called Apache2 which is a wildly popular web server. This collection of stuff is called Xampp. To get all of this juicy goodness go here:
http://www.apachefriends.org/en/xampp.html and select the correct installation for your operating system and follow the easy directions. If you are doing a windows installation select the installer option as opposed to the 7zip or winzip options. This allows you to do an uninstall. Accept the defaults and do not add MySQL and Apache as Services. This means that they will not start without you telling them to. This is something you might want to do later but for now let's start and stop these programs explicitly.
Under Windows, Xampp installs in its own directory at the root, c:\xampp. If you change this during the install to say, the more normal c:\Program Files\ things will work with XP but will break under Vista. I haven't checked with Windows 7. Don't do this, accept the defaults. You do need to determine and remember the document root directory for your installation. This is where you need to put the .html and .php files for the web server to find them. For all flavors of windows look for c:\xampp\htdocs, Linux users will find the document root at /var/www, Mac OS X and Solaris users should probably also find the root at /var/www but I don't know for sure.
Important Security Considerations:
Don't turn on your Apache server unless you are behind a hardware firewall. You should already be behind a hardware firewall. If you have a router between your computer and your ISP you probably already have a hardware firewall. Check, be sure. If you don't, Walmart had a sale last week on Cisco M-10 routers for $25 and you need one right now. I'm serious about this. If you turn on an unprotected server outside a firewall it will be infested by the Chinese within 24 hours. Most likely it will be infested in 2 hours but if I claimed that you probably wouldn't take me seriously; but there are people with Asian IP addresses trolling all the time. You need to block port 80 incoming, most routers do this by default. Port 80 is what your Apache server listens to on your installation. You don't want people outside your local net getting to your server, honest. These are shark infested waters, mate'e...better gear up.After successfully installing Xampp you will be asked if you want to start the Xampp control panel. Answer yes and start the Apache and MySQL services on the control panel. This will take a few seconds to start. Then open Chrome or some other web browser and in the address bar type localhost and hit 'Enter' to navigate to the Xampp splash page. Select your language and you should see a page congratulating you on a successful install. In the navigation bar on the left towards the bottom you will see under Tools and selection for 'phpMyAdmin'. Remember that if Apache and PHP are not running none of the following works.
At this point you should have successfully installed a web server and a database on your local machine. This is kind of neat but you need some content, some web pages to look at for this to be interesting. This next bit describes the creation of a program that keeps a list of purchased items in a database and can more or less organize food and other consumables for a household. All of the elements described at the beginning of this section will be exercised and a vaguely useful program will emerge.
Now start phpMyAdmin to add a new user to the MySQL database access list. The User-Name needs to be 'admin' and the Password needs to be 'password'. These are both obvious values that really should be something else for security reasons. It is up to you to make that so if you desire. The only other place those values appear is in the 'include/connect.php' file and they may be freely edited to something more security conscious, but don't do that now. They need to be simple right now for the tutorial to work. Look along the top of the page for the tab 'Privileges' and select it. Then select 'Add New User' and a create a user 'admin' with a password 'password'. Both are all lower case and it does matter. The host setting is 'local' and check all of the global privileges and leave the resource allocations alone and 'Create User'.
<html>
  <head>
    <title>
	Minimal
    </title>
  </head>
  <body>
	Hello World...
  </body>
</html>
Locate your document root and copy the above code into a file there called "index.html" Under Linux the document root is /var/www and under Windows it's c:\xampp\htdocs. For historic and server population reasons we will refer to that directory in general, no matter what its actual name, as ~www. The ~ part indicates whatever path you have to take to get to your document root, the www is the actual directory name if your are using a sensible OS, otherwise substitute htdocs. It's a choice.


Type "localhost" (← exactly that, not your machine's name, no quotes) into the address bar of your browser and hit CR. You should now be looking at "Hello World..." Feel free to edit the <body> part to your heart's content. It's a way to prove to yourself that you actually are in control. Have fun.
Editing .html and .php files in Windows is best done with Programmer's Notepad. The reason is that PN knows about the syntax of .php (and many other languages) and will clue you up with colors when you have made errors in the placement of that single quote in a sea of text. For this sort of thing it's the bee's knees and you can find it at: Programmer's Notepad. Under Linux I am using Geany which offers a similar feature set to PN.
When you configured the MySQL db you created a user 'admin' with a password 'password' to allow the program to access the database. These names and passwords are rather obvious and will be easily guessed by any bored teenager. You can change this username and password by editing the file /include/connect.php and the appropriate user in phpMyAdmin to the values you desire. Don't do this now, they need to be exactly the current values for the tutorial to work. You will understand more concerning this later but you really need to remember about the bored teenager part, oh, and the Chinese.
HTML Heavy: top
This is a more rigorous HTML section describing what you need to know to do stand alone web pages outside the Free Republic environment, perhaps on a server on your own machine using Xampp. HTML is an extension of XML (eXtensible Markup Language) which has been extended (hey!) to be especially useful in describing the appearance of pages. XML is designed to be both human and machine readable. All of the characters in an XML file are either markup or content. Markup begins and ends with angle brackets <markup>. Everything else is content. Some characters are special and sometimes need to be represented in a form that XML won't recognize (like <). There is a way to create these characters by representing them with with a code that begins with an ampersand and ends with a semicolon &char_desc;. The char_desc part is either numeric or a short alphabetic descriptor, like & for & or < and > for < and >. Mash here for a more complete treatment.
A tag is markup which begins with < and ends with >. There must be no space between the < and the text which defines the type of tag, if there is XML treats the whole mess as text. Most tags are part of tag pairs which are individually referred to as start tags <tag> and end tags </tag>. There are also empty element tags like break <br /> which is its own start and end tag. Note that the forward slash / appears as the first character of the text part of the end tag and also as the last character of the empty element tag.
An element begins with a start tag and ends with an end tag. There may be content or other elements between the start and end tags. An element may also be an empty element tag, (honestly, I don't make this stuff up). Elements provide programs with well defined chunks of data that describe what they are about. As a bonus it is all human readable.
Web pages always begin and end with an <html> tag. Let's cut straight to the chase and show all the normal elements of an HTML page.
<html>
  <head>
    <title>
	Page title goes here...
    </title>
    <style>
	CSS Style, if you've got it...
    </style>
    <script>
	JavaScript here...
    </script>
  </head>
  <body>
	Hello New World...
  </body>
</html>
Make a subdirectory under your document root called "tutorial". If you cut and paste the code above into a file called "~www/tutorial/index.php" in the root directory of the Apache server created in the xampp section and point your browser at "http://localhost/tutorial/index.php" you should see "Hello New World..."
The exact location of root directory of the Apache server depends on the operating system that Xampp is installed on. We are using a subdirectory "tutorial" to keep all the files in one obvious place. The file name "index" is special to HTML. If we pointed our browser to "http://localhost/tutorial/" the server would look for the file "index.html" or "index.php" in the directory "~www/tutorial" if we didn't explicitly specify a file. We are using "index.php" which tells the server that the file should be run through the PHP preprocessor before being served up to the browser.
The only required bits are the opening and closing html tags <html></html> That is what makes an HTML page, a bit boring though. There are two main subdivisions of the page, the <head></head> and the <body></body>.
The <head> contains three elements, <title> <style> and <script>. None of the elements of the <head> appear on the web page proper, but you can see them by doing View Source with your browser. The Title is what appears in the tab at the top of the browser. The Style element contains CSS (Cascading Style Sheets) descriptions of the styles of various parts of the document. It is strongly recommended to learn and use CSS instead of the deprecated <font>. More about this later. The third section contains the Scripts. These are little bits of program that travel with the web page and do computation and interaction with the user in his browser. Scripts are powerful and interesting.
The <body> contains the web page content. This content can be as simple as text and images or it can be dynamically created by driving it with a database and a bit of clever programming.
Forms: top
You can't use forms on the forum for obvious reasons.
Most useful web pages collect data from the user and transform it in some interesting way. Forms are the method used to collect data from the user. Like everything else, a form is an element that looks like <form action="mumble.html" method="post"> some stuff in the middle </form>. That's all there is to it, just kidding. You can read more about forms here.
The action="mumble.html" part specifies what page will be presented back to the user when the data is entered and the Submit button is pressed. The data is entered into named Inputs which are contained in the form on the current page and that data is conveyed back to the server for use in creating the mumble.html page.
The method="post" bit describes how the information is passed back to the server when the submit button is pressed. If the method is "get" the information appears appended to the URL and is visible to the user. The preferred method is "post" because more information can be passed and it doesn't appear appended to the URL.
Because we are using PHP to construct our web pages, we can use a much more elegant construct for our forms that looks exactly like this:
<form method="post" action="<?php echo $_SERVER['PHP_SELF']; ?>">
This is much the same as the form above, except for the action part. This bit is a PHP script which runs on the server and just points to the current page in PHP-speak. You could just put the actual page name there but if you use this construct you can change the file name without having to edit the form. A self referring page allows you to write an interactive web page that looks like many pages but is really all the same page being called with different inputs. All of the following presumes this style of programming.Replace the body part of "index.php" with the following:
  <body>
	<form method="post" action="<?php echo $_SERVER['PHP_SELF']; ?>">
	Hello World...
	<form>
  </body>
Now refresh the page and you should see no change, but you have added a form.Inputs: top
You can't use inputs on the forum for obvious reasons.
Inputs look like <input type="text" name="favorite_flavor" /> This is a type "text" which has a default size of 20 characters. Available types are text, button, checkbox, file, hidden, image, password, radio, reset and submit. The name="favorite_flavor" provides a "handle" or name for that particular input. Copy the text below and use it to replace the body of "index.php".
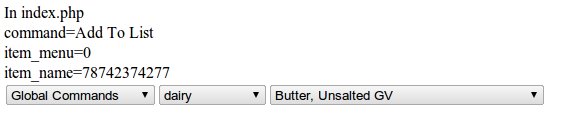
  <body>
	<form method="post" action="<?php echo $_SERVER['PHP_SELF']; ?>">
	Hello World...<br />
	Fave Flav:<input type="text" name="favorite_flavor" />
	<select onchange='updateMenu();' name='command'>
		<option value='Global Commands'>Global Commands</option>
		<option value='Add To List'>Add To List</option>
		<option value='Delete From List'>Delete From List</option>
	</select>
	<br />
	<input type="submit" name="submit" />
	<form>
  </body>
Save the file and mash reload on your browser and you should see:
If you see anything like the above you have a working form. There will be slight differences in size and fonts depending on what the defaults of your particular browser are, but it should look pretty much the same. Now, we are going to do a bit of debugging. What follows is probably my favorite PHP fragment.
<?php
$debug = true;
if($debug) {$ta = array_keys($_POST);for($ti=0;$ti<count($ta);$ti++) {echo $ta[$ti]."=".$_POST[$ta[$ti]]."<br />";}}
?>
This is an embedded PHP Script. The first line is the opening token of the script, this alerts the PHP preprocessor that what follows until the closing bit (last line) is a PHP Script that should be processed. What it does is picks apart and prints out the names of all of the inputs passed back to the server along with their values. How it does this in detail is contained in the PHP Section but just accept it as a little bit of magic for the moment. Copy the above fragment and insert it in the file "index.php" immediately after the opening <form> tag.Once you have done that you can mash the submit button on the page and whatever values you have in the inputs will be listed in text with the names of the inputs themselves. This saves a whole lot of heartache debugging web pages. You should see roughly the following above the select and text entry areas:
favorite_flavor=chocolate
command=Add To List
submit=Submit
Hello World...
You did type "chocolate" didn't you? To get to the interesting stuff we are going to have to understand more about PHP.
PHP: top
Functions Variables Strings Concatenation IfYou can't use PHP on the forum for obvious reasons.
PHP is a Scripting Language like JavaScript. Unlike JavaScript, which runs in the user's browser to mediate user interactions, PHP runs on the server in a fashion which is invisible to the user. It the user invokes View Source he won't see any of the PHP on the page. PHP is used to run C programs as part of the HTML pages on the server before the raw HTML is generated and presented to the user.
All scripts in HTML begin with <? Have script stuff here, and end with ?>. The default script type is JavaScript. To get the PHP interpreter you need to start the script with <?php You can find the PHP manual here. What you will find if you poke the link is a pretty good manual describing how the PHP preprocessor works and quite a bit of material about the language C. You need to know this, leave this tab open if you are not fluent in C.
C is fundamental. You can not go wrong learning C, it's everywhere you want to be. C in PHP is a little different than standard C, it is not really typed. This means that variables, which all start with $, can have any sort of value stuffed into them. If you try to multiply a character by an array this implementation will let you and not warn you. It's part of its charm. Let's talk about that magical little PHP fragment we are using for debugging:
<?php
$debug = true;
if($debug) {$ta = array_keys($_POST);for($ti=0;$ti<count($ta);$ti++) {echo $ta[$ti]."=".$_POST[$ta[$ti]]."<br />";}}
?>
If your eyes glaze over as you read this next passage just skip it. I promised to do this bit earlier and understanding exactly how this works is not at all necessary to continue but it is a nice spot to stop and talk about the syntax of C as practiced by PHP.The first line opens the PHP script. The second line assigns the value of "true" to the variable $debug. The assignment operator is an equals sign = . Note that the line, and what we call the expression ends with the semicolon → ; ←. Expressions are bits of C that have meaning and are almost always terminated with a semicolon. Expressions may continue across lines that don't end with a semicolon.
The third line is an if statement, if $debug is true (and it is, we set it the line before) then we do all of the stuff inside the first pair of curly braces {...do all this stuff...}. This is the entire rest of the line as the curly braces nest so you do the stuff out to the matching brace at the end of the line. The curly braces serve to group the entire rest of the line as the required "do if true" part of the if statement. There is an optional "else, do if false" part but that isn't present here. A parenthetical note here, if you are using Programmer's Notepad you'll see that PN will show you the matching brace to one you select. This is really sweet and you need this, get it now.
The first expression in the "do if true" part is $ta = array_keys($_POST); $ta is a variable we pulled out of thin air. I call it 'ta' as a really short form of TemporaryArray. I don't call it TemporaryArray because I want the entire expression to fit on one line. array_keys($_POST); is what we are assigning to $ta. array_keys() is a built in PHP function that returns an array of keys from the key=>value pairs which comprise an array.
Arrays are a bit different in PHP; the index of the array is not constrained to be numeric, it can also be a string. This is very different from C and has profound and useful implications. $_POST is an array constructed from the HTML post data where the keys (indexes of the array) are the names of the inputs in the form being submitted and the values of the array are the values of those inputs. And yes, you can have arrays of arrays. PHP is nothing if not flexible.
So after the first expression is evaluated we have an array of keys in $ta. The second expression: for($ti=0;$ti<count($ta);$ti++) {echo $ta[$ti]."=".$_POST[$ta[$ti]]."<br />";} is a for loop. This is a loop that iterates through a sequence of instructions a number of times and then quits. The basic logic goes: 1. set x to some number; 2. if x < some other number don't quit ; 3. do some thing; 4. increment x; 5. Go to 2 until quit. The actual formal expression is a bit more compact.
for($ti=0;$ti<count($ta);$ti++) is the control structure for the loop. The first expression inside the parenthesis assigns $ti (temporary index) the value 0. The second expression checks to see if $ti is less than count($ta). count is another built in PHP function that returns the number of keys in an array. If $ti is less than count($ta) then the statement(s) in the curly braces { } right after the closing parenthesis of the control structure are executed. After executing the "do_if_inbounds" statement, $ti is incremented.
The doing part looks like: {echo $ta[$ti]."=".$_POST[$ta[$ti]]."<br />";} echo emits a string of raw HTML to the page. What we are echoing is the concatenation of four strings. The concatenation operator is the period (.), really. The first string $ta[$ti] is fetched from the array of keys we put in $ta. The keys for the array $ta itself are numeric, as this is the default for the function array_keys. Other options are possible, we'll see those later.
As the loop increments the string in $ta[$ti] will be the name of each input in the previous form's post and that will be printed to the screen. The next string to be printed is an equals sign "=". Next is the string in the array $_POST[$ta[$ti]]. $_POST contains the key=>value pairs that are the previous form's inputs, $ta[$ti] contains the string that is the key for $_POST so that whole bit resolves to the value in $_POST pointed to by a particular named input. This cycles through all of the variables passed in the post. Hope that made sense.
The previous web page rewritten in PHP idiom looks like:
  <body>
	<form method="post" action="<?php echo $_SERVER['PHP_SELF']; ?>">
<?php
$debug = true;
if($debug) {$ta = array_keys($_POST);for($ti=0;$ti<count($ta);$ti++) {echo $ta[$ti]."=".$_POST[$ta[$ti]]."<br />";}}

	echo "Hello World...<br />";
	echo "Fave Flav:<input type='text' name='favorite_flavor' /> ";
	echo "<select onchange='updateMenu();' name='command'>";
		echo "<option value='Global Commands'>Global Commands</option>";
		echo "<option value='Add To List'>Add To List</option>";
		echo "<option value='Delete From List'>Delete From List</option>";
	echo "</select>";
	echo "<br />";
	echo "<input type='submit' name='submit' /> ";
?>
	<form>
  </body>
This is pretty boring, all we have done is put the PHP command echo in front of each line of HTML, quoted the HTML using double quotes, and replaced the double quotes " in the HTML with single quotes '. The last bit is important, HTML doesn't care about the difference between double and single quotes, PHP does. If you write all your HTML using single quotes you may then grab it right up and echo it without editing. Also, we added a semicolon ; to the end of each line of PHP, that's what indicates the end of the line.One of the many things that PHP lets us do is sort of hide, or cram down information. The select in the previous example takes a lot of lines to make but is conceptually simple. Using PHP we can make the creation of that select appear as a single line by putting most of the work in another file. Copy the following text into a subdirectory you name "include", name the file "tutorial_functions.php".
<?php
/*		file: include/tutorial_functions.php
*		2012/02/13 - working initial cut
*
*		Functions for tutorial
*/
function select_command($_POST, $base_name) {
	echo "<select onchange='updateMenu();' name='".$base_name."'>";
	if ($base_name == 'command') {
		echo "<option value='Global Commands'>Global Commands</option>";
		echo "<option value='Add To List'>Add To List</option>";
		echo "<option value='Delete From List'>Delete From List</option>";
	} else {
		echo "<option value='Local Commands'>Local Commands</option>";
		echo "<option value='Chocolate'>Chocolate</option>";
		echo "<option value='Vanilla'>Vanilla</option>";
	}
	echo "</select><br />";
}
?>
to PHP
This is a function that makes a Select Object. A function is not an in-line replacement, rather it is a template for an instance of, in this case, a select object. The function's name is select_command. Information is passed into the function by the variables inside the parenthesis after the function name. All variables in PHP begin with $, that's how you know they are variables. Variables that are used by PHP and the System begin with $_, don't begin your variable names with underscore. In this case, we are passing in all of the inputs from the previous page in $_POST and a name for the particular select we are making when we call this function in $base_name.The second line of the function begins with echo to emit raw HTML to make the select. The onchange='updateMenu();' bit is a directive to the select to call the script updateMenu(); when the value of the select changes. There is no script available to run, yet, so this is ignored. We'll be using this later. To understand the next new bit .$base_name. we'll need to talk a bit about strings.
Strings in PHP are collections of characters surrounded by double quotes. They can also be variables which have been assigned the value of strings, like $base_name in the example above. The PHP command echo expects one string as its argument. In the above example there are three distinct strings, two delimited by double quotes and the string contained in the value of $base_name. How we make these three strings one is by Concatenation of the strings using the . operator. Yes, the operator (symbol) for concatenation (mushing the strings together) is a period. Learn more about strings here.
So what we are doing with the second line is an echo of three strings mushed into one by the two periods surrounding .$base_name. followed by a ; (semicolon) to terminate the line.
The next line is an If Statement. The if statement is one method of directing program flow, or deciding things depending on how you think of this stuff. It has the form if(some_expression){do_if_true;}else{do_if_false;} The some_expression part has to evaluate to true or false. This is called a Boolean type. The semicolons after the do_if_true/false parts are required, the else do_if_false part is not required. The curley braces are used to group statements together and are optional if there is only one statement in each group.
The boolean expression in the example if($base_name == 'command') gets evaluated. If $base_name is equal to the string literal 'command' the expression evaluates to TRUE and the next statement is executed. The double equals == is the comparison operator for equals. A single equals = is an assignment operator which would assign the string 'command' to the variable $base_name, not what we want.
To recap, we have a function which when called creates an instance of a select which is named whatever name we passed in $base_name and depending on the value of that name makes one or the other type of select. After the select is constructed we echo a break to put whatever comes next on a new line.
Now we'll rework index.php, copy the following into the body part of the file.
  <body>
	<form method="post" action="<?php echo $_SERVER['PHP_SELF']; ?>">
<?php
$debug = true;
if($debug) {$ta = array_keys($_POST);for($ti=0;$ti<count($ta);$ti++) {echo $ta[$ti]."=".$_POST[$ta[$ti]]."<br />";}}

	include "include/tutorial_functions.php";  // a collection of functions for various stuff

	echo "Hello World...<br />";
	echo "Fave Flav:<input type='text' name='favorite_flavor' /> ";
	select_command($_POST, $base_name="command"); // pick a command
	select_command($_POST, $base_name="something_else"); // pick another command
	echo "<input type='submit' name='submit' /> ";
?>
	<form>
  </body>
What's changed here is the include directly after the debug line. This sticks the contents of the named file in-line in that spot. Since the file is a function it isn't executed (run) until it is called (invoked). We call that function twice with the lines that start select_command. If you save both files and mash Submit you should see something like:The function we have constructed previously is pretty trivial and perhaps not very interesting but it does show how you can use a function as a template to create different instances of similar items.
What follows is a more amusing piece of code that actually does solve something. Specifying a quantity of stuff is a problem that comes up fairly often. Quantities have an amount and a unit, like 3 gallons or 5 feet. As a general rule you want to avoid allowing the user to type anything that will be used as an entry into a database, they will only break your heart (or tables). So selects are preferred to text inputs for pretty much everything. This generates a pair of selects named $prefix.'count' and $prefix.'units' right next to each other.
By this time when you see $ you should think variable. So you know that $prefix means some string that has been assigned to the variable $prefix. You should also think string literal when you see single quotes around some text, like 'count'. So when you see $prefix.'count' you are seeing the contents of the variable $prefix concatenated (.) with the string literal 'count' which results in one string.
Another thing you need to be aware of is that if something isn't a variable and it isn't quoted by either single or double quotes and it isn't an operator (<,>,=,+,-,...) and it looks like some_text($mumble_optional) then it is probably a function. Either one of yours or a PHP built in function. There is a nifty little search feature at the top of the the PHP documentation that defaults to searching the PHP function list. If you see something you don't understand that looks like a function(), go there for enlightenment grasshopper.
If you find yourself doing the same thing more that once you probably want to try to generalize it an make it into a function. Think of functions as tools that you are building. A few tools that do a a lot of things are better than a lot of tools that each do a few things. They are easier to find if they don't proliferate in an uncontrolled fashion.
A word about comments. PHP supports C style comments, which you don't see in the fragment below. I think comments are an unalloyed good, I just couldn't think of any to add to the code here that aren't blindingly obvious. Maybe I have been doing this too long. I do try to give variables and functions names that have readily apparent meaning.
Another thing I find useful is using text for option values in selects. If you don't specify a value an integer is assigned. Later when you evaluate the value you have an integer with no readily apparent meaning. In the past, integers were the preferred way of carrying value because memory was expensive and we tried to cram as much meaning into each bit as possible. Today memory is cheap, programmer's time is expensive. So any little thing we can do to make things blindingly obvious is a good thing.
Note that we are passing $Ingredient_Count and $Units into the function. This is because we can use the select as both a knob (to adjust things) and an indicator (to inform the user). Without special effort a select shows the first option on the list. We are passing the function the values that we want the select to stick at. If we don't provide values it will do the default behavior. In general we want to design objects that are as broadly useful as possible. This is why we didn't stick any labels on the selects in this function; any that we picked now would probably be wrong. We could pass one in, but it's a complication. Simple and general are what we strive for in functions.
function select_quantity($prefix, $Ingredient_Count, $Units)
{
	echo "<select onchange='updateMenu();' name='".$prefix."count' >";
	for($i=0.5;$i<5;$i=$i+0.5) {
		if($i != $Ingredient_Count) echo "<option value='".$i."'>".$i."</option>";
		else echo "<option selected='selected' value='".$i."'>".$i."</option>";
	}
	for($i=5;$i<33;$i++) {
		if($i != $Ingredient_Count) echo "<option value='".$i."'>".$i."</option>";
		else echo "<option selected='selected' value='".$i."'>".$i."</option>";
	}
	echo "</select>";
	echo "<select onchange='updateMenu();'  value='ea' name='".$prefix."units' >";
	if ('ea' != $Units) {echo "<option value='ea'>ea</option>";}
	else {echo "<option selected='selected' value='ea'>ea</option>";}
	if ('oz' != $Units) {echo "<option value='oz'>oz</option>";}
	else {echo "<option selected='selected' value='oz'>oz</option>";}
	if ('g' != $Units) {echo "<option value='g'>g</option>";}
	else {echo "<option selected='selected' value='g'>g</option>";}
	if ('lb' != $Units) {echo "<option value='lb'>lb</option>";}
	else {echo "<option selected='selected' value='lb'>lb</option>";}
	if ('tsp' != $Units) {echo "<option value='tsp'>tsp</option>";}
	else {echo "<option selected='selected' value='tsp'>tsp</option>";}
	if ('tbsp' != $Units) {echo "<option value='tbsp'>tbsp</option>";}
	else {echo "<option selected='selected' value='tbsp'>tbsp</option>";}
	echo "</select>";
}
The first line echos the opening tag of the select assigning the name of the select to be $prefix.'count' so we can identify this particular select. The next line is the beginning of a for loop which spans 4 lines. The control structure for the loop increments the temporary variable $i by 0.5 for each pass of the loop. We are doing this because we want the count part of this control to increment by half on the low end till the value 5 and then increment by 1 to 32 which is done in the second for loop. This gives us a finer control of the value on the low end where it is more important and the ability to choose the appropriate units give the user the ability to input any reasonable values for this application.Thinking about reasonable values is part of what you want to do when you design a function. This particular application manages a household inventory. Initially I believed that most of what I was buying was groceries and this select design reflects that. The units are all weights and volumes which are useful in the kitchen and not lengths which are useful other places. After using the program for a bit I would add lengths to this control. I just haven't done it yet because I designed a general purpose work-around into the program that makes this flaw not painful enough to immediately address.
I'd also might add more numbers at the top incrementing by 5 from maybe 30 to 100. There is a limit to how many items you can usefully cram into a select though. One of the ways to manage that is to use a two stage select but that has some interesting complications we will get into later. Another useful variation would be to pass the function increment values and boundaries so that they wouldn't be fixed. That's probably useful enough to do RSN.
The third section of the function generates the units selector. In a select an option has two parts, a value and a label that appears to the user on the select itself. Explicitly calling out the value is not required, if it is absent an integer starting at 0 and incrementing for each additional option is provided. I like to use the same text for the value as the user sees; this way when I encounter the value in the program I know what it does, not just that it is '2'.
Now grab that code above and save it in ~www/tutorial/include/tutorial_functions.php just in front of the closing tag for the PHP at the end of the file. We'll be using this bit shortly. Now we want to rework ~www/tutorial/index.php so that the body looks like:
  <body>
	<form method="post" action="<?php echo $_SERVER['PHP_SELF']; ?>">
<?php
$debug = true;
if($debug) {$ta = array_keys($_POST);for($ti=0;$ti<count($ta);$ti++) {echo $ta[$ti]."=".$_POST[$ta[$ti]]."<br />";}}

	include "include/tutorial_functions.php";  // a collection of functions for various stuff

	echo "Hello World...<br />";
	echo "Fave Flav:<input type='text' name='favorite_flavor' /> ";
	select_command($_POST, $base_name="command"); // pick a command
	echo "<br />Food: ";
	select_quantity($prefix='food_'); // pick a quantity of food
	echo "<br />Drink: ";
	select_quantity($prefix='drink_'); // pick a quantity of drink
	echo "<input type='submit' name='submit' /> ";
?>
	<form>
  </body>
So save the files and hit Submit or Reload and pay attention. The first time you hit submit or reload the debug values aren't quite what you expect. Then you hit Submit again and they look OK. This is because the values in the debug area are the values that were on the previous screen. You need to keep that firmly in mind. These things become much more important later. You should now be seeing a screen that looks much like this:So who ordered that break between Fave Flave: and Food:? Not what I had in mind. Poking about I notice that the select_command() function emits a <br /> at the end which is affecting our placement of related objects. Do not put positioning stuff in functions, it doesn't belong there. So fix select_command() in include/tutorial_functions.php so it doesn't emit that nasty break and save it away so it works properly. Good.
Another thing you might notice is that I entered 'chocolate => really' into the favorite_flavor text field. That => bit looks dangerously like an operator which ought to scare you. Remember, users can enter anything they can type into a text field and they are not usually looking to make life easy for you. They'll type the darnedest things... Don't give them the chance if you don't have to; if you do, pay attention, there are ways to mitigate the problem.
Another thing that is irritating about this program is that the controls and text inputs are not sticky. The data disappears when you Submit it. Usually that is what we want so that is the default behavior, but not always. Sometimes we want the data to stick. I want it to stick so that's what we'll do next.
So the current goal is to make the data stick from Submit to Submit. Copy the following code into the body of index.php.
  <body>
	<form method="post" action="<?php echo $_SERVER['PHP_SELF']; ?>">
<?php
$debug = true;
if($debug) {$ta = array_keys($_POST);for($ti=0;$ti<count($ta);$ti++) {echo $ta[$ti]."=".$_POST[$ta[$ti]]."<br />";}}

	$FoodCount = $_POST["food_count"];  // Memory, Dr Memory
	$FoodUnits = $_POST["food_units"];
	$DrinkCount = $_POST["drink_count"];
	$DrinkUnits = $_POST["drink_units"];
	$FavoriteFlavor = $_POST["favorite_flavor"];

	include "include/tutorial_functions.php";  // a collection of functions for various stuff

	echo "Hello World...<br />";
	echo "Fave Flav:<input type='text' value='".$FavoriteFlavor."' name='favorite_flavor' /> ";
	select_command($_POST, $base_name="command"); // pick a command
	echo "<br />Food: ";
	select_quantity($prefix='food_', $FoodCount, $FoodUnits); // pick a quantity of food
	echo "<br />Drink: ";
	select_quantity($prefix='drink_', $DrinkCount, $DrinkUnits); // pick a quantity of drink
	echo "<input type='submit' name='submit' /> ";
?>
	<form>
  </body>
The new parts are the block of assignments directly below our debugging statement and the use of those assigned values to inform the various elements of the form what their values should be. By now you recognize $_POST["food_count"] is an access to the array $_POST using the index "food_count" and assigning the value to $FoodCount.Following the use of $FoodCount down to the function select_quantity() we see that $FoodCount is being fed to what we labeled $Ingredient_Count in the function. It might be occurring to us now that maybe $Ingredient_Count isn't the best sort of function name, it's too specific. Just $Count might be a more appropriate name, maybe $Amount, mumble.
You might also notice that the names don't match between the function call in index.php and the function template in tutorial_functions.php. This is a very good thing. This lets us change the poor names in our function template to good ones without having to find everywhere they were used and change those too. What does have to match is the order of the variables in function call and the function itself. It is best to put the required variables first in the function and the optional variables last.
But the really clever bits of this have probably passed unnoticed. If you look at the code above it makes sense. Once you understand the general syntax of C and a few operators the biggest help or hindrance to producing readable code is reasonable names. Reasonable descriptive names for variables and functions will make your life a lot easier. If you doubt the wisdom of this take a close look at the debug line again.
I know you have already mashed submit, I hope you saw something like:
But there is still something bothersome about the form. That Submit button looks like a pretty much otherwise useless piece of digital flotsam; let's get rid of it. What we would really like is for the form to be submitted when the command select is changed. This is going to need for us to do a bit of translation in the web browser. A change in the value of command needs to be transmogrified into the push of the vanished Submit button. We can't do this with PHP; it runs on the server, so it's
JavaScript to the rescue!
JavaScript for tutorial: top
You can't use JavaScript on the forum for obvious reasons.
JavaScript runs on the client-side as opposed to the server-side where PHP runs. This makes it beautifully complementary to PHP. In another complementary fashion we are going to be editing the head of index.php not the body for this piece. Scripts may appear in-line, but I like to segregate them into their own little ghetto in the head. Replace all of the script element in the head with the following:
    <script type="text/javascript">
		/*	These scripts are available globally to all the included files.  The scripts
		*	are executed by the client machine in response to inputs by the user, typing
		*	input and selecting menus and such.
		*
		*	Unlike the php source, these scripts are visible to the client when view source
		*	is used. The scrip functions are generally called by form elements when they
		*	are manipulated by the user, and cause things to happen on the client page.
		*
		*	It is very important in general to test all objects for non-null values before
		*	attempting to write to them as writing to a null object will hang the script.
		*	You can tell this is happening when you see that the form doesn't update when
		*	the values of the <selects> are changed.
		*/
		function formSubmit()
		{	// reload frm1 (everything is frm1) with the current input values
			document.getElementById('frm1').submit();
		}
		function updateMenu() // runs every time any menu <select> is updated
		{	//
			formSubmit();
		}
    </script>
Now let's chat. In the opening tag we declare the script type to be text/javascript. We don't have to do this, it's the default. It's nice to make explicit the default though so that everybody is clear on the concept. Inside JavaScript C style comments work. Outside, HTML style comments are necessary. All of the comments above are true and useful.Those comments are pretty typical of what I write for comments. I'm lazy, to do this tutorial I swiped all this stuff from a program I already had written and working and deleted the stuff that isn't relevant. I don't like to write about what the code is doing; if I have named things properly I can read that. I comment about why the code is doing what it is doing. That I can't read in the code and I am unlikely to remember from one day to the next.
Our selects pretty much all have
onchange='updateMenu();'in the opening tag. The attribute onchange is what we call an event. An event is something that happens to an element like changing value (onchange) or having the mouse move over the element (onmouseover). Events are things which happen to elements; think of them as verbs for elements. Mash here for a more complete treatment of events.The event onchange causes a call to the function updateMenu() which calls formSubmit() which actually does the heavy lifting. The reason we didn't call formSubmit() directly is that we might want to do other things when a select changes that we don't want to do when some other element wants to submit the form. The actual submitting gets done by the
document.getElementById('frm1').submit();statement. To explain that statement we have to get into something known as the Document Object Model.I don't want to talk in detail about DOM right now so just take a gander at that little bit of magic that simulates pushing the submit button and then look carefully in the opening tag of the form in the modified body that follows:
  <body>
	<form id="frm1" method="post" action="<?php echo $_SERVER['PHP_SELF']; ?>">
<?php
$debug = true;
if($debug) {$ta = array_keys($_POST);for($ti=0;$ti<count($ta);$ti++) {echo $ta[$ti]."=".$_POST[$ta[$ti]]."<br />";}}

	$FoodCount = $_POST["food_count"];  // Memory, Dr Memory
	$FoodUnits = $_POST["food_units"];
	$DrinkCount = $_POST["drink_count"];
	$DrinkUnits = $_POST["drink_units"];
	$FavoriteFlavor = $_POST["favorite_flavor"];

	include "include/tutorial_functions.php";  // a collection of functions for various stuff

	echo "Hello World...<br />";
	echo "Fave Flav:<input type='text' value='".$FavoriteFlavor."' name='favorite_flavor' /> ";
	select_command($_POST, $base_name="command"); // pick a command
	echo "<br />Food: ";
	select_quantity($prefix='food_', $FoodCount, $FoodUnits); // pick a quantity of food
	echo "<br />Drink: ";
	select_quantity($prefix='drink_', $DrinkCount, $DrinkUnits); // pick a quantity of drink
	//echo "<input type='submit' name='submit' /> ";
?>
	<form>
  </body>
What's different about the opening tag of the form isid="frm1". You can find all of the standard attributes here, and id is one. The short story is that it is a unique identifier for our form. The entire stringdocument.getElementById('frm1').submit();is DOMinese for "submit 'frm1' in this document".One more thing to notice is that the line that echoed out the raw HTML for our former Submit button has been commented out. If you don't do this the button and the DOM fight and things don't work. You want things to work. Don't have two objects try to do the same thing, it's bad and wasteful (also bad).
You'll find that if you copy the script and the body into index.php, save and refresh, that the Submit button disappears and that the form is now submitted every time the value of a select changes. Give it a whirl.
To recap, we learned about events, which are like verbs for elements. We learned that we can use JavaScript to link events to the actions of elements on the browser's page through the Document Object Model. And that the DOM itself is a big black box at the moment. That will change.
DOM: top
Document Object Model: Or how I learned to love OOP...
Object Oriented Programming is the latest fad in code-smithing, all the cool kids have been doing it for 20+ years. The previous model was procedural, you called procedures with a pointer to data and the procedure munged the data and returned a value indicating success or failure or something... Procedures, algorithms, were separate from data and you called one to operate on the other.
The Object Model rolls procedures and data into a single fur-ball called an object. Procedures get renamed methods (I guess so you know it's an object) and the data, which gets renamed properties is inside the object and is usually divided into public and private parts (methods too). The public parts are the bits you can see and use.
Looking at the money bit from the last section
document.getElementById('frm1').submit();In this fragment,documentis an object.getElementById('frm1')is a method of the object document which resolves to an object which is an element of type form with the id 'frm1'. This object has a methodsubmit()which involks the Submit Input on the element object. Clear?DOM can be viewed as an inverted tree with the document at the top. All of the elements of the document (page of HTML) are accessible if you give them a unique
id="mumble". getElementById() is the best method of referring to elements in JavaScript. There is a method getElementsByTagName() which gets you a NodeList of all the elements withname="mumble"but it's easier just to useid="mumble"and ensure that id is unique.You can look at the methods for the element object here. The most useful is setAttribute() which can be used to force inputs to desired values and states. But if you look to the left on the screen you will see a list of HTML DOM Objects. This is where the gold lies if you want to twiddle elements from JavaScript.
The take away here is that those elements on your page that you want to manipulate with JavaScript need to have a unique
id="mumble". You may then refer to that element asdocument.getElementById('mumble').method();. The methods that are available to the object (element) depend on the object. In the tutorial example the object was a form and one of the methods of a form is submit();.One of the hazards of JavaScript is that it fails silently. This is probably a good idea in a client side scripting language, if a particular thing is unavailable at the moment you don't want error messages spewed all over the user's screen. But it does make it annoying to debug. One of the things that will definitely cause JavaScript to fail is any attempt to write to a NULL object. Any object that doesn't appear on the current page is NULL. This is not as nonsensical as it seems. Your program may have the notion of an object that you just aren't rendering at the moment because the time is not right. If your script tries to write to that object when it has not been instantiated the script stops silently.
DOM is just another way to look at the document. We have been thinking of the document as a collection of HTML that gets spewed by the server to the client for rendering but it really is more complicated than that, and the DOM gives us a way to talk about it.
Editorial Rant: I've heard a lot of whining from old farts about how OOP doesn't make sense, or that it's too hard. Get over it. It turns out to be a fairly useful way of thinking about things and frankly, who cares if the actual bits don't work that way. In the early '90's I wrote a Java application (not script, running on the iron) of >100K lines in less than a year which maintained a schedule in an arbitrary database, built a website to sell time in that schedule, routinely displayed images and video and even answered and took reservations over the phone. It was, of course, wildly networked. We managed to sell about a thousand systems and never had a user report a bug. It is my understanding that most of them are in use to this day. End of rant.
MySQL: top
You can't use MySQL on the forum for obvious reasons.
xkcd: exploits of a mom. For more, click pic.
The first step in using a database is to create one. The easy way to do this is directly using phpMyAdmin. Type
localhost/phpmyadmin/into your browser's address bar and hit CR. Select the Databases tab and type 'tutorial_db' into the textbox under Create New Database. Select 'ascii_bin' under Collate (you are selecting a character set for the db here). Bug (select, hit-it) Create. You should get feedback that "Database tutorial_db has been created" and you should see it appear in your list of databases.Later we will discuss creating the db programmatically using PHP.
Copy the following code into a file named ~www/tutorial/include/connect.php
<?php
$db = "tutorial_db";
$link = mysql_connect('localhost', 'admin', 'password');
if (!$link) {
    die('Could not connect: ' . mysql_error());
}
echo 'Connected successfully<br />';
mysql_select_db($db) or die(mysql_error());
?>
This fragment is not a function but an in-line bit of code that appears wherever we typeinclude 'include/connect.php';It just drops right in, like text from the gods. What it does is connects us to our database, using the name and password provided earlier, and informs us that we have successfully connected. The "or die" construct is interesting. If we fail to successfully connect the PHP script quits, Dead Right There. There is a very helpful error log though, you should find it soon. Part of the beauty of PHP is that this fragment (with our login name and password) never appears in the raw HTML emitted by the server. We then select, as opposed to connect to our database to proceed further. Copy the following code into the body of ~www/tutorial/index.php to make sure we are all on the same page.<body> <form id="frm1" method="post" action="<?php echo $_SERVER['PHP_SELF']; ?>"> <?php $debug = true; if($debug) {$ta = array_keys($_POST);for($ti=0;$ti<count($ta);$ti++) {echo $ta[$ti]."=".$_POST[$ta[$ti]]."<br />";}} $FoodCount = $_POST["food_count"]; // Memory, Dr Memory $FoodUnits = $_POST["food_units"]; $DrinkCount = $_POST["drink_count"]; $DrinkUnits = $_POST["drink_units"]; $FavoriteFlavor = $_POST["favorite_flavor"]; include "include/tutorial_functions.php"; // a collection of functions for various stuff echo "Hello World...<br />"; echo "Fave Flav:<input type='text' value='".$FavoriteFlavor."' name='favorite_flavor' /> "; select_command($_POST, $base_name="command"); // pick a command echo "<br />Food: "; select_quantity($prefix='food_', $FoodCount, $FoodUnits); // pick a quantity of food echo "<br />Drink: "; select_quantity($prefix='drink_', $DrinkCount, $DrinkUnits); // pick a quantity of drink echo "<br />"; include 'include/connect.php'; // connects us to tutorial_db ?> <form> </body>The new thing here is the include/connect.php at the bottom. If you do the usual save/submit cycle you should see "Connected successfully" from the include file telling you all is good. We will soon eliminate the line generating that happy feedback as it will be in our way, but for now it lets us know everything is working as it should.Now we need to add a Table. In this case, a table is not furniture but a template for a collection of data. The data we are collecting for this little program is about stuff we buy at the store. The first table we need is one that represents items. I've copied below the existing table I am using.
	 1	name			varchar(64)	latin1_swedish_ci
	 2	upc			bigint(16)		No	None
	 3	menus			varchar(64)	latin1_swedish_ci
	 4	price			varchar(16)	latin1_swedish_ci
	 5	amount			varchar(32)	latin1_swedish_ci
	 6	calories_unit		varchar(32)	latin1_swedish_ci
	 7	suppliers		varchar(64)	latin1_swedish_ci
	 8	handling		int(11)		No	None
	 9	url			varchar(64)	latin1_swedish_ci
	 10	level			double		No	None
	 11	reorder			float		No	None
- name- Is pretty much what appears on the label that enables our buyers to recognize what we wanted. We have a choice here in how big we want to make the name. At the time, 64 characters seemed to be plenty. In retrospect, after a bit of use, I'd make that 256. Memory and disk are cheap, aggravation is not.
- upc- We need a unique identifier and the name just won't cut it. One good reason to use UPC is that everybody else uses it and if you ever want to hook this program up to an outside source of data, well, you'll be talking about the same stuff. This is typed as a bigint which is easy to search. We'll be using this as a primary key meaning we will mostly be using this as an index into the db so we care. UPC's are 12 digit number (mostly) with a checksum digit as the least significant.
- menus- I was a bit conflicted by this. Items need to be assigned to individual menus like 'dairy' and 'freezer' or else they become unwieldy with the mass of items. I initially thought that these menus might need to be individualized by user by experience has shown that they really need to be keyed to the store where the items are mainly purchased. Anyway, this is a bit misguided and I'll talk more about it later.
- price- Pretty obvious, what did we last pay?
- amount- How much stuff is in the box?
- calories_unit- Used for a daily calorie accumulator/meal deal.
- suppliers- This is text, but also an index to a supplier table. More Later.
- handling- The thinking here was that some items require special handling, freezer, refrigerator, no-flame... Hasn't been useful so far.
- url- This was included as possibly a pointer to an image of the product. It needs to be a lot longer.
- level- How much stuff do we have in inventory?
- reorder- And when should we get more.
Tables are where data is stored in a database. It's convenient to think of tables as rows of individual items and columns of data fields. One of the columns is designated the primary key and the values in that column must be unique, each row's value must be different. Think of the primary key as the one true name of the record or individual entry (row) in the table.
The list above comprise the columns of the table. In general it is better to overdo than to fall short on field sizes. Don't be ridiculous, we don't need 4096K to store a product name, but it is easy to make fields go away or be smaller. Before you have accumulated significant data it is easy to adjust fields in general. Going big and cutting back when you have some experience seems to be a path that has worked for me.
Another database trick you want to be very aware of: If you are storing the same data in two different places you are doing it wrong. Consider the table above, there is a field named 'suppliers' and its a varchar(64). You might naively think we are going to put the supplier's name and address in that field, but that would be wrong. Many (most, really) of the items come from the same supplier. Imagine row after row containing the data 'Wallmart in Milton, FL 32570' over and over again, row after row. Pretty dreary all this duplication of text.
So what we do is create another table called 'suppliers' with a numeric primary key and a bunch of fields that have the supplier name, address, phone, contact, url, last conversation and anything else we can think of because we are only going to store this bit once and use that primary key in the suppliers field of the item table data.
So why is suppliers a text field? Because we may have multiple suppliers for the same item. We can store them by saving their primary keys as Comma Separated Values (CSV) in the suppliers field. There are downsides to this we will discuss later.
The next thing to do is write some code that will check to see if the tables we are interested in are present, and if not, to create them. Being lazy, for this application I just used phpMyAdmin to define the tables, but if you want to deploy an application to some folks and have them collect their own data you might want your program to set up the tables. So, I'll go away now and work that out and be back with some code that creates tables.
I hope some of you are being entertained. I know I am...
When we last left off I had erroneously stated that you can't create a db from PHP. More accurately, I had tried for a little bit and given up and just whacked it off with phpMyAdmin, tables too. So here is the promised code to create a db and tables from PHP. First, to make sure we are all on the same page, here are the three files we will be playing with in their entirety.
~www/tutorial/index.php
<html> <head> <title> Page title goes here... </title> <style> CSS Style, if you've got it... </style> <script type="text/javascript"> /* These scripts are available globally to all the included files. The scripts * are executed by the client machine in response to inputs by the user, typing * input and selecting menus and such. * * Unlike the php source, these scripts are visible to the client when view source * is used. The scrip functions are generally called by form elements when they * are manipulated by the user, and cause things to happen on the client page. * * It is very important in general to test all objects for non-null values before * attempting to write to them as writing to a null object will hang the script. * You can tell this is happening when you see that the form doesn't update when * the values of the <selects> are changed. */ function formSubmit() { // reload frm1 (everything is frm1) with the current input values document.getElementById('frm1').submit(); } function updateMenu() // runs every time any menu <select> is updated { // formSubmit(); } </script> </head> <body> <form id="frm1" method="post" action="<?php echo $_SERVER['PHP_SELF']; ?>"> <?php $debug = true; if($debug) {echo "In index.php<br />";$ta = array_keys($_POST);for($ti=0;$ti<count($ta);$ti++) {echo $ta[$ti]."=".$_POST[$ta[$ti]]."<br />";}} $FoodCount = $_POST["food_count"]; // Memory, Dr Memory $FoodUnits = $_POST["food_units"]; $DrinkCount = $_POST["drink_count"]; $DrinkUnits = $_POST["drink_units"]; $FavoriteFlavor = $_POST["favorite_flavor"]; include "include/tutorial_functions.php"; // a collection of functions for tutorial include "include/connect.php"; // keys for db login include "include/check_tables.php"; // see that db tables are present, create if not echo "Hello World...<br />"; echo "Fave Flav:<input type='text' value='".$FavoriteFlavor."' name='favorite_flavor' /> "; select_command($_POST, $base_name="command"); // pick a command echo "<br />Food: "; select_quantity($prefix='food_', $FoodCount, $FoodUnits); // pick a quantity of food echo "<br />Drink: "; select_quantity($prefix='drink_', $DrinkCount, $DrinkUnits); // pick a quantity of drink echo "<br />"; echo "Hi there<br />"; check_tables(); // check to see that tables present echo "<br />Hi Again<br />"; ?> <form> </body> </html>~www/tutorial/include/connect.php<?php // this is an in-line and the only place where the db username // and password should appear. $debug = true; $db = "tutorial_db"; $link = mysql_connect('localhost', 'admin', 'password'); if (!$link) { die('Could not connect: ' . mysql_error()); } if($debug == true) {echo 'Connected to MySQL successfully<br>';} ?>~www/tutorial/include/check_tables.php<?php /* file: include/check_tables.php * 2012/02/17 - working initial cut * * Check for existance of tables and create any * missing ones. */ function check_tables() { // Usage without mysql_list_dbs() deprecated $debug = true; include 'include/connect.php'; // connects us to db if($debug == true) {echo 'Connected SQL link='.$link.'<br />';} $res = mysql_query("SHOW DATABASES"); if($debug == true) {echo "checking database...<br />";} while ($row = mysql_fetch_assoc($res)) { echo $row['Database'] . "\n"; } } // Create items table function create_items_table() { include 'include/connect.php'; // connects us to tutorial_db echo "Creating Table items.<br />"; $sql = "CREATE TABLE items ( name varchar(256), upc bigint(16) NOT NULL, menus varchar(64), price varchar(32), amount varchar(32), calories_unit varchar(32), suppliers varchar(32), handling int(11), url varchar(512), level double, reorder float, CONSTRAINT item_pk // primary key PRIMARY KEY (upc), CONSTRAINT item_uq // unique fields UNIQUE (upc) )"; // Execute query mysql_query($sql,$link); mysql_close($link); } ?>These have been edited a bit to suit my nefarious purposes so please do cut and paste. The main differences here are that we are making a connection to the db and getting a list of the databases present. We can then check to see if our db is among them. If so, we'll check the tables and if they are not present we will create them. We won't ask permission because without tables the rest of the tutorial is pretty useless, but in a real application it is usually wise to ask before doing anything rash.
After you have saved the files away and diddled one of the selects to get a refresh, you should see something like:
Whoops! See below:
drink_units=oz
Connected to MySQL successfully
Hello World...
Who ordered that? Looks like we have treated an inline, connect.php, like a collection of functions and it hurt us. So remove the include to prevent unnecessary connects. Fix this to be sure you understand.The other thing that is going on here, the thing that we planned, is that we are connecting to the db successfully with a particular Resource id and we got a list of databases. Ours, "tutorial_db" is among them because we created it earlier using phpMyAdmin. Using that same tool, let's blow it away so we can recreate it auto-magically.
A quick word about debugging here. I use echo extensively for debugging (and the error logs). Sometimes it is temporary, like "Hi there". These statements get blown away forever when they have served their purpose. There are others though, that I think may just get used again, and they get hidden by if($debug==true){spray_information_to_page;} in the normal course of things. As the number of files grow, I like to identify what file or function the debugging information came from so I can turn it off. This is why "In index.php" now appears at the top of the output.
So let's add a little bit to our check_tables() function to create the necessary db and tables.
function check_tables() {
// Usage without mysql_list_dbs() deprecated
	include 'include/connect.php'; // connects us to db
	$debug = true;
	if($debug == true){echo 'Connected SQL link='.$link.'<br />';}
	$res = mysql_query("SHOW DATABASES");
	if($debug == true){echo "checking database...<br />";}
	$present = false;
	while ($row = mysql_fetch_assoc($res)) {
		if($debug == true){echo $row['Database']." ";}
		if($row['Database'] == $db){$present = true;}
	}
	if($debug == true){echo "<br />";}
	if($present == false) { // Create db
		echo "Database ".$db." not present. Creating...<br />";
		$sql = 'CREATE DATABASE '.$db;
		if (mysql_query($sql, $link)) {
			echo "Database ".$db." created successfully<br />";
		} else {
			echo 'Error creating '.$db.': ' . mysql_error() . "<br />";
			die(mysql_error());
		}
	}
	mysql_select_db($db);
	$sql = "SHOW TABLES FROM ".$db;
	$result = mysql_query($sql);
	if (!$result) {
		echo "DB Error, could not list tables\n";
		echo 'MySQL Error: ' . mysql_error();
		exit;
	}
	$items_present = false;
	while ($row = mysql_fetch_row($result)) {
		if($debug == true){echo "Table: {$row[0]} <br />";}
		//echo "Table: ."$row[0]." ";
		if($row[0] == 'items') {$items_present = true;}
	}
	if($items_present == false) { //make items table
		create_items_table();
	}
	mysql_free_result($result);
}
Copy, save, submit and you should see something like:
Which shows a database named 'tutorial_db' and table called 'items' created. Yea! Next we'll talk more about SQL in general.
We are using a version of SQL called MySQL. There are about 5 major flavors of SQL, all pretty much mutually incompatible at the level of fine detail. At the same time, they all work substantially alike. Understanding one version gets you 97% of the way to understanding any other. SQL was developed originally by IBM in the early 1970's and called SEQUEL. It was renamed due to a trademark dispute.
A pretty good tutorial on SQL in general can be found here. SQL is an acronym for Structured Query Language. Some formulations replace Structured with something less complementary. It became an ANSI standard in 1987 (the reason there are only five versions) which has been enhanced by vendors several times since then in the interest of keeping their customers locked to their particular product.
It's a language like any other. There are control structures (CASE statements) and a blizzard of data types, different for each version, of course. The whole business is optimized to work on data structured as tables. Think rows of individual entries with columns of fields of different data types. SQL is used to sort through a collection of such data looking for rows which meet the specification of the moment and returning those rows to the user for further processing.
Most of the actual mechanics of what we will be doing is putting together a string in the variable $sql (called a query in SQL-speak) and stuffing it into the function
$res = mysql_query($sql);with the results ending up in the array $res. It's the query string itself that does most of the work communicating with the db. The formulationwhile ($row = mysql_fetch_row($result)) {paw_through_the_rows;}lets you step through the rows of results looking for what you want. Ninety five percent of what we do is simple variations on this theme.Most of the art of SQL lies in designing the tables. There are definitely right and wrong ways to go about it. You can even make the wrong way work, for a while. I'm not a database guy and I do have a penchant for learning things the hard way. I've been trying to formulate general rules for db design but have only come up with one so far. If you find yourself storing the same information in two different places, you are doing it wrong.
We have already designed one table. We slipped that in with the function
create_items_table()in ~www/tutorial/check_tables.php. This is a table of items one might buy at the store. We enumerated the list of fields earlier and that list is present in the function above. One of those fields is called menu and it tells us which menu (a grouping) that item is to be found on. We need to somehow group items so as to keep the selects for the items from becoming unwieldy.The initial thought was to group like items with like. Drinks with drinks and dairy with dairy and such. This turns out to be not such a bad idea and almost correct. The people doing the actual buying wanted a list organized by where the items physically were in the store. This meant that some items that were say fresh orange juice were not stored with the other drinks but instead are with the dairy items. Some flexibility in the menus is obviously required.
So we need a table for the item menus. Let's call it item_menus. It needs two fields, index0 type int(11) and name type varchar(64). We are using index0 instead of index for a name because the name index is special to SQL, name does not appear to be special. This is the table's primary key and it is also used to order the menu. The name part of the table is the text that actually appears in the menu used to organize the items.
I've reworked this file a bit so stuff this whole mess into ~www/tutorial/include/check_tables.php
<?php
/*		file: include/check_tables.php
*		2012/02/17 - working initial cut
*		2012/02/20 - added creating db, items
*		2012/02/20 - added creating item_menus
*
*		Check for existance of tables and create any
*		missing ones.
*/
function check_tables() {
// Usage without mysql_list_dbs() deprecated
	include 'include/connect.php'; // connects us to db
	$debug = true;
	if($debug == true){echo 'In check_tables() Connected SQL link='.$link.'<br />';}
	$res = mysql_query("SHOW DATABASES");
	if($debug == true){echo "checking database...<br />";}
	$present = false;
	while ($row = mysql_fetch_assoc($res)) {
		if($debug == true){echo $row['Database']." ";}
		if($row['Database'] == $db){$present = true;}
	}
	if($debug == true){echo "<br />";}
	if($present == false) { // db not present, creat it.
		echo "Database ".$db." not present. Creating...<br />";
		$sql = 'CREATE DATABASE '.$db;
		if (mysql_query($sql, $link)) {
			echo "Database ".$db." created successfully<br />";
		} else {
			echo 'Error creating '.$db.': ' . mysql_error() . "<br />";
			die(mysql_error()); // die a horrible death, can't go on...
		}
	}
	mysql_select_db($db);
	$sql = "SHOW TABLES FROM ".$db;
	$result = mysql_query($sql);
	if (!$result) {
		echo "DB Error, could not list tables\n";
		echo 'MySQL Error: ' . mysql_error();
		exit; // die a horrible death, can't go on...
	}
	$items_present = false; // flags for table creation
	$item_menus_present = false;
	while ($row = mysql_fetch_row($result)) { // paw through the results
		if($debug == true){echo "Table: {$row[0]} <br />";}
		//echo "Table: ."$row[0]." ";
		if($row[0] == 'items') {$items_present = true;}
		if($row[0] == 'item_menus') {$item_menus_present = true;}
	}
	mysql_free_result($result); //return some memory
	if($items_present == false) { //make items table
		create_items_table();
	}
	if($item_menus_present == false) { //make item_menus table
		create_item_menus_table();
	}
}
	// Create items table
function create_items_table() {
	include 'include/connect.php'; // connects us to tutorial_db
	echo "Creating Table items. <br />";
	// do NOT put any comments in the string below
	$sql = "CREATE TABLE items (
	name varchar(256),
	upc bigint(16) NOT NULL,
	menus varchar(64),
	price varchar(32),
	amount varchar(32),
	calories_unit varchar(32),
	suppliers varchar(32),
	handling int(11),
	url varchar(512),
	level double,
	reorder float,
	CONSTRAINT item_pk
		PRIMARY KEY (upc),
	CONSTRAINT item_uq
		UNIQUE (upc)
	)";
	// Execute query
	$res = mysql_query($sql);
	if($debug == true){echo "Result = ".$res;}
	mysql_close($link);	// we're done, clean up.
}
	// Create item menus table
function create_item_menus_table() {
	include 'include/connect.php'; // connects us to tutorial_db
	echo "Creating Table item_menus. <br />";
	// do NOT put any comments in the string below
	$sql = "CREATE TABLE item_menus (
	index0 int(11) NOT NULL,
	name varchar(64) NOT NULL,
	CONSTRAINT item_menus_pk
		PRIMARY KEY (index0),
	CONSTRAINT item_menus_uq
		UNIQUE (name)
	)";
	// Execute query
	$res = mysql_query($sql);
	if($debug == true){echo "Result = ".$res;}
	mysql_close($link);	// we're done, clean up.
}
?>
The rework is in the table creation logic and in closing the links after individual table creation. This is probably a good idea to let the system reclaim memory in an orderly fashion. The system will also probably reclaim the memory when a new $link is opened, at least it should. Better to be explicit and safe than rely on how things should be and sorry. A few comments have been added for clarity. Hey, I tried.Another thing to be aware of is that this whole check_tables() business runs every time the page is refreshed. You might not want to do that, it consumes resources (CPU) that you might want for something else, like running the program with > 10K users. It would be wise to only run this function when there are new tables to be made. On the other paw, it isn't very computationally expensive. For the moment we will leave things as they are. We'll be slipping new tables in pretty regularly for a while.
So, to recap; we know how to check to see if a db is present and create it if not. We can check for the presence of individual tables and create them if they are not in the db. In the future, for additional tables I will provide the function for table creation and you will graft it into check_tables() so that it all works. You should be able to do this now. If not, I need to know because I may not be communicating clearly.
Writing the Program: top
Server New Connect Edit Menu Select Generic Edit Items:
So now we have all of the pieces in place to begin writing our program and our understanding of all of the various bits is sufficient to proceed. There is a new factor I would like to introduce here, the notion of a hidden variable. This is an input in a form that doesn't appear on the rendered page. It's very useful in passing state information from page view to page view; it's really all the same page.
A hidden variable looks like this
<input id='edit_menu_exists_id' type='hidden' value='exists' name='edit_menu_exists'>The simple existence of the variable can contain the information or you can attach a value to it. This variable is going to be used to indicate how we are editing items in the database. There are three types of edit we can do, add, edit and delete. We can also note that a page (or display interface) exists. We use simple obvious strings to convey those values to make the program more readable.In the code below there is a hidden variable in the function edit_menu() that only shows up in $_POST when an instance of function edit_menu() exists. We assign the value of that variable to $EM_exists and it serves as a flag to let us know if we are editing menus or not.
We can light up an instance of edit_menu() by selecting 'Edit Menus' at the bottom of the global command select created by
select_command($_POST);We removed the silly switch and base_name business, that was just for the tutorial. If we do select 'Edit Menus' the form is submitted with the value of the input 'command' as 'Edit Menus' which will appear in the array$_POST["command"]and gets stuffed into $Command.When we come to the if statement
$Command == 'Edit Menus'is satisfied and none of the other variables exist so they are not a factor.edit_menu($_POST);gets invoked (called, executed) and an instance of edit_menu() is created with all of its various objects. We'll see those later.The newly created instance creates it's hidden variable which eventually lands in $EM_exists which lets us "latch" the instance of edit_menu() until the 'Exit Edit Menus' condition in the if statement is satisfied.
Replace the entire body of ~www/tutorial/index.php with the following:
  <body>
	<form id="frm1" method="post" action="<?php echo $_SERVER['PHP_SELF']; ?>">
<?php
$debug = true;
if($debug) {echo "In index.php<br />";$ta = array_keys($_POST);for($ti=0;$ti<count($ta);$ti++) {echo $ta[$ti]."=".$_POST[$ta[$ti]]."<br />";}}

	$Command = $_POST["command"];  // Memory, Dr Memory; global command select value
	$EM_command = $_POST["edit_menu_command"];  // edit_menu command select value
	$EM_exists = $_POST["edit_menu_exists"];  // edit_menu exists
	$New_menu = htmlspecialchars_decode($_POST["new_menu"]);  // used in edit_menus as a source (is a textfield)
	$Current_menu = $_POST["menu_current"];
	$Feedback = ''; // Global string, produced by everybody, consumed by index.php and printed at the bottom of the page.

	include "include/tutorial_functions.php";  // a collection of functions for tutorial
	include "include/check_tables.php";  // see that db tables are present, create if not
	include "include/edit_menu.php";  // edit the menu catagories.
	include "include/select_generic.php";  // a generic select into the db

	select_command($_POST); // pick a command
	echo "<br />";
	check_tables(); // check to see that tables present

	if  (($Command == 'Edit Menus'  || $EM_exists == 'exists') && $EM_command != 'Exit Edit Menus')  {
		edit_menu($_POST);
	}
	echo "<p class='fb'>".$Feedback."</p>"; // output at bottom of page
	echo "<p class='err'>".$Error."</p>"; // using the css defined at the beginning of the page
?>
	<form>
  </body>
We include two new .php files which we'll be using later. When they are missing things should fail silently but an error message is recorded in the error log. You have found the error log, yes?The first file, edit_menu.php, we discussed above, it lets you create and edit menus (categories) for items you purchase. The second file, select_generic.php is used by edit_menu() and a whole lot more. With select_generic() we can begin to see the possibilities of maybe making all of this not so dreary and confusing. We'll get to that too.
Near the bottom is code that prints the contents of a couple of variables that are used to report errors and feedback. There is a new construct
<p class='fb'>".$Feedback."</p>. This is the first sighting of the actual use of CSS. What we have done is assigned this entire paragraph to the class 'fb' (feedback). Later we will color it blue but that's a distraction for now.Another thing to notice as we move forward is that the pages now start to seem to have two parts. There is a noun part that makes objects that show up on the page and there is a verb part that controls the action. I like to group the action at the end of the file. This seems to make sense, first you make things and then you act on them. When we Submit the page all of the values of the inputs with the names of their instances (most of the objects we are creating) are posted back to the server.
Back at the Server: program
Whoops! Un-comment
$Feedback = "";in index.php, the example above. Sorry, slip of the mind. That statement zeros out that variable before it gets processed by the grammar of the includes. That is where it sees most of its use.Back at the server, the very first thing we do in the form (modulo debug) is unwrap all of those inputs in the $_POST and stuff them into variables so that they can be evaluated by the verb part of the include files that follow the assignment. The include files to this point have been mostly functions. Functions don't actually exist until they are called. The verb parts, the included grammar (I did make that one up), do exist and the logic of it is executed as the files are included (processed by PHP) while it reads and evaluates the file. In order for the variables to be usable by the included grammar the variable assignment must precede the included files. You see this in index.php which is currently the only file with includes. This will also change.
We have redone the function select_command() so that it only need be passed the variable $_POST. By unwrapping $_POST we can get to all of the current state. We use a bit of that state, $EI_exists, to modify the creation of this select. We will be seeing this work shortly. We also added a new function, edit_menu_command() which creates a command select for the function edit_menu().
Replace the function select_command() in ~www/tutorial/include/tutorial_function.php with the following:
function select_command($_POST) {
	$EI_exists = $_POST["edit_item_exists"];
	$Command = $_POST["command"];

	echo "<select onchange='updateMenu();' name='command'>";
	echo "<optgroup label=\"List Operations\">";
	echo "<option value='Global Commands'>Global Commands</option>";
	echo "<option value='Add To List'>Add To List</option>";
	echo "<option value='Delete From List'>Delete From List</option>";
	echo "</optgroup>";
	echo "<optgroup label=\"DB Operations\">"; // are we permitted to save item?
	if(($Command != 'Save Item to DB' && $Command != 'Continue Unchanged') && ($EI_exists == 'add' || $EI_exists == 'edit' || $EI_exists == 'delete'
		|| $Command == 'Add Item to DB' || $Command == 'Edit Item in DB' || $Command == 'Delete Item in DB')) { // add the ask $Command ==
			echo "<option value='Save Item to DB'>Save Item to DB</option>";
			echo "<option value='Continue Unchanged'>Continue Unchanged</option>";
	} else {
		echo "<option value='Add Item to DB'>Add Item to DB</option>";
		echo "<option value='Edit Item in DB'>Edit Item in DB</option>";
		echo "<option value='Delete Item in DB'>Delete Item in DB</option>";
	}
	echo "</optgroup>";
	echo "</optgroup>";
	echo "<optgroup label=\"List Operations\">";
	echo "<option value='Edit Menus'>Edit Menus</option>";
	echo "</optgroup>";
	echo "</select>";
}

function edit_menu_command() {
	echo "<select onchange='updateMenu();' name='edit_menu_command'>";
	echo "<optgroup label='Menu Editing'>";
	echo "<option value='Menu Edit Commands'>Menu Edit Commands</option>";
	echo "<option value='Add Menu'>Add Menu</option>";
	echo "<option value='Rename Menu'>Rename Menu</option>";
	echo "<option value='Move Menu After'>Move Menu After</option>";
	echo "</optgroup>";
	echo "<optgroup label=\"Menu Deletion\">";
	echo "<option value='Delete Menu'>Delete Menu</option>";
	echo "</optgroup>";
	echo "<optgroup label=\"Exit Here\">";
	echo "<option value='Exit Edit Menus'>Exit Edit Menus</option>";
	echo "</optgroup>";
	echo "</select>";
}
This also adds selections and some decorations to group choices in the selects in such a way that is easy to grasp the function. The commands for edit menu are simple enough that I didn't feel the need to pass in the post, that may change.
Lovely, another bug in the previous post. Replace the first echo line in the function select_command() with
echo "<select onchange='updateMenu();' name='command'>";It doesn't seem to matter how long I look at this stuff, something is always wrong with the post. Here I missed part of the edit. I have multiple copies of the same code, the code that actually runs on my machine, and the 'neutered' code that will actually display on a web page rather than execute. I try to keep them "the same", but they aren't.
New Connect: program
The connect.php has been reworked a bit to accommodate auto-magical db and table creation. This involved dividing connect.php in twain adding a file called ~www/tutorial/include/sql_password.php which contains:
<?php
// this is an in-line and the only place where the db username
// and password should appear.
$db = "tutorial_db";
$link = mysql_connect('localhost', 'admin', 'password');
?>
And copy the following into ~www/tutorial/include/connect.php<?php // this is an in-line $debug = false; include "include/sql_password.php"; if (!$link) { die('Could not connect: ' . mysql_error()); } if($debug == true) {echo 'Connected to MySQL successfully<br>';} mysql_select_db($db); ?>There is a bit of a hazard here in the $debug = false; assignment. Since this is an include and not a function the variable $debug is in scope anywhere after you drop in the connect.php include. This means if you do something like this:$debug = true; include "include/connect.php";You might think that $debug == true, but you would be wrong. You might want to remove debugging entirely from the connect but hang on for a bit. We want all the debugging turned on for the moment so we can see how the bits are flying. Maybe just removing the assign in the connect will get us what we want. The important thing here is to become aware of the scope of variables. This is covered in exquisite detail in the references I have previously pointed out. You need to know this, Buckaroo.Now we want to replace the function check_tables() in ~www/tutorial/include/check_tables.php with:
function check_tables() {
// Usage without mysql_list_dbs() deprecated
	include 'include/sql_password.php'; // connects us to db
	if (!$link) {die('Could not connect: ' . mysql_error());}
	mysql_select_db($db);
	$debug = false;
	if($debug == true){echo 'In check_tables() Connected SQL link='.$link.'<br />';}
	$res = mysql_query("SHOW DATABASES");
	if($debug == true){echo "checking database...<br />";}
	$present = false;
	while ($row = mysql_fetch_assoc($res)) {
		if($debug == true){echo $row['Database']." ";}
		if($row['Database'] == $db){$present = true;}
	}
	if($debug == true){echo "<br />";}
	if($present == false) { // db not present, creat it.
		echo "Database ".$db." not present. Creating...<br />";
		$sql = 'CREATE DATABASE '.$db;
		if (mysql_query($sql, $link)) {
			echo "Database ".$db." created successfully<br />";
		} else {
			echo 'Error creating '.$db.': ' . mysql_error() . "<br />";
			die(mysql_error()); // die a horrible death, can't go on...
		}
	}
	mysql_select_db($db);
	$sql = "SHOW TABLES FROM ".$db;
	$result = mysql_query($sql);
	if (!$result) {
		echo "DB Error, could not list tables\n";
		echo 'MySQL Error: ' . mysql_error();
		exit; // die a horrible death, can't go on...
	}
	$items_present = false; // flags for table creation
	$item_menus_present = false;
	while ($row = mysql_fetch_row($result)) { // paw through the results
		if($debug == true){echo "Table: {$row[0]} <br />";}
		//echo "Table: ."$row[0]." ";
		if($row[0] == 'items') {$items_present = true;}
		if($row[0] == 'item_menus') {$item_menus_present = true;}
	}
	mysql_free_result($result); //return some memory
	if($items_present == false) { //make items table
		create_items_table();
	}
	if($item_menus_present == false) { //make item_menus table
		create_item_menus_table();
	}
}
The above code uses the new connect formula. The actual table creation stays the same. One of the things to notice is that the user will be informed whenever a db or table is created, no mater the state of $debug. Another thing is that if we fail to make the db or the table for some reason we die a horrible death. The screen goes blank and truth is hard to see. View Source is your friend at that point, it will often show you just where you went awry. echo Statements are useful too.Edit Menu: program
Now we need to add the two new files. The first is edit_menu.php I am a bit torn about this. The object (noun) part of this is pretty small and the only really new elements are the function htmlspecialchars_decode() and the function select_generic() which is where we have been trying to get. The verb part though, I could have stripped out everything but the functionality of 'Add Menu', but then I'd have to put it right back in. Sigh.
Copy all of this into: ~www/tutorial/include/edit_menu.php
<?php
/*	This function provides for the editing of the Item, Ingredient, and Meal
 * 	menus.
 * 	copyright 2011 by mumble all rights reserved
 *	file: edit_menu.php
 *
 * 	2011/10/07 - initial working cut
 * 	2011/10/14 - update to current UI - working
* 	2012/02/21 - modified for tutorial - working
 *
 * 	This function edits the menus created by the select_generic() objects which are used to
 * 	look into the database.
*/

function edit_menu($_POST)
{
	$New_menu = htmlspecialchars_decode($_POST["new_menu"]);
	$Current_menu = $_POST["menu_current"];
	$EM_command = $_POST["edit_menu_command"];
	$New_menu = htmlspecialchars_decode($_POST["new_menu"]);  // used in edit_menus as a source (is a textfield)

	$debug = false; if($debug) {echo "<br />In edit_menu() post_length=".count($_POST)."<br />";}
	if($debug) {$ta = array_keys($_POST);for($ti=0;$ti<count($ta);$ti++) {echo $ta[$ti]."=".$_POST[$ta[$ti]]."<br>";}}

	if ($Current_menu == '') {$Current_menu = '0';}

	// create a selector for which menu to edit
	// this probably ought to be a function but so far this is the
	// only time I have to do this one.
	echo "<select onchange='updateMenu()' name='menu_current'>";
	if($Current_menu == '0') {echo "<option selected='selected' value='0'>Items</option>";}
	else {echo "<option value='0'>Items</option>";}
	echo "</select>";
		if($Current_menu == '0') {select_generic('item',$_POST,'menu_only','_source');}
	echo "<input id='em_text' type='text' size='32' maxlength='64' value='".$New_menu."' name='new_menu'><br /> Destination: ";
		if($Current_menu == '0') {select_generic('item',$_POST,'menu_only','_destination');}
	echo "<br>Menu Commands: ";
	edit_menu_command();
	echo "<input id='em_exists' type='hidden' value='exists' name='edit_menu_exists'>";

}
// end of the function, the rest is included as the grammar of the function

// we begin with a little general housekeeping.
// set the value of the data bases being worked with
if ($Current_menu == '0') {$menu_db = 'item_menus';}

// before we actually try to execute any commands we see if the inputs are even vaguely reasonable.
if ($EM_command == 'Rename Menu' || $EM_command == 'Add Menu') {  // check for good inputs
	if($New_menu == "") {
		$Error = "There must be text in the textfield to ".$EM_command;
		$EM_command = "Menu Edit Commands"; // don't want to return here
	}
}
// fix up the global menu vars to point to the right menu set
if($Current_menu == '0') {$Menu_source = $_POST['item_menu_source'];$Menu_destination = $_POST['item_menu_destination'];}
/*
if($Current_menu == '1') {$Menu_source = $_POST['ingredient_menu_source'];$Menu_destination = $_POST['ingredient_menu_destination'];}
if($Current_menu == '2') {$Menu_source = $_POST['food_menu_source'];$Menu_destination = $_POST['food_menu_destination'];}
*/
//and now we should be ready to actually execute some commands

if ($EM_command == 'Rename Menu') {  // rename menu
	$debug = false;
	include 'include/connect.php';
	$query_str = "UPDATE ".$menu_db." SET name='".$New_menu."' WHERE index0='".$Menu_source."'";
	if($debug) {echo $query_str."<br>";}
	if(!$debug) {$result = mysql_query($query_str) or die(mysql_error());}
	if(!$debug) {$Feedback = "Menu: ".$Menu_source." named ".$New_menu." saved to DB.";}
	if($debug) {echo "Menu: ".$Menu_source." named ".$New_menu." NOT saved to DB.***debugging in edit_menu_rename***<br>";}
}

if ($EM_command == 'Add Menu') {  // add menu
	$debug = true;
	include 'include/connect.php';
	$query_str = "SELECT MAX(index0) as index0 FROM ".$menu_db."";
	if($debug) {echo $query_str."<br>";}
	// SELECT doesn't need a debug shield
	$result = mysql_query($query_str) or die(mysql_error());
	$row = mysql_fetch_array( $result );
	$new_index = $row['index0'] + 1 ;  // next new index
	if($debug) {echo "new index = ".$new_index."<br>";}
	$query_str = "INSERT INTO ".$menu_db."
	(index0, name)
	VALUES('".$new_index."', '".$New_menu."' )";
	if($debug) {echo $query_str."<br>";}
	if(!$debug) {$result = mysql_query($query_str) or die(mysql_error());}
	if(!$debug) {$Feedback = "Menu: ".$New_menu." at position ".$new_index." saved to DB.";}
	if($debug) {echo "Menu: ".$New_menu." at position ".$new_index." NOT saved to DB.***debugging in edit_menu_add***<br>";}
}

if ($EM_command == 'Delete Menu') {  // delete menu
	$debug = false;
	if($debug) {echo "Menu src = ".$Menu_source." Menu dst = ".$Menu_destination."<br>";}
	if ($Menu_source == $Menu_destination) {
		$Error = "Source and Destination menus must be different.<br> Source menu contents get copied to the destination menu.<br> Delete Failed!</p><br>";
	} else {
		include 'include/connect.php';
		$query_str = "SELECT name FROM ".$menu_db." WHERE index0='".$Menu_source."'";
		if($debug) {echo $query_str."<br>";}
		// SELECT needs no debug shield
		$result = mysql_query($query_str) or die(mysql_error());
		$row = mysql_fetch_array( $result );
		$sname = $row['name'];  // source name
		$query_str = "SELECT name FROM ".$menu_db." WHERE index0='".$Menu_destination."'";
		$result = mysql_query($query_str) or die(mysql_error());
		$row = mysql_fetch_array( $result );
		$dname = $row['name'];  // destination name
		$query_str = "SELECT MAX(index0) as index0 FROM ".$menu_db."";
		$result = mysql_query($query_str) or die(mysql_error());
		$row = mysql_fetch_array( $result );
		$max_index = $row['index0'];  // biggest index before delete
		if($debug) {echo "max index = ".$max_index."<br>";}
		$query_str = "DELETE FROM ".$menu_db." WHERE index0='".$Menu_source."'";
		if($debug) {echo $query_str."<br>";}
		$result = mysql_query($query_str) or die(mysql_error());
		//echo "Menu: ".$sname." at position ".$Menu_source." deleted from DB.<br>";
		$Feedback = "Menu: ".$sname." at position ".$Menu_source." deleted from DB.<br>";
		$mv_index = $Menu_source;
		while ($mv_index <= $max_index) {
			//echo "working index = ".$mv_index." max = ".$max_index."<br>";
			$Feedback = "working index = ".$mv_index." max = ".$max_index."<br>";
			$query_str = "UPDATE ".$menu_db." SET index0='".$mv_index."' WHERE index0='".($mv_index + 1)."'";
			if($debug) {echo $query_str."<br>";}
			$result = mysql_query($query_str) or die(mysql_error());
			if($mv_index == $Menu_source) {
				//echo "Moving ".$thing_db."  on Menu ".$sname." to ".$dname."<br>";
				$Feedback = "Moving ".$thing_db."  on Menu ".$sname." to ".$dname."<br>";
				$query_str = "UPDATE ".$thing_db." SET menus='".$Menu_destination."' WHERE menus='".$Menu_source."'";
				if($debug) {echo $query_str."<br>";}
				$result = mysql_query($query_str) or die(mysql_error());
				//echo "".$thing_db."  moved from ".$sname." to ".$dname."<br>";
				$Feedback = "".$thing_db."  moved from ".$sname." to ".$dname."<br>";
			} else {
				echo "Adjusting menu ".$mv_index." in ".$thing_db."  db...<br>";
				$Feedback = "Adjusting menu ".$mv_index." in ".$thing_db."  db...<br>";
				$query_str = "UPDATE ".$thing_db."  SET menus='".($mv_index-1)."' WHERE menus='".$mv_index."'";
				if($debug) {echo $query_str."<br>";}
				$result = mysql_query($query_str) or die(mysql_error());
			}
			$mv_index++;
		}
	}
}

if ($EM_command == 'Move Menu After') { // check for valid inputs to move after
	$debug = false;
	//if($debug) {$ta = array_keys($_POST);for($ti=0;$ti<count($ta);$ti++) {echo $ta[$ti]."=".$_POST[$ta[$ti]]."<br>";}}
	if($debug) {echo "Menu_source = ".$Menu_source." Menu_destination = ".$Menu_destination."<br>";}
	include 'include/connect.php';
	$query_str = "SELECT name FROM ".$menu_db." WHERE index0='".$Menu_source."'";
	$result = mysql_query($query_str) or die(mysql_error());
	$row = mysql_fetch_array( $result );
	$sname = $row['name'];  // source name
	$query_str = "SELECT name FROM ".$menu_db." WHERE index0='".$Menu_destination."'";
	$result = mysql_query($query_str) or die(mysql_error());
	$row = mysql_fetch_array( $result );
	$dname = $row['name'];  // destination name
	if($Menu_source == $Menu_destination) { //
		//echo "<p class='ex'>Can not move ".$sname." after ".$dname."</p><br>";
		$Error = "Move Menu After: Can not move ".$sname." after ".$dname." ";
		$EM_command = 'Menu Edit Commands'; // make command go away.
	}
}
if ($EM_command == 'Move Menu After') {  // move source menu after destination menu
	include 'include/connect.php';
	$query_str = "SELECT name FROM ".$menu_db." WHERE index0='".$Menu_source."'";
	$result = mysql_query($query_str) or die(mysql_error());
	$row = mysql_fetch_array( $result );
	$sname = $row['name'];  // source name
	$query_str = "SELECT name FROM ".$menu_db." WHERE index0='".$Menu_destination."'";
	$result = mysql_query($query_str) or die(mysql_error());
	$row = mysql_fetch_array( $result );
	$dname = $row['name'];  // destination name
	if($Menu_source == $Menu_destination) { // this should never execute
		//echo "<p class='ex'>Can not move ".$sname." after ".$dname."</p><br>";
		$Error = "Can not move ".$sname." after ".$dname." ";
		$EM_command = 'Menu Edit Commands'; // make command go away.
	}
	//echo "Moving menu item ".$sname." after ".$dname."<br>";
	$Feedback = "Moving menu item ".$sname." after ".$dname."<br>";
	// get the index one larger than is being used for temporary storage
	$query_str = "SELECT MAX(index0) as index0 FROM ".$menu_db."";
	$result = mysql_query($query_str) or die(mysql_error());
	$row = mysql_fetch_array( $result );
	$max_index = $row['index0'];  // biggest index
	if($debug) {echo "max index = ".$max_index."<br>";}
	$mv_index = $Menu_source;
	if($debug) {echo "working index = ".$mv_index." max = ".$max_index."<br>";}

	if($Menu_source > $Menu_destination) { //moving source up, do this
		// move source to max+1
		$query_str = "UPDATE ".$menu_db." SET index0='".($max_index + 1)."' WHERE index0='".($mv_index)."'";
		if($debug) {echo $query_str."<br>";}
		$result = mysql_query($query_str) or die(mysql_error());
		$query_str = "UPDATE ".$thing_db."  SET menus='".($max_index + 1)."' WHERE menus='".($mv_index)."'";
		if($debug) {echo $query_str."<br>";}
		$result = mysql_query($query_str) or die(mysql_error());

		// shift everyone from source-1 to dest up one
		for($mv_index = $Menu_source-1; $mv_index > $Menu_destination; $mv_index--) {
			$query_str = "UPDATE ".$menu_db." SET index0='".($mv_index+1)."' WHERE index0='".($mv_index)."'";
			if($debug) {echo $query_str."<br>";}
			$result = mysql_query($query_str) or die(mysql_error());
			$query_str = "UPDATE ".$thing_db."  SET menus='".($mv_index+1)."' WHERE menus='".($mv_index)."'";
			if($debug) {echo $query_str."<br>";}
			$result = mysql_query($query_str) or die(mysql_error());
		}
		// move max+1 to dest+1
		$query_str = "UPDATE ".$menu_db." SET index0='".($Menu_destination + 1)."' WHERE index0='".($max_index + 1)."'";
		if($debug) {echo $query_str."<br>";}
		$result = mysql_query($query_str) or die(mysql_error());
		$query_str = "UPDATE ".$thing_db."  SET menus='".($Menu_destination + 1)."' WHERE menus='".($max_index + 1)."'";
		if($debug) {echo $query_str."<br>";}
		$result = mysql_query($query_str) or die(mysql_error());
	} else {  // Moving src down the menu, do this
		// move source to max+1
		$query_str = "UPDATE ".$menu_db." SET index0='".($max_index + 1)."' WHERE index0='".($mv_index)."'";
		if($debug) {echo $query_str."<br>";}
		$result = mysql_query($query_str) or die(mysql_error());
		$query_str = "UPDATE ".$thing_db."  SET menus='".($max_index + 1)."' WHERE menus='".($mv_index)."'";
		if($debug) {echo $query_str."<br>";}
		$result = mysql_query($query_str) or die(mysql_error());

		// shift everyone from source+1 to dest up one
		for($mv_index = $Menu_source+1; $mv_index <= $Menu_destination; $mv_index++) {
			$query_str = "UPDATE ".$menu_db." SET index0='".($mv_index-1)."' WHERE index0='".($mv_index)."'";
			if($debug) {echo $query_str."<br>";}
			$result = mysql_query($query_str) or die(mysql_error());
			$query_str = "UPDATE ".$thing_db."  SET menus='".($mv_index-1)."' WHERE menus='".($mv_index)."'";
			if($debug) {echo $query_str."<br>";}
			$result = mysql_query($query_str) or die(mysql_error());
		}
		// move max+1 to dest
		$query_str = "UPDATE ".$menu_db." SET index0='".($Menu_destination)."' WHERE index0='".($max_index + 1)."'";
		if($debug) {echo $query_str."<br>";}
		$result = mysql_query($query_str) or die(mysql_error());
		$query_str = "UPDATE ".$thing_db."  SET menus='".($Menu_destination)."' WHERE menus='".($max_index + 1)."'";
		if($debug) {echo $query_str."<br>";}
		$result = mysql_query($query_str) or die(mysql_error());
	}
}

?>
This is an interesting file. A lot of the complexity of the verb part has to do with deleting menus (the items need to be moved to a destination menu) and changing the ordering of menus. I chose to order the menus by the value of index0 which implies that as the index0 for a particular menu item, say 'dairy' changes from 4 to 0 to put it at the top of the menu, then all of the items that reference the menus pointed to by 0 or 4 need to be reworked. This is probably not so great. We really need probably yet another table that actually keeps the ordering. We'll try to remember to fix this.
Select Generic: program
Now we get to the good part. This next function builds a select that uses two tables in a database. The first table, mumble needs to have a primary key called 'name' or if the $base_name == 'item' then it is called 'upc'. This table holds the data, or collection of information. The second table, mumble_menu has a much smaller bit of data that helps us organize the first table. You can point this select at any pair of tables that are organized like this, and we do.
The function requires $base_name, $_POST, $mode and $postfix = "". The mode switches the select between 'menu_only' which just shows the categories available in the collection, or not, which shows the categories and the data in two adjacent selects. The postfix part we use to differentiate separate instances of the same function and we set that to nothing as the default case.
And finally ~www/tutorial/include/select_generic.php
<?php
/*
*		file: include/select_generic.php
*
*
*		2011/10/05 - working initial cut
*		2012/02/21 - fixed hang on empty table
*
*		This function is a template for a select object that provides a single level of
* 		menu selection to a collection of objects.  The menus are stored in the table $base_name_menus
* 		and the collection is in $base_name.  A $postfix is available to further differentiate
* 		select objects that reference the same db but need to have different names. $mode is
* 		used to get the menu only without the collection.
*
*
*/
function select_generic($base_name, $_POST, $mode, $postfix = "") //$Menu, $Upc, $select_menu_id, $select_item_id, $mode, $menu_name
{
	if($base_name == 'item') {$generic_key_name = 'upc';}
	else {$generic_key_name = 'name';}  // base names 'ingredient', 'food'

	$Menu = $_POST[$base_name.'_menu'.$postfix];	// integer index into the menu
	$IndexX = $_POST[$base_name.'_name'.$postfix];  // $Ucp or name depending on table, PRIMARY key

	if( $Menu == "") {$Menu = 0;} // if not initialized, point somewhere reasonable

	if($mode != 'menu_only') {
		echo "<select onchange='validateUPC();'  id='".$base_name."_menu_id".$postfix."'  name='".$base_name."_menu".$postfix."' >";
	} else {
		echo "<select onchange='updateMenu();'  id='".$base_name."_menu_id".$postfix."'  name='".$base_name."_menu".$postfix."' >";
		echo "<optgroup label='".str_replace('_',' ',$base_name.$postfix)."'>";// decoration for menu only, lets us distinguish menus
	}

	include 'include/connect.php';
	// check to see that there are entries in the table.

	// Get all the data from the "item_menus" table
	$result = mysql_query("SELECT * FROM ".$base_name."_menus ORDER BY index0")
		or die("getting item_menus table ".mysql_error());

	while($row = mysql_fetch_array( $result )) {
		// Print out the contents of each row into a table
		if ($row['index0'] != $Menu) {
			echo "<option value='".$row['index0']."'>".htmlspecialchars_decode($row['name'],ENT_QUOTES)."</option>";
		} else {
			echo "<option selected='selected' value='".htmlspecialchars_decode($row['index0'],ENT_QUOTES)."'>".$row['name']."</option>";
		}
	}
	if($mode == 'menu_only') { echo "</optgroup>";} // decoration for menu only
	mysql_close($link);
	echo "</select>";
	if($mode != 'menu_only') {
		echo "<select onchange='updateMenu();' id='".$base_name."_select_id".$postfix."'   name='".$base_name."_name".$postfix."'>";
		include 'include/connect.php';
		// Get all the data from the "items" table
		$result = mysql_query("SELECT * FROM ".$base_name."s WHERE menus=".$Menu." ORDER BY name")
			or die(mysql_error());
		while($row = mysql_fetch_array( $result )) {
			// Print out the contents of each row into a table
			if ($row[$generic_key_name] != $IndexX){
				echo "<option value=\"".$row[$generic_key_name]."\">".htmlspecialchars_decode($row['name'],ENT_QUOTES)."</option>";
			} else {
				echo "<option selected=\"selected\" value=\"".$row[$generic_key_name]."\">".htmlspecialchars_decode($row['name'],ENT_QUOTES)."</option>";
			}
		}
		mysql_close($link);
		echo "</select>";
	}
}
?>
This should all work out of the box just so long and you don't do anything but 'Add Menu'. With the new programmatic creation of the db and tables I haven't bullet-proofed edit_menu() with respect to moving and deleting menu items when there are no items in the collection. So, you can break the tables if you do anything other than Add Menu. If you do break the tables, and I hope you do, simply delete them with phpMyAdmin and submit the form again to recreate the empty tables. Get very familiar with phpMyAdmin, it too is a wonderful debugging tool.Have Fun.
Edit Items: program
Here is a nice dataset for our database. I've done the typing already so there is no reason for you to do it. Besides, it's an excuse to exercise our phpMyAdmin skills. So poke at: db download and put it someplace you will remember. Open phpMyAdmin and select tutorial_db then Structure. Empty the tables. The tables need to exist and be empty for the next part to work. Import the file tutorial_db.xml.zip. Scroll down and click Go. This should complete successfully and give you 147 items and 13 item_menus. This is much easier than typing.
You might want to look at the file in the download. It is in our old friend XML and completely human readable. After the first few entries it gets pretty boring.
Stuff the following in index.php in the appropriate spot. With the code you have, if you have imported the database data above, you should see your command select and then a generic select pointed at the db. Fiddle with it. There is a bug that you need to understand.
	select_command($_POST); // construct global commands
	check_tables(); // check to see that tables present
	select_generic('item',$_POST,'all'); // we need tables for this to work.
	echo "<br />";
You should see:
JavaScript for real: top
That's all folks! top


Is gun. Is not safe.
.
Part of my modest contribution to Western Civilization...


Text Copyright © 2012 by Stephen Jackson, All rights reserved. Jim or John Robinson may make free and unrestricted use of any and all of this text without attribution. Thanks guys!