Family Handyman magazine (and website), always has great ideas and is worth the price of a subscription. A dual rain barrel system for less than $100.00??!! And, you can add as many barrels to this sytem as you need.
Most rain barrels that you buy are so expensive it's silly, and most DIY instructioins are for one barrel. Having two set up like this is great! From www.familyhandyman.com...
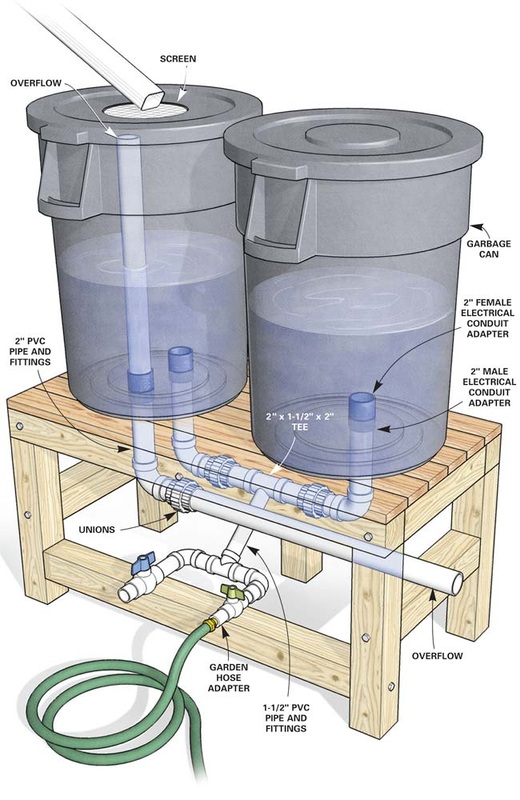
It's pretty easy to build your own rain barrels from plastic drums or trash cans. Search online for “bottles” or “containers” to find an “open head” plastic 55-gallon drum with a cover (about $60). Or find a used barrel by talking to car wash managers (they buy soap and wax by the barrel). If you can't find a container you like, buy a large, heavy-duty garbage can (about $35) at a home center. All the other plumbing parts will add up to about $40.
Place the drum near a downspout, drill a hole in the side near the bottom and screw in a drain valve. That's an OK installation if you plan to run a soaker hose to your garden. But if you want to use a wand or a spray nozzle, you'll need to elevate the barrel on a stand for more water pressure. Water is heavy (55 gallons weighs 440 lbs.), so use 4x4 treated lumber for the legs and secure everything with construction screws or stainless steel lags. But don't place the stand on soft ground. You could kill somebody if the rig toppled over. If you have large gardens and want to store more water, double-size the stand and add a second barrel.
Cut holes in the bottoms of the barrels with a 2-1/4-in. hole saw. Then screw in a 2-in. male threaded electrical (gray PVC) conduit adapter (electrical adapters aren't tapered like plumbing adapters, so you can tighten them down all the way). Squirt a thin bead of silicone caulk around the opening and screw on a threaded electrical PVC coupler to cinch the barrel between the two fittings (see Figure A). Next, glue together sections of 2-in. PVC pipe, unions (to make winter disassembly easier), reducers and valves. As long as you're at it, install an overflow pipe so you can direct the excess where you want it.
Finally, cut a hole in one of the covers and mount a screen to filter out leaves and debris. Then just wait for the next big rain.
For complete instructions and more photos, visit...
Family Handyman